
PHOT-220 · Lesson 6 of 12 · 25 min
Finding and shaping light for portraits on location
Much portrait photography happens away from the studio: in homes, offices, parks, streets and workplaces. PHOT-102 introduced natural light, window light and reflectors, and PHOT-210 and PHOT-211 cover studio lighting in depth; this lesson focuses on how portrait photographers find, read and shape light quickly on location for people. It covers seeing light on faces, the direction of light relative to the face, open shade and its edge, window light for portraits, backlight and rim light outdoors, reflectors and subtraction on location, a single off-camera light for portraits, balancing flash with ambient light efficiently, and a quick routine for assessing a location.
Seeing light on faces
The first skill is noticing light. Before photographing, look at the subject's face, or your own hand held in front of you as you turn, and observe where the light comes from, how hard or soft it is, whether there are shadows under the eyes, nose and chin, whether the eyes have catchlights, and what colour the light is. Turning the subject slowly through 360 degrees while watching their face reveals the most flattering direction. Look for catchlights first: if the eyes show a clear reflection of a bright, large area such as the sky, a window or a light wall, the light is probably flattering. Dark eye sockets, harsh shadows under the nose or patches of dappled light usually mean you should move the subject or modify the light.
Direction of light on the face
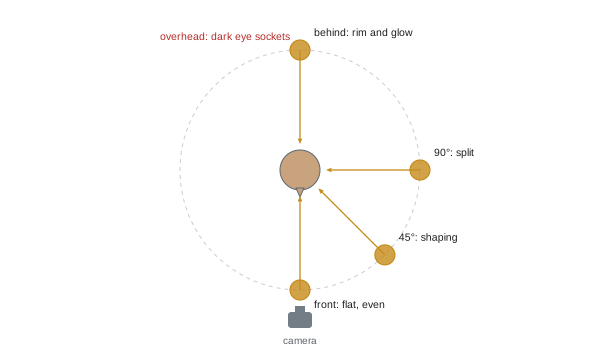
The direction of the main light relative to the face shapes the portrait:
- Front light, from near the camera, is even and flattering for skin but flat, with little modelling.
- Light from about 30 to 45 degrees to the side and slightly above creates gentle shadows that shape the face, the basis of loop and Rembrandt lighting (PHOT-210).
- Side light at 90 degrees splits the face into light and shadow, dramatic and textured.
- Backlight outlines the head and shoulders with a rim of light and creates glow, but leaves the face in shadow unless filled.
- Top light, such as midday sun or overhead fixtures, creates dark eye sockets and shadows under the nose and chin, usually unflattering.
On location you control direction mainly by moving the subject and yourself relative to the light, and by turning the subject's face. A small turn of the head, a step closer to a window, or rotating the subject so that the sun is behind them often transforms a portrait.
Open shade and the edge of shade
Open shade, a shaded area with a large expanse of open sky in front of it, is the portrait photographer's favourite natural light. Under a porch, in a doorway, beside a building or under the edge of a tree canopy, the subject is lit by soft light from the open sky rather than harsh direct sun. The most flattering position is usually near the edge of the shade, facing out toward the open, bright area: the light comes from the front and slightly above, with good catchlights, while the overhang blocks top light. Moving deeper into the shade makes the light dimmer and more directional; moving out to the edge makes it brighter and more even. Watch for coloured light reflected from nearby surfaces, such as green from grass or foliage, which can tint skin, and for bright backgrounds in sun behind a shaded subject, which may need exposure management or fill.
Window light for portraits
Windows are ideal portrait lights on location because they are large, soft and directional. Placing the subject about one to two metres from a window, with their face turned toward it at about 45 degrees, creates soft, sculpted light; facing the window directly gives even, flattering light; turning to 90 degrees gives dramatic split light. Turn off overhead room lights to avoid mixed colour and top light. Shooting from beside the window, looking back at the subject, keeps the light on the face; shooting from the window side with the subject facing away produces silhouettes or low-key images. Sheer curtains soften direct sun. Lesson 8 shows how window light serves office headshots.
Backlight and rim light outdoors
Placing the subject with the sun behind them, especially when the sun is low in the late afternoon, creates attractive rim light on the hair and shoulders, glowing backgrounds and soft light on the face from the sky in front. It also prevents squinting. The face is lit only by reflected skylight and must be exposed properly: meter for the face or use exposure compensation of +1 to +2 stops, accepting a bright background. Adding fill from a reflector or a small flash brightens the face and adds catchlights. Watch for flare, which can add atmosphere or reduce contrast; shading the lens or positioning the sun just behind the subject's head controls it. Golden hour backlight is especially popular for couples, families and lifestyle portraits.
Reflectors and subtraction on location
Reflectors are the simplest way to shape light on location. A white reflector adds soft fill; silver adds brighter, crisper fill, useful in backlight; gold warms skin, which suits some subjects but can look orange; and the translucent diffuser panel softens direct sun over a subject. Position reflectors below and in front of the face for catchlights and to fill under-eye shadows, or to the side opposite the main light to reduce contrast. An assistant, a reflector stand or even the subject holding a reflector in their lap for a headshot can help. Subtraction is equally important: a black flag, a dark wall or even a jacket on the shadow side deepens shadows and adds shape in flat, overcast light or bright, white rooms, a technique called negative fill. Moving the subject so that a dark wall or hedge is on one side has the same effect.
| Tool | Effect | Typical use |
|---|---|---|
| White reflector | Soft, natural fill | Headshots, window light fill |
| Silver reflector | Bright, crisp fill | Backlit portraits, distance |
| Gold reflector | Warm fill | Golden-hour looks, cool light correction |
| Diffuser | Softens direct sun | Midday portraits |
| Black flag or dark surface | Deepens shadows (negative fill) | Overcast and white rooms |
A single off-camera light for portraits
One light, used well, solves most location problems. A speedlight or small battery strobe with a modifier such as an umbrella, small softbox or octabox, on a light stand or held by an assistant, can act as the key light when natural light is poor, add fill in backlight, or overpower harsh sun. Placed at about 45 degrees to the side and slightly above the subject, a modest-sized modifier close to the subject gives soft, flattering light. The flash can be balanced with ambient light (below) so that the background looks natural. Radio triggers make this quick. For fast-moving sessions such as weddings, on-camera flash bounced off a wall or ceiling, behind or to the side of the photographer, creates soft directional light without a stand. PHOT-102 and PHOT-210 cover flash technique in detail.
Balancing flash with ambient light
A quick, reliable approach for location portraits balances flash with existing light in a few steps:
- Set the exposure for the ambient light and background first: choose ISO and aperture, then set shutter speed (up to the flash sync speed, or using high-speed sync) so that the background looks as bright as you want, often a stop darker than normal for drama or at normal exposure for a natural look.
- Add the flash and adjust its power until the subject is correctly exposed.
- Adjust: shutter speed changes the ambient light and background without affecting the flash; flash power or distance changes the subject.
In bright sun, the shutter speed may exceed sync speed at wide apertures; use high-speed sync, a neutral density filter, or a smaller aperture. In dim interiors, a slower shutter speed brings up the ambient light, adding warmth from practical lamps behind the subject.
Worked problem
A backlit park portrait with fill flash
At sunset, a couple stands with the sun behind them. The ambient exposure for the bright sky and background is 1/250 s at f/4, ISO 100, but their faces are 2 stops darker. The camera syncs at 1/250 s. How should the photographer light them?
Show solution
- Keep 1/250 s at f/4, ISO 100 so the background and rim light look right.
- Place a flash with a small softbox about 45 degrees to one side, slightly above, about 2 m from the couple.
- Set the flash power so that the faces read correctly, about 2 stops more light than the ambient on the faces, checking the histogram and skin on a test frame.
- Warm the flash slightly with a quarter CTO gel to match the golden ambient light.
Answer: Expose for the background at 1/250 s f/4, then add a softened, slightly warmed flash at about 45 degrees to bring the faces up 2 stops.
Assessing a location quickly
Portrait photographers often arrive at an unfamiliar office, home or park with limited time. A quick routine helps:
- Walk the space and note the brightest, softest light sources: windows, open doorways, shaded areas facing open sky, light-coloured walls.
- Identify backgrounds with depth, simplicity or meaning, and where the light and background combine well.
- Note problems: overhead fluorescent lights, mixed colour temperatures, harsh sun, clutter, reflective surfaces.
- Decide on two or three setups that give variety, such as a window headshot, an environmental portrait at a desk, and an outdoor portrait in open shade.
- Decide whether to add light or reflectors, and set up before bringing in the subject.
Taking a quick test photo with an assistant or of your own hand at each spot confirms the light before the subject is in place, saving their time and patience.
Light and the time of day for portraits
Natural light changes rapidly through the day. Early morning and late afternoon light, especially during golden hour, is low, warm and soft, ideal for outdoor portraits. Midday light is high and harsh, best avoided for faces or managed with shade, diffusion and fill. Overcast days provide soft, even light that is flattering but sometimes flat, and benefits from subtraction on one side to create shape. Blue hour after sunset offers cool, gentle light that combines well with warm artificial lights for atmospheric portraits. Plan outdoor sessions around these changes, and check sunset times and weather forecasts in advance.
Light in vehicles, doorways and corridors
Unexpected places often provide excellent portrait light. A doorway with the subject just inside, facing out, gives a soft, directional light with a dark background behind. A corridor with a window at one end acts as a huge light tunnel. A car interior, with the subject seated and the door open, gives soft light from the open side. Parking garages often have open sides that create beautiful edge-of-shade light. Training yourself to notice these places makes you a more resourceful location portrait photographer.
Carrying a minimal location kit
A minimal location portrait kit might include a collapsible five-in-one reflector, a small flash or LED with a compact softbox, a light stand and radio trigger, clamps, a small black flag and a grey card. This fits in one bag and solves most light problems quickly.
Whatever tools you use, keep the subject's comfort in mind: holding a pose in bright reflected light or waiting while lights are adjusted is tiring, so prepare light before bringing them into position and work efficiently once they are there.
Common mistakes
MistakePosing subjects in harsh midday top light.
InsteadMove to open shade or backlight with fill.
MistakeGoing deep into shade where light is flat and dim.
InsteadUse the edge of shade facing open sky.
MistakeLeaving overhead room lights on with window light.
InsteadTurn them off to avoid mixed colour and top light.
MistakeUnderexposing backlit faces.
InsteadMeter for the face or add reflector or flash fill.
MistakeSetting flash before ambient exposure.
InsteadSet background exposure first, then flash power.
Summary and key terms
- Read light on faces by turning the subject and looking for catchlights.
- Light direction shapes the face; control it by moving the subject.
- The edge of open shade facing open sky gives soft, flattering light.
- Windows are ideal soft, directional location lights.
- Backlight creates rim light and glow; expose for the face and add fill.
- Reflectors fill and flags subtract to shape light.
- Balance flash by setting ambient first, then flash; assess locations quickly.
- Open shade
- Shade lit by a large area of open sky.
- Edge of shade
- Brightest, most flattering position at the shade boundary.
- Top light
- Light from overhead causing dark eye sockets.
- Rim light
- Light outlining the edges of the subject.
- Fill
- Light that reduces shadow contrast.
- Negative fill
- Dark surfaces that deepen shadows.
- Diffuser
- Translucent panel that softens light.
- Ambient exposure
- Exposure set for existing light.
- High-speed sync
- Flash mode allowing speeds above sync.
- Bounce flash
- Flash reflected off a wall or ceiling.
Practice problems
Work each problem on paper first, then reveal the answer to check.
How can you find the best light direction?
Show answer
Turn the subject slowly and watch the face and catchlights.
What does top light do to a face?
Show answer
Creates dark eye sockets and shadows under the nose and chin.
Where is the best position in open shade?
Show answer
Near the edge, facing open sky.
What colour cast can foliage cause?
Show answer
Green.
Ideal distance from a window for soft light?
Show answer
About 1–2 m.
How much compensation for a backlit face?
Show answer
About +1 to +2 stops.
What does a gold reflector do?
Show answer
Warms the fill.
What is negative fill?
Show answer
Dark surfaces that deepen shadows.
Which setting controls ambient light with flash?
Show answer
Shutter speed.
Name three steps in assessing a location.
Show answer
Find light, find backgrounds, note problems, plan setups.
Lesson quiz · 5 questions
Score 60% or more to complete this lesson.
Create a free account to save your progress, take quizzes and earn a certificate.