
PHOT-220 · Lesson 4 of 12 · 25 min
Posing fundamentals: body, weight and hands
Posing is the arrangement of the body to create a pleasing, purposeful shape that communicates something about the person. Good posing rarely looks posed: it looks like a natural, comfortable version of how the person stands, sits or leans. Poor posing looks stiff, awkward or artificial, or makes people look larger, smaller or older than they are. Most posing principles come from a few observations about how the camera flattens three dimensions into two, how weight and angles create shape, and how hands, limbs and space communicate. This lesson covers the purposes of posing, the body angle to the camera, weight distribution and the S-curve, creating space between limbs and body, standing poses, sitting and leaning poses, hands, arms and legs, posing different body types, and building a flowing posing sequence.
What posing is for
Posing serves three aims. It flatters, presenting the person's body in proportions that look natural and attractive on camera. It communicates, conveying confidence, openness, relaxation, strength or intimacy through body language. And it composes, creating lines, shapes and directions that lead the eye to the face and fit the frame. Different genres emphasize different aims: corporate portraits favour open, confident and approachable poses; fashion uses angular, dynamic and sometimes exaggerated poses; family portraits favour warmth and connection; editorial portraits often favour natural, characterful postures that suit the person. Posing is always in service of the person and the purpose, not a set of rules to apply mechanically.
The body angle
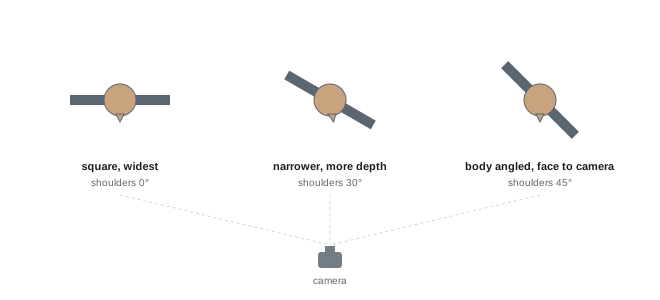
A person standing square to the camera, with shoulders parallel to the sensor, presents the widest possible view of the body, which can look confrontational or static and adds visual width. Turning the body about 30 to 45 degrees away from the camera narrows the silhouette, creates depth and looks more relaxed. The face can then turn back toward the camera, creating a pleasing twist between shoulders and head. Square poses are not wrong; they can communicate strength, directness and confidence, and they suit some editorial and fashion images, and symmetrical compositions. But for most portraits, starting with the body angled and the face toward the lens is a reliable default. The direction the body turns also matters: turning toward the light usually lights the face better, and turning toward the open side of the frame gives the composition direction.
Weight, posture and the S-curve
How a person distributes their weight changes the whole body. Standing with weight evenly on both feet looks rigid, like standing to attention. Shifting the weight onto the back foot, the one farther from the camera, relaxes the body: the hips shift slightly, the front knee softens, and the shoulders drop. This creates a gentle S-curve through the body, a classic shape in painting and sculpture that the eye finds graceful. The posture also moves the body slightly away from the camera, keeping the front of the body smaller relative to the face. Good posture matters too: a lengthened spine, shoulders relaxed down and back, and the chest slightly lifted look confident; slouching looks tired, and an overly stiff military posture looks tense. Small cues, such as "stand tall as if a string is pulling the top of your head", help.
Creating space
Arms pressed against the body flatten and widen the upper arms and torso on camera, because the camera merges them into one mass. Creating a little space between the arms and the body, by placing a hand on the hip, resting a hand on an object, slightly bending the elbows or moving the arms forward, reveals the waist and gives the body shape. Similarly, a small gap between the legs, or crossing one leg in front of the other at the ankle, avoids a single column. In seated poses, space between the arms and torso and between the thighs and chair avoids flattening. The goal is not to exaggerate shapes but to let the camera see the person's natural form.
Standing poses
Reliable standing poses include:
- The classic three-quarter stance: body angled about 45 degrees, weight on the back foot, front knee softly bent, hands relaxed or occupied, face toward the camera.
- The lean: leaning a shoulder or the back against a wall, door frame or tree, which relaxes the body and suggests ease; keep a little space between the body and the support.
- The walk: walking slowly toward or past the camera, capturing mid-stride, creates natural movement; ask the subject to walk slowly, look ahead or at a companion, and repeat several times.
- Hands in pockets: thumbs or fingers in pockets, with elbows relaxed outward, a casual pose suitable for many people; avoid hands buried entirely, which can look awkward.
- Arms crossed: can look confident or defensive; keep it loose, with the hands visible and relaxed, and pair with a warm expression to avoid seeming closed.
For each pose, check the feet: pointed toes and a slight turn look more graceful than flat-footed square stances, and the front foot often points toward the camera while the back foot is turned out.
Sitting and leaning poses
Sitting poses change the body's shape and feel more relaxed. Guidelines include sitting toward the front of the chair rather than slumping back, which keeps the spine long; angling the body to the camera; leaning slightly forward from the hips toward the camera, which brings the face closer and looks engaged; crossing legs at the knees or ankles, or placing one foot slightly forward; and resting arms on the knees, the arm of the chair or a table rather than letting them hang. Sitting on the floor, steps or a low wall creates casual, grounded poses suitable for lifestyle and family portraits. Leaning on a table or desk with forearms, hands lightly clasped or relaxed, suits business portraits. When a person sits, the camera height usually comes down to around their eye level or slightly above.
Hands
Hands are among the most expressive and most awkward parts of a portrait. They draw attention, especially if they are close to the camera, clenched, or shown as flat palms or backs. Guidelines for hands include:
- Give hands a job: holding an object, a coffee cup, glasses, a tool of the subject's trade, a lapel, a jacket, a partner's hand.
- Show the side of the hand rather than the flat back or palm, which looks larger and flat.
- Keep fingers relaxed and slightly separated, not clenched or spread like claws.
- Use soft touches: a hand lightly touching the face, hair or collar looks gentle; pressing into the face distorts it.
- Keep wrists gently bent rather than locked straight.
- Watch hands close to the lens, which look enlarged, especially with wider lenses.
Showing a subject how to relax their hands by shaking them out, then placing them lightly, often helps.
| Problem | Why it looks wrong | Fix |
|---|---|---|
| Clenched fists | Signals tension | Shake out, relax fingers, give an object |
| Flat palm to camera | Looks large and flat | Turn to show the side of the hand |
| Hand pressing the face | Distorts cheek or jaw | Touch lightly or move away |
| Arms hanging at sides | Flattens and widens the arms | Create space, rest hand on hip or object |
| Hands near lens | Enlarged by perspective | Move hands back or use a longer lens |
Legs and feet
In full-length portraits, legs and feet complete the body's line. Weight on the back leg with the front knee softly bent and the front foot pointing toward the camera creates a relaxed shape and lengthens the legs; crossing one leg over the other while standing works for some people and outfits. Avoid legs locked straight and feet planted flat and wide, which look stiff, unless a strong, confident stance is the goal. In sitting poses, legs pointing directly at the camera look foreshortened and larger; angling them to the side looks more natural. A lower camera height, around waist or hip level, lengthens legs in full-length portraits, while shooting from above shortens them.
Posing different bodies
Every body is different, and good posing works with the person's own body rather than forcing everyone into the same shapes. Some principles help most people: angle the body, create space, keep good posture, bring the face slightly forward, and use the camera height and focal length suited to their proportions. People who are self-conscious about weight often appreciate angled poses, space between arms and body, a slightly higher camera angle, darker or well-fitting clothing and careful choice of focal length, but avoid assumptions: ask how the person likes to be photographed and what they want emphasized. Tall subjects may be posed sitting or leaning to fit frames with shorter companions; short subjects may appear taller with lower camera angles and vertical lines. Posing for disability and different mobility needs is discussed in Lesson 11; the key principle is to adapt poses to the person, never the other way round.
Worked problem
Fixing a stiff full-length pose
A client stands square to the camera with weight on both feet, arms pressed to their sides and hands clenched, photographed from a high camera position. List the adjustments that would improve the pose.
Show solution
- Turn the body about 30–45 degrees away from the camera, then turn the face back toward the lens.
- Shift weight to the back foot and soften the front knee, pointing the front foot toward the camera.
- Create space: place one hand lightly on the hip or in a pocket, and let the other rest naturally.
- Shake out the hands and relax the fingers; show the side of the hand.
- Lower the camera to about waist or chest height to keep body proportions natural.
Answer: Angle the body, shift weight back, create space with the arms, relax the hands and lower the camera.
Building a posing flow
Rather than setting up each pose from scratch, experienced photographers move subjects through a posing flow: a sequence of related poses in which small changes produce many variations without breaking momentum. For example, from a standing three-quarter pose, the subject might move the hands, then lean against a wall, then look away, then sit on a nearby step, then lean forward, with the photographer capturing several frames and framings at each stage. A flow keeps the session moving, reduces awkward pauses, and gives clients a range of images. Practising flows on friends, and keeping a personal reference of poses that suit different situations, makes directing faster and more confident.
Posing couples
Couples sessions, from engagement portraits to anniversaries, rely on connection more than precise posing. Start with simple, close poses: standing facing each other, foreheads close; one partner behind the other with arms around them; walking hand in hand. Overlap bodies so there is no gap between them, and angle them slightly toward the camera so both faces remain visible. Use prompts that create interaction, such as asking one partner to whisper something to the other, or to describe their first date. Pay attention to height differences, which can be accentuated or minimized with steps, sitting or camera height depending on the couple's wishes. Ask about comfort with physical affection, which varies with culture and personality.
Posing for clothing and context
Clothing affects posing. Jackets look best buttoned for standing poses and unbuttoned for seated ones; long dresses benefit from movement and walking; tight clothing shows creases when sitting. Check for gaping buttons, twisted collars and bunched fabric before each setup. Context affects posing too: a formal business portrait calls for upright, composed posture, while a lifestyle portrait in a park allows sitting on grass, leaning and laughing.
Practising poses
Practise posing with friends, family or yourself in a mirror, working through the defaults in this lesson and noting which suit different bodies and clothing. A personal reference sheet of reliable poses helps when nerves or time pressure strike during real sessions.
Common mistakes
MistakePosing everyone square to the camera.
InsteadAngle the body and turn the face toward the lens.
MistakeEven weight on both feet.
InsteadShift weight to the back foot for an S-curve.
MistakeArms pressed to the body.
InsteadCreate space between arms and torso.
MistakeFlat palms and clenched fists.
InsteadRelax hands and show their side, or give them a job.
MistakeApplying the same pose to every body.
InsteadAdapt poses to the person and ask their preferences.
Summary and key terms
- Posing flatters, communicates and composes; it should look natural.
- Angling the body 30–45 degrees narrows the silhouette and adds depth.
- Weight on the back foot creates a relaxed S-curve.
- Space between limbs and body reveals natural form.
- Standing, leaning and sitting poses each have reliable defaults.
- Hands need a job, relaxed fingers and the side presented to the camera.
- Adapt poses to each person and move through a posing flow.
- Pose
- Arrangement of the body for a portrait.
- Square pose
- Shoulders parallel to the camera.
- Three-quarter stance
- Body angled about 45 degrees.
- S-curve
- Graceful curve through the body from shifted weight.
- Weight shift
- Moving weight to the back foot.
- Creating space
- Separating limbs from the body.
- Posing flow
- Sequence of related poses.
- Lean
- Pose supported by a wall or object.
- Foreshortening
- Apparent shortening of limbs pointing at the camera.
- Soft touch
- Light contact of a hand with face, hair or object.
Practice problems
Work each problem on paper first, then reveal the answer to check.
Name the three aims of posing.
Show answer
Flatter, communicate, compose.
Default body angle to the camera?
Show answer
About 30–45 degrees.
When might a square pose be right?
Show answer
For strength, directness or symmetry.
Which foot should carry the weight?
Show answer
The back foot.
Why create space between arms and body?
Show answer
To avoid flattening and reveal the waist.
Name three standing poses.
Show answer
Three-quarter stance, lean, walk, hands in pockets, arms crossed.
How should a subject sit?
Show answer
Toward the front of the chair, angled, leaning slightly forward.
Which side of the hand should face the camera?
Show answer
The side.
Camera height to lengthen legs?
Show answer
Around waist or hip level.
What is a posing flow?
Show answer
A sequence of related poses with small changes.
Lesson quiz · 5 questions
Score 60% or more to complete this lesson.
Create a free account to save your progress, take quizzes and earn a certificate.