
PHOT-202 · Lesson 8 of 12 · 25 min
Portrait retouching
Portrait retouching ranges from removing a few temporary blemishes to the meticulous skin work of beauty and fashion photography. Done well, it makes people look like the best version of themselves on a good day; done badly, it erases texture, character and identity, producing the plastic, over-smoothed look that audiences increasingly reject. This lesson covers the principles and levels of retouching, a retouching workflow, healing and cloning tools, frequency separation, dodging and burning skin, eyes and teeth, hair and flyaways, shaping tools and their ethics, and working with clients.
Principles of portrait retouching
Good portrait retouching follows a few principles. Preserve texture: real skin has pores, fine lines and variations in colour, and removing them makes people look artificial. Remove the temporary and keep the permanent: blemishes, redness, stray hairs and creases in clothing are usually removed, while moles, scars, freckles, birthmarks and the lines that define a person's face are generally kept unless the subject asks otherwise. Respect identity: changes to face shape, body shape, skin tone and features can misrepresent people and should be avoided or done only with the subject's informed request. Work non-destructively on separate layers so that every change can be adjusted. And view the image at its intended output size as well as zoomed in: detail that seems important at 200 % may be invisible in the final image.
Levels of retouching
Retouching is often described in levels, which help set expectations with clients and estimate time:
| Level | Typical work | Typical use |
|---|---|---|
| Basic | Global corrections, removing temporary blemishes, light softening | Events, school and corporate headshots |
| Standard | Basic plus under-eye softening, flyaways, teeth and eye enhancement, light dodge and burn | Professional portraits, weddings |
| High-end | Detailed dodge and burn, frequency separation, colour evening, hair work, clothing clean-up | Beauty, fashion, advertising |
| Composite or creative | Background replacement, combining images, stylized looks | Advertising, fine art, editorial concepts |
Time ranges from a few minutes per image for basic work to several hours for high-end beauty retouching. Agree on the level of retouching, the number of images and the number of revision rounds before starting.
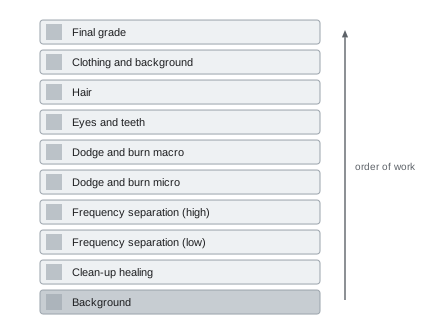
A retouching workflow
A structured workflow keeps retouching efficient and consistent:
- Complete raw processing, including white balance, exposure and global colour.
- Open in Photoshop as a 16-bit file and duplicate or work above the background.
- Clean up: remove blemishes, dust and distractions with healing tools on a separate layer.
- Even skin tone and texture with frequency separation or targeted techniques, if needed.
- Dodge and burn to even out unevenness and shape the face.
- Enhance eyes, teeth and lips subtly.
- Tidy hair and flyaways.
- Clean clothing and background.
- Apply final colour grading and global adjustments.
- Check at 100 % and at output size, compare with the original, and save the layered master.
Healing and cloning tools
Photoshop offers several tools for removing blemishes and distractions:
- The spot healing brush removes small blemishes with one click by sampling surrounding texture automatically. Content-aware modes work well on skin; set it to sample all layers when working on an empty layer.
- The healing brush samples texture from a source point you choose and blends it with the colour and brightness of the target area, giving more control over texture matching.
- The patch tool replaces a selected area with texture from another area, useful for larger patches of skin or background.
- The clone stamp copies pixels exactly from a source to a target, without blending; it is used near edges, where healing tools smear colours, and for precise reconstruction.
- The remove tool, an AI-based tool, removes objects and blemishes intelligently and is often fastest for small distractions.
Work on a separate empty layer with the tools set to sample all layers, so that corrections can be removed or adjusted. Sample texture from areas with similar pore size and direction, such as the same cheek, and avoid repeating patterns that reveal cloning. Use a brush slightly larger than the blemish.
Frequency separation
Frequency separation splits an image into two layers: a low-frequency layer containing colour and tone, with fine detail removed by blurring, and a high-frequency layer containing texture and detail without colour. Editing them separately lets the retoucher smooth uneven colour and tone transitions on the low-frequency layer without affecting texture, and fix texture problems on the high-frequency layer without affecting colour. The technique is powerful for evening skin tone, reducing blotchiness and fixing texture issues such as large pores or creases in clothing, but it is easily overused: heavy blurring of the low-frequency layer creates smeared, plastic skin. Many retouchers now prefer dodge and burn for most skin work and reserve frequency separation for specific problems, using it at reduced opacity.
Worked problem
Setting up frequency separation for a 24 MP portrait
A retoucher wants to even out blotchy skin colour on a close-up portrait without removing pore texture. How should frequency separation be set up and used?
Show solution
- Duplicate the background twice; name the lower copy "low" and the upper copy "high".
- Apply a Gaussian blur to the low layer until pores just disappear, perhaps a radius of 4 to 8 pixels for a close-up at 24 MP.
- On the high layer, use Apply Image with the low layer as the source (in 16-bit: Add, Invert checked, Scale 2, Offset 0; in 8-bit: Subtract, Scale 2, Offset 128) and set the blend mode to linear light.
- Group the layers; the result should look identical to the original.
- Smooth blotchy colour on the low layer with a soft brush or lasso and slight blur at low opacity; fix texture flaws on the high layer with the clone stamp set to current layer.
Answer: Separate into blurred low and texture-only high layers, then even colour on the low layer gently and fix texture on the high layer, keeping pores intact.
Dodging and burning skin
Dodge and burn is the core technique of high-end skin retouching. At the micro level, retouchers zoom in and lighten small dark spots and darken small light spots on the skin, evening out texture and transitions while keeping every pore, a slow but natural-looking process often done on a 50 % grey layer in soft light mode or with paired curves adjustment layers (one brightening, one darkening) and black masks painted with a soft white brush at very low opacity. Helper layers, such as a black-and-white adjustment and a high-contrast curve placed temporarily at the top of the stack, make unevenness easier to see. At the macro level, larger dodging and burning shapes the face: brightening cheekbones, the bridge of the nose and the forehead, and deepening shadows under cheekbones and along the jaw, enhancing the light and form created by the lighting. Under-eye shadows and lines can be reduced, not erased, by dodging and by healing at reduced opacity.
Eyes, teeth and lips
Eyes draw attention first in portraits. Subtle enhancements include brightening the iris and catchlights slightly, increasing contrast and sharpness in the iris, reducing redness in the whites of the eyes, and darkening the outer ring of the iris. Avoid making the whites pure white or the irises unnaturally bright, which looks alarming. Teeth can be whitened slightly by reducing yellow saturation and raising brightness, but teeth are never pure white; overwhitened teeth look fake. Lips may benefit from slight colour evening and reduction of dry texture. All of these changes should be small enough that the person looks rested and well, not altered.
Hair and flyaways
Stray hairs crossing the face, the background or the outline of the hair are common distractions. Remove those crossing the skin with healing or clone tools; for hairs against the background, the clone stamp and healing brush with careful sampling, or the remove tool, work well. Do not remove so many flyaways that the hair looks like a helmet; some natural strands at the edge look realistic. Gaps in hair can be filled by cloning or by painting hair strands with a small brush. Colour evening of hair, such as reducing grey roots or uneven dye, should be agreed with the subject.
Shaping tools and their ethics
Photoshop's Liquify filter and similar tools push, pull and reshape pixels, and face-aware liquify adjusts eyes, nose, mouth and face shape automatically. They are used legitimately to correct lens distortion, smooth clothing, fix posture issues and tidy stray clothing folds. They are also used to slim bodies, enlarge eyes and reshape faces, practices that have attracted strong criticism for promoting unrealistic beauty standards, and that some jurisdictions and organizations regulate. France, for example, has required since 2017 that commercial images with digitally altered body shapes be labelled as retouched, and several advertising standards bodies and publishers have rules on misleading alteration. Body and face reshaping should be done only with the subject's informed request, and never in documentary or editorial contexts where images claim to represent reality. Lesson 12 discusses these ethics further.
Working with clients and subjects
Retouching is a service shaped by the client's needs and the subject's wishes. Discuss expectations before the shoot: what retouching is included, what the subject would like changed or kept, and how many revisions are allowed. Show examples of your retouching style. Be sensitive: people may be self-conscious about features you consider attractive, or proud of features others might remove, such as freckles, scars or grey hair. Never make assumptions based on gender, age, ethnicity or body type. For commercial work, agree on retouching levels and timeframes in writing, and deliver proofs for approval before final files. Keep the layered master so that revisions can be made easily.
Retouching for different genres
Retouching expectations differ by genre. Corporate headshots need clean, natural results that look like the person on a good day, with consistent colour and lighting across a team. Wedding and family portraits favour flattering, gentle retouching that keeps people recognizable for decades. Beauty and cosmetics advertising demands immaculate skin, often with detailed dodge and burn, but must not misrepresent product effects. Fashion editorial retouching focuses on clothing, styling and mood as much as skin, and may embrace texture and imperfection. Fine art portraiture may involve little or no retouching. Understanding the genre and the client's expectations guides how much to do.
Retouching men, women and people of all ages
Retouching should not follow different standards based on gender or age in ways that reinforce stereotypes, such as removing all lines from women's faces while keeping them on men. The same principles apply to everyone: remove temporary blemishes, soften distracting unevenness, and keep the features that define a person. Older subjects often value retaining their lines and character, softened slightly rather than erased. Children generally need very little retouching beyond temporary marks, scrapes or food, and heavy retouching of children's images is widely considered inappropriate.
Clothing, background and final checks
Portrait retouching extends beyond skin. Clothing may need lint and pet hair removed, creases and wrinkles smoothed, labels hidden and colours corrected; backgrounds may need seams, marks, stands and distractions removed, and gradients smoothed. Glasses may need reflections reduced, often by combining a frame shot with the glasses tilted. Before finishing, step back and review the whole image: compare with the original at the same size, check skin at 100 % for artefacts and repeated patterns, look for halos and smudges near edges, and confirm that the subject still looks like themselves. Taking a break and reviewing again with fresh eyes catches overretouching.
AI retouching tools
AI-powered retouching tools, available as plug-ins, standalone applications and features within raw processors, can detect faces and apply skin smoothing, blemish removal, eye and teeth enhancement and even dodge and burn automatically, often across hundreds of images at once. They are valuable for high-volume work such as school portraits, events and headshots, but their default settings are often too strong, producing smooth, uniform skin that looks artificial. Use them at reduced strength, check results individually, and refine important images manually.
Common mistakes
MistakeSmoothing skin until texture disappears.
InsteadPreserve pores and use subtle dodge and burn.
MistakeRemoving permanent features without asking.
InsteadKeep moles, scars and freckles unless the subject requests otherwise.
MistakeOverwhitening eyes and teeth.
InsteadMake small, natural enhancements.
MistakeHeavy blurring in frequency separation.
InsteadBlur gently and use reduced opacity.
MistakeReshaping bodies without consent.
InsteadReshape only on informed request and never in documentary work.
Summary and key terms
- Preserve texture, remove the temporary, keep the permanent and respect identity.
- Retouching levels set expectations from basic to high-end.
- A structured workflow moves from clean-up to colour grading on separate layers.
- Healing tools blend texture; clone stamp copies exactly; AI remove speeds clean-up.
- Frequency separation separates colour and texture but is easily overused.
- Micro and macro dodge and burn even skin and shape the face.
- Eyes, teeth, lips and hair need subtle work; reshaping raises ethical issues.
- Retouching level
- Agreed scope of retouching work.
- Spot healing brush
- Tool removing small blemishes automatically.
- Healing brush
- Tool blending sampled texture into a target.
- Clone stamp
- Tool copying pixels exactly.
- Frequency separation
- Splitting colour and texture into separate layers.
- Low frequency
- Colour and tone information.
- High frequency
- Fine texture and detail.
- Micro dodge and burn
- Evening small light and dark spots in skin.
- Liquify
- Filter that reshapes pixels.
- Helper layer
- Temporary layer that reveals unevenness.
Practice problems
Work each problem on paper first, then reveal the answer to check.
What should usually be kept in retouching?
Show answer
Permanent features such as moles, scars and freckles.
Name the four retouching levels.
Show answer
Basic, standard, high-end, composite or creative.
Why retouch on an empty layer sampling all layers?
Show answer
Corrections remain adjustable.
When is the clone stamp better than healing?
Show answer
Near edges and for exact reconstruction.
What does the low-frequency layer contain?
Show answer
Colour and tone.
What is the risk of frequency separation?
Show answer
Plastic, smeared skin.
What is micro dodge and burn?
Show answer
Evening small light and dark spots while keeping pores.
What does macro dodge and burn do?
Show answer
Shapes the face.
Why avoid pure white teeth?
Show answer
They look fake.
What did France require in 2017?
Show answer
Labels on commercial images with altered body shapes.
Lesson quiz · 5 questions
Score 60% or more to complete this lesson.
Create a free account to save your progress, take quizzes and earn a certificate.