
PHOT-202 · Lesson 11 of 12 · 25 min
Output for screen and print
A photograph is finished only when it reaches its audience, on a phone, a website, a client's layout or a print on the wall. Each destination has different requirements for size, resolution, colour space, file format, sharpening and compression, and an image that looks perfect on your calibrated monitor can look disappointing if exported incorrectly. This lesson covers master files and derivatives, image size and resolution, resizing, output sharpening, colour spaces for output, export formats and compression, preparing images for the web and social media, preparing files for print and soft proofing, watermarks and metadata, and delivering files to clients.
Masters and derivatives
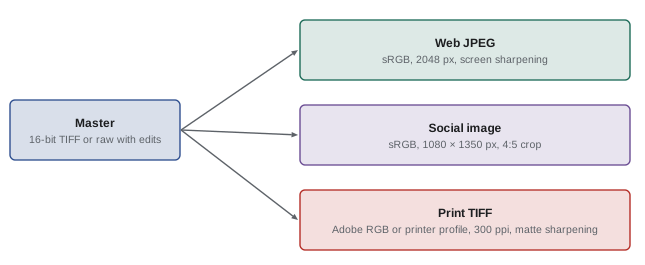
Professional workflows separate master files from output derivatives. The master is the full-resolution, fully edited version: the raw file with its adjustments in the catalogue, or a layered 16-bit PSD or TIFF for images finished in Photoshop. Derivatives are exported copies prepared for a specific use: a 2048-pixel sRGB JPEG for the web, a 4:5 crop for social media, a CMYK TIFF for a magazine, a print file sized and sharpened for a 50 × 70 cm print. Never overwrite the master with a derivative; reduced, sharpened, compressed files are poor sources for future outputs. Export presets in raw processors make derivatives fast and consistent, and many photographers keep exported files only temporarily, regenerating them from masters when needed.
Image size and resolution
Digital images are measured in pixels, such as 6000 × 4000 pixels for a 24-megapixel camera. Resolution in pixels per inch (ppi) matters only when an image is printed or placed in a layout: it determines how large the image prints. For print, the size in inches equals the pixel dimensions divided by the ppi. A commonly used standard for high-quality prints viewed at close distances is 300 ppi, though 240 ppi often looks equally good, and large prints viewed from farther away can be printed at 150 ppi or less without visible loss. For screens, ppi metadata is irrelevant; only the pixel dimensions matter. A 72 ppi setting, often mentioned for web images, is a historical convention with no effect on how images display.
| Pixel dimensions | At 300 ppi | At 240 ppi | At 150 ppi |
|---|---|---|---|
| 6000 × 4000 (24 MP) | 20 × 13.3 in (51 × 34 cm) | 25 × 16.7 in (64 × 42 cm) | 40 × 26.7 in (102 × 68 cm) |
| 8256 × 5504 (45 MP) | 27.5 × 18.3 in (70 × 47 cm) | 34.4 × 22.9 in (87 × 58 cm) | 55 × 36.7 in (140 × 93 cm) |
| 9504 × 6336 (60 MP) | 31.7 × 21.1 in (80 × 54 cm) | 39.6 × 26.4 in (101 × 67 cm) | 63.4 × 42.2 in (161 × 107 cm) |
Resizing and upscaling
Downsizing for the web or smaller prints discards pixels and generally looks good with modern resampling algorithms, especially when output sharpening is applied afterward. Upscaling, enlarging beyond the original pixel count for large prints or heavily cropped images, requires interpolation, which traditionally produced soft results. AI-based upscaling tools, such as super resolution features in raw processors and dedicated upscaling software, use neural networks to create convincing detail at two to four times the original resolution. They are useful for large prints and old low-resolution files, but can invent textures or artefacts, especially in faces, text and fine patterns; check results at full size. For most prints, a good modern camera file needs no upscaling.
Worked problem
Can this crop print large?
A client wants a 60 × 40 cm print of a wildlife image cropped from a 45-megapixel file to 4000 × 2667 pixels. What resolution would it print at, and what are the options?
Show solution
- Print width: 60 cm ÷ 2.54 = 23.6 inches.
- Effective resolution: 4000 ÷ 23.6 ≈ 169 ppi.
- At normal viewing distances for a 60 × 40 cm print, about 170 ppi often looks acceptable, especially with good output sharpening.
- For closer inspection, AI upscaling by 2× would give about 340 ppi, with careful checking of feather and fur detail.
Answer: About 169 ppi, usually acceptable at normal viewing distances; AI upscaling can raise it if close viewing is expected.
Output sharpening
Output sharpening compensates for the softening caused by resizing and by the output medium. Images downsized for screens benefit from light sharpening after resizing; raw processors offer screen sharpening at low, standard and high amounts. Prints need more sharpening, because ink spreads into the paper and the eye views prints from a distance: glossy papers show detail more crisply and need less sharpening than matte papers, which soften the image more. Raw processors offer output sharpening settings for glossy and matte paper, and dedicated tools adjust sharpening for print size and viewing distance. Output sharpening often looks slightly crunchy on screen at 100 % but correct on paper; making a test print is the only reliable way to judge it.
Colour spaces for output
The colour space of an exported file should match its destination. For the web, social media, most online services and consumer printing labs, export in sRGB, which matches typical displays and the assumptions of most software. Wide-gamut screens on phones and computers can show Display P3 colours, and some platforms preserve embedded P3 profiles, but sRGB remains the safest choice for consistent appearance. For professional printing with your own printer or a high-end lab, export in Adobe RGB or ProPhoto RGB at 16 bits, or let the printing software convert to the printer profile. For offset printing in magazines and books, files are converted to CMYK using the printer's specified profile, usually by the designer or printer rather than the photographer, unless requested. Always embed the colour profile in exported files.
File formats and compression
Common export formats include:
- JPEG: universal and compact, with lossy compression controlled by a quality setting; quality around 80 to 90 % on a 0–100 scale gives excellent results with moderate file sizes, while 100 % offers little visible improvement for much larger files.
- TIFF: lossless, supports 16-bit and layers, used for print, archiving and delivery to designers.
- PNG: lossless, supports transparency, used for graphics and cut-out products for the web.
- HEIF and AVIF: modern efficient formats with smaller files than JPEG at similar quality, and support for HDR; browser and platform support has grown but is not yet universal.
- PSD: layered Photoshop masters, not for general delivery.
Compression artefacts, such as blockiness and banding in smooth gradients, are amplified when images are recompressed repeatedly, which is why masters should never be JPEG and why exporting at high quality before platforms recompress gives better results.
Preparing images for the web and social media
Social platforms resize and recompress uploaded images, sometimes heavily. To retain as much quality as possible, export at or slightly above the platform's display dimensions, typically around 1080 to 2048 pixels on the long side depending on the platform, in sRGB, as high-quality JPEG, with light screen sharpening; crop to the platform's preferred aspect ratio; and check results on a phone after uploading. For websites, balance quality with loading speed: large images slow pages, which harms user experience and search ranking, so export at the maximum display size needed, often 2000 to 2500 pixels for full-width images on high-density screens, and use efficient compression or modern formats. Portfolio platforms may have their own recommendations.
Preparing files for print and soft proofing
Printing requires attention to size, resolution, colour and paper. Soft proofing simulates on screen how an image will look when printed on a specific printer and paper, using the printer and paper profile supplied by the lab or paper manufacturer. It reveals colours that are out of the printer's gamut, which can be shown with a gamut warning, and the reduced contrast and duller blacks of matte papers. Photographers often create a proof copy and adjust it, typically adding brightness, contrast or saturation to compensate, before printing. Labs may require specific file formats, sizes, bleed margins and colour spaces, and some prefer that you do not apply your own output sharpening. Making test prints, especially small strips of critical areas, saves money and paper. PHOT-301 covers colour management and fine printing in depth.
Watermarks and metadata
Watermarks, visible marks such as a name or logo placed on images, deter casual misuse and promote the photographer, but they also distract from the image and can be removed with modern tools. Many professional photographers use small, subtle watermarks on social media or none at all, relying on copyright metadata, reverse image search and low-resolution web files. Export settings let you choose which metadata to include: copyright and contact information should usually remain; camera serial numbers and location data may be removed for privacy, particularly for images of private homes, children or sensitive locations. Content credentials, where supported, can be attached at export to record authorship and edit history (PHOT-201 Lesson 11).
Delivering files to clients
Client delivery should be professional and reliable. Online gallery platforms let clients view, select, download and order prints, with options for watermarking, download permissions and expiry dates. File transfer services deliver large files securely. Agree the delivery specification in advance: number of images, resolution, file formats, colour space, retouching level and naming. Provide files named consistently, organized in folders by use where appropriate, with a short note explaining the formats and how to use them. Keep records of what was delivered and when, and retain master files for the period agreed in your contract, so that additional sizes or revisions can be supplied later.
Printing at home and with labs
Photographers can print on their own inkjet printers or use professional labs. Home printing with pigment inkjet printers offers control, quick proofing and a choice of fine art papers, but requires investment in a printer, inks and papers, and careful colour management with paper profiles. Professional labs offer a range of processes, including chromogenic prints on photographic paper, inkjet prints, metal and acrylic prints and canvas, with expert operators and calibrated equipment, and often supply printer profiles for soft proofing. Many photographers proof at home and send final large prints to a lab, or work with a single trusted lab for consistency.
Print media and finishes
The choice of paper or medium shapes how a print looks and feels. Glossy and lustre papers offer deep blacks, high contrast and vivid colour, suitable for commercial and colourful work; matte fine art papers, made from cotton rag or alpha cellulose, offer a soft, textured, painterly feel with lower contrast and more muted blacks; baryta papers combine a fibre base with a glossy surface reminiscent of traditional darkroom prints. Metal, acrylic and canvas prints suit decorative displays. Archival permanence, the expected life of a print before fading, depends on the inks, paper and display conditions; pigment inks on archival papers can last many decades when displayed away from direct sunlight.
Preparing images for books and layouts
Images for photobooks, magazines and design layouts usually go to a designer or printer. Provide high-resolution files at the size required, typically 300 ppi at final print size, in the colour space the printer or designer requests, often Adobe RGB or sRGB with conversion to CMYK done later. Leave bleed, extra image beyond the trim edge, for images that run to the edge of the page, and be aware that the binding area, called the gutter, can hide parts of images that cross the centre of a spread. Proofs from the printer, ideally hard proofs on the final paper, are the best way to check colour before a full print run.
Archiving output files
Exported files are usually temporary, but some should be archived: final deliveries to clients, files supplied for publication, and print files that were approved and printed. Keeping these, along with notes on the paper, printer profile and settings used, allows reprints to match the originals and provides a record if questions arise about what was delivered. Organize them within each project folder, clearly separated from masters.
Common mistakes
MistakeOverwriting masters with exported JPEGs.
InsteadKeep masters and export separate derivatives.
MistakeBelieving 72 ppi affects web display.
InsteadOnly pixel dimensions matter on screens.
MistakeUploading Adobe RGB files to the web.
InsteadExport in sRGB with embedded profiles.
MistakeSkipping output sharpening for prints.
InsteadSharpen for paper type and test print.
MistakePrinting without soft proofing.
InsteadSoft proof with the lab's printer and paper profile.
Summary and key terms
- Keep full-resolution masters and export derivatives for each use.
- Print size equals pixels divided by ppi; screens use pixels only.
- AI upscaling helps large prints but must be checked.
- Output sharpening depends on size, medium and viewing distance.
- Use sRGB for the web and wider spaces or printer profiles for professional print.
- Choose formats and compression for quality and destination.
- Soft proof prints, manage metadata and deliver files professionally.
- Master file
- Full-resolution, fully edited version.
- Derivative
- Exported copy prepared for a specific use.
- Pixels per inch
- Print resolution measure.
- Upscaling
- Enlarging an image beyond its original pixels.
- Output sharpening
- Sharpening for a particular output.
- sRGB
- Standard colour space for screens and the web.
- CMYK
- Ink-based colour model for offset printing.
- Soft proofing
- Simulating print appearance on screen.
- Gamut warning
- Indicator of colours a printer cannot reproduce.
- Watermark
- Visible mark identifying the photographer.
Practice problems
Work each problem on paper first, then reveal the answer to check.
Why never overwrite masters?
Show answer
Derivatives are reduced, sharpened and compressed.
Print width of 6000 pixels at 300 ppi?
Show answer
20 inches.
Does 72 ppi matter for web images?
Show answer
No, only pixel dimensions matter.
Name a risk of AI upscaling.
Show answer
Invented textures or artefacts.
Which paper needs more sharpening, glossy or matte?
Show answer
Matte.
Colour space for social media?
Show answer
sRGB.
Typical JPEG quality for export?
Show answer
About 80–90 %.
Which format supports transparency losslessly?
Show answer
PNG (and TIFF).
What does soft proofing reveal?
Show answer
Out-of-gamut colours and paper contrast.
What metadata might be removed for privacy?
Show answer
Location and camera serial numbers.
Lesson quiz · 5 questions
Score 60% or more to complete this lesson.
Create a free account to save your progress, take quizzes and earn a certificate.