
PHOT-202 · Lesson 4 of 12 · 27 min
Colour adjustments and black and white
Colour shapes how viewers feel about a photograph. Warm tones suggest comfort, nostalgia or heat; cool tones suggest calm, distance or cold; saturated colour feels energetic; muted colour feels quiet or melancholy. Raw processors offer precise tools to correct colour casts, refine individual hues, create colour grades and convert to black and white. This lesson covers vibrance and saturation, HSL and colour mixer tools, colour grading, calibration and custom profiles, skin tones, colour harmony and consistency across a series, and black-and-white conversion.
Vibrance and saturation
Saturation increases or decreases the intensity of all colours equally. Even modest increases can push already strong colours, such as red flowers, blue skies or orange skin, into clipping, where detail and gradation are lost and colours look garish. Vibrance increases the intensity of muted colours more than already saturated ones, and in most software protects skin tones, making it a safer general control. Reducing saturation slightly can create a subtle, refined look; reducing vibrance strongly desaturates muted colours while keeping strong ones, an effect some photographers use creatively. Watch the RGB histogram and clipping warnings when adding saturation, since single-channel clipping often appears first.
HSL and colour mixer
HSL tools, also called the colour mixer, adjust individual colour ranges independently:
- Hue shifts a colour toward its neighbours: making greens more yellow or more blue, oranges more red or more yellow, blues more cyan or more purple.
- Saturation increases or decreases the intensity of a colour range.
- Luminance brightens or darkens a colour range.
HSL is the main tool for fine colour work. Common adjustments include shifting greens toward yellow or blue to make foliage look natural or stylized; darkening blue luminance to deepen skies; brightening orange luminance to brighten skin; reducing saturation in distracting colours, such as a bright red sign in the background; and harmonizing colours by shifting them toward a shared palette. Targeted adjustment tools let you click and drag directly on an area of the image to adjust the colours under the cursor. Because colour ranges overlap, large adjustments can create unnatural transitions or banding at the boundaries between colours, particularly in skies and skin; small adjustments are usually better.
| Goal | HSL adjustment |
|---|---|
| Deeper blue sky | Lower blue luminance, slightly raise blue saturation |
| Brighter, cleaner skin | Raise orange luminance, slightly lower orange saturation |
| Less yellow foliage | Shift green and yellow hue toward blue-green |
| Calmer background | Lower saturation of distracting colours |
| Warmer autumn colours | Shift yellows toward orange, raise orange saturation |
Colour grading
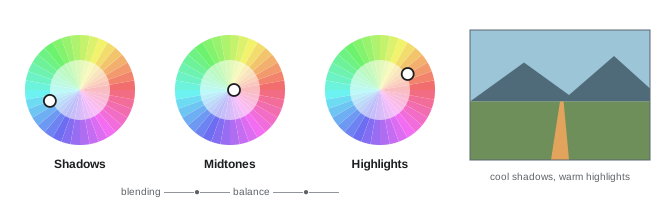
Colour grading, called split toning in older software, adds colour to the shadows, midtones and highlights separately. Each range has a colour wheel to choose a hue and saturation, plus controls for balance, which shifts the boundary between shadows and highlights, and blending, which controls how smoothly the ranges overlap. A popular approach is complementary grading: warm highlights and cool shadows, echoing the orange and teal look of many films, which separates skin tones from backgrounds. Others include warm overall grades for nostalgia, cool grades for melancholy, and subtle tints in black-and-white images. Colour grading is most effective when subtle; heavy grades can make skin unnatural and date quickly as fashions change. Channel curves, adjusting the red, green and blue tone curves separately, offer even finer control, such as adding blue to the shadows while removing it from the highlights.
Calibration and custom profiles
Calibration controls in some raw processors adjust how the camera's primary colours are interpreted, shifting the hue and saturation of the underlying red, green and blue primaries. Because every colour is built from these primaries, calibration adjustments affect the whole image in a coherent way, and they are used by some photographers to create signature colour looks or to correct a camera's colour rendering. For accurate colour, such as product photography, art reproduction and scientific work, custom camera profiles are the best tool. The photographer photographs a colour chart, such as a Calibrite ColorChecker, under the shooting light, and profiling software compares the recorded colours with the chart's known values to create a profile that corrects the camera's response under that light. Applying the profile to images shot under the same light produces colour that closely matches the original.
Worked problem
Accurate colour for a clothing catalogue
A photographer shoots a clothing catalogue in a studio with LED lights. The client complains that a teal sweater looks bluer in the images than in reality. How should the photographer fix the colour?
Show solution
- Photograph a colour chart under the same lights at the start of the shoot (and repeat if lighting changes).
- Create a custom camera profile from the chart with profiling software.
- Apply the profile and set white balance from the chart's neutral patch for all images under that light.
- Compare the sweater with the physical garment on a calibrated monitor under suitable viewing light, and make a small HSL hue adjustment to the teal range if needed.
Answer: Use a custom profile built from a colour chart under the shooting light, set white balance from the chart, and fine-tune with HSL while comparing with the garment.
Skin tones
Skin is the colour viewers judge most critically. Natural skin tones across all ethnicities share a similar hue, roughly between red and yellow, differing mainly in brightness and saturation. Common problems include magenta or red casts, often from flash or warm light; green or yellow casts, from fluorescent light, foliage reflections or some LEDs; uneven colour between face, neck and hands; and excessive saturation that makes skin look orange or sunburnt. Corrections include setting white balance carefully; using the orange, red and yellow HSL controls to adjust hue, saturation and luminance; using local adjustments to even out redness in specific areas; and checking skin on a vectorscope or with colour sampler readings in RGB, where well-balanced skin typically shows red highest, green in the middle and blue lowest. Respect the natural diversity of skin tones: avoid lightening or homogenizing skin in ways that misrepresent people.
Colour harmony and consistency
Strong colour in photographs often comes from harmony: a limited, coherent palette rather than every colour at full intensity. Analogous harmonies use neighbouring hues, such as greens and blues, for calm; complementary harmonies use opposites, such as orange and blue, for contrast and energy; monochromatic schemes use variations of one hue. In editing, you can reinforce harmony by reducing the saturation of colours that clash, shifting hues toward the palette, and using colour grading to unify tones. For a series, a feed, an album or a book, consistency matters as much as the individual image: similar white balance, saturation, contrast and grading across images make the work feel cohesive. Editing images in a grid view, side by side, helps judge consistency.
Black-and-white conversion
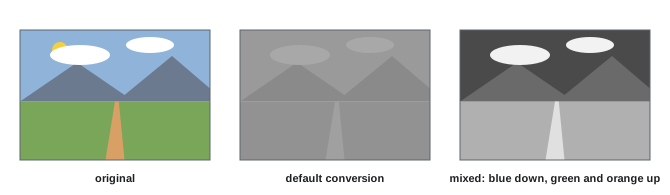
Black-and-white photography emphasizes tone, shape, texture and light. Converting a colour raw file to black and white offers more control than shooting in a monochrome mode, because you can choose how each colour translates into grey. The black-and-white mixer adjusts the brightness of each colour range in the monochrome result: darkening blues deepens skies and makes clouds stand out, like a red filter in film photography; brightening greens lightens foliage, like a green filter; brightening oranges lightens skin and reduces blemishes. Strong tonal separation between subject and background is essential, since colours that contrast strongly can become similar greys. After conversion, adjust contrast, curves, local dodging and burning, and grain to taste. Toning, adding a subtle warm or cool tint to the black-and-white image through colour grading, can evoke traditional darkroom toners such as sepia or selenium.
When to choose black and white
Black and white suits images where colour distracts from the subject, form or emotion; where colour is unattractive or inconsistent, such as mixed lighting at events; where the subject has strong shapes, textures or contrasts; and where a timeless or documentary feeling is desired. It does not rescue weak images, and converting simply because colour editing is difficult often produces flat, grey results. Many photographers decide during shooting whether an image is conceived in colour or black and white, and setting the camera to a monochrome picture style while shooting raw shows a black-and-white preview while preserving the colour data.
Point colour and targeted colour adjustments
Some raw processors offer point colour tools, which sample a specific colour from the image and adjust its hue, saturation and luminance within a defined range, more precisely than HSL sliders. Point colour is useful for correcting a single product colour to match a reference, adjusting skin tones without affecting similar colours in the background, or making a specific colour pop. Range controls determine how much nearby colours are included, and a visualization view shows which areas are affected. Capture One's colour editor offers similar precision, with the ability to select colour ranges directly on the image and save them for reuse, and is widely used for skin tone uniformity in commercial portrait and fashion work.
Working with skin tone uniformity
Skin often varies in colour across a face and body: redder cheeks and nose, yellower forehead, different colour on hands and neck. Uniformity tools, such as Capture One's skin tone tool or targeted HSL and point colour adjustments in Lightroom, pull the range of skin hues and saturations closer together, producing more even, flattering skin without affecting texture. Used subtly, they reduce redness and blotchiness; overused, they make skin look painted. Combined with local masks for face skin, these tools achieve much of what once required detailed Photoshop work.
Worked problem
Matching a series for an album
A wedding photographer edits 400 images from a day that moved from a warm church interior to an overcast park and a reception lit by tungsten and LED lights. How can colour be made consistent across the album?
Show solution
- Group images by lighting situation: church, park and reception.
- Edit one representative image in each group, setting white balance on skin and neutral elements, and adjusting HSL for consistent skin tones.
- Sync settings within each group, then adjust exposure and white balance where individual images differ.
- Compare images from all groups side by side in a grid, adjusting each group so skin tones and overall warmth feel related.
- Apply a subtle, shared colour grade across all images to unify the album.
Answer: Edit by lighting group, sync within groups, compare across groups for consistent skin, and unify with a gentle shared grade.
Colour and culture
Colour meanings vary between cultures and contexts: white signifies purity and weddings in many Western cultures but mourning in some East Asian traditions; red signifies luck and celebration in China, danger or passion elsewhere. Brands have specific colours that must be reproduced exactly. When editing for clients and audiences from different backgrounds, consider how colour choices will be read, and respect the importance of colours in clothing, ceremonies and products to the people photographed.
Monochrome profiles and infrared
Some raw processors include monochrome camera profiles that emulate classic black-and-white films, with characteristic contrast curves and tonal responses, as starting points for conversion. Infrared photography, made with converted cameras or infrared filters, produces images with glowing foliage and dark skies; processing typically involves a custom white balance, channel swapping in Photoshop to create false-colour looks, and black-and-white conversion. These specialized techniques reward experimentation and show how flexible the raw processor can be.
Common mistakes
MistakeBoosting global saturation heavily.
InsteadUse vibrance and targeted HSL adjustments.
MistakeLarge HSL moves that cause banding.
InsteadMake small adjustments and check transitions.
MistakeHeavy orange and teal grades on every image.
InsteadGrade subtly to suit each subject.
MistakeLightening or homogenizing skin tones.
InsteadCorrect casts while respecting natural skin diversity.
MistakeConverting to black and white without tonal separation.
InsteadUse the mixer, curves and local adjustments.
Summary and key terms
- Vibrance boosts muted colours safely; saturation affects all colours equally.
- HSL tools adjust hue, saturation and luminance of colour ranges.
- Colour grading tints shadows, midtones and highlights separately.
- Custom profiles from colour charts give accurate colour.
- Skin tones share a hue range and need careful, respectful correction.
- Colour harmony and consistency strengthen individual images and series.
- Black-and-white conversion uses the mixer to control tonal separation.
- Saturation
- Intensity of colours.
- Vibrance
- Saturation control favouring muted colours.
- HSL
- Hue, saturation and luminance per colour range.
- Colour grading
- Tinting shadows, midtones and highlights.
- Split toning
- Older term for tinting shadows and highlights.
- Calibration panel
- Controls adjusting primary colour interpretation.
- Colour chart
- Target with known colour patches.
- Custom profile
- Camera profile built from a chart.
- Black-and-white mixer
- Controls for converting colours to greys.
- Toning
- Adding a tint to a black-and-white image.
Practice problems
Work each problem on paper first, then reveal the answer to check.
Why is vibrance safer than saturation?
Show answer
It favours muted colours and protects skin.
What do the three HSL controls do?
Show answer
Shift hue, change intensity, change brightness of a colour range.
How do you deepen a blue sky with HSL?
Show answer
Lower blue luminance.
What is complementary grading?
Show answer
Warm highlights with cool shadows, for example.
How is a custom profile made?
Show answer
From a colour chart photographed under the shooting light.
Typical RGB order in balanced skin?
Show answer
Red highest, green middle, blue lowest.
Name two colour harmonies.
Show answer
Analogous, complementary, monochromatic.
How do you darken a sky in black and white?
Show answer
Lower blue in the black-and-white mixer.
What does brightening orange do in black and white?
Show answer
Lightens skin.
When does black and white suit an image?
Show answer
When colour distracts or form, texture and emotion dominate.
Lesson quiz · 5 questions
Score 60% or more to complete this lesson.
Create a free account to save your progress, take quizzes and earn a certificate.