
PHOT-202 · Lesson 10 of 12 · 25 min
Compositing and multi-image techniques
Many photographs are made from more than one exposure. Landscape photographers blend exposures to capture skies and shadows; architectural photographers merge panoramas; advertising and fine art photographers build imaginative composites from many elements; and everyday retouching often replaces a closed eye or a sky. Compositing combines elements from different images so convincingly that the result looks like a single photograph, or creates something deliberately impossible. This lesson covers HDR merging, exposure blending, panoramas, focus stacking for landscapes, image averaging and stacking, head swaps and group photos, sky replacement, building composites from planned elements, matching light, perspective, colour and grain, and generative tools in compositing.
HDR merging
High dynamic range merging combines bracketed exposures, typically three to seven frames one or two stops apart, into a single file with the highlight detail of the darkest frame and the shadow detail of the brightest. Raw processors such as Lightroom Classic and Capture One merge brackets into a high-bit-depth DNG or similar file that can then be processed like a single raw file with an enormous editing range. Merging works best with a tripod and static subjects; deghosting options handle moving elements, such as leaves or people, by taking them from one frame. The notorious "HDR look" of the late 2000s, with halos, flat tones and oversaturated colour, came from aggressive tone mapping rather than from merging itself; natural results come from merging and then editing with restraint, keeping some shadows dark and highlights bright.
Exposure blending
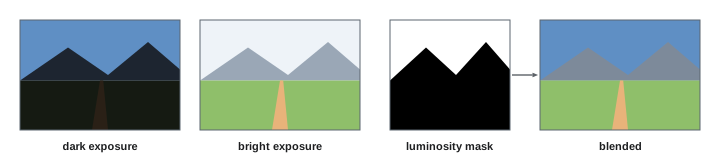
Exposure blending combines bracketed frames manually with layer masks, giving more control than automatic HDR merging. A typical approach places the exposures as layers in Photoshop, with the darker exposure for the sky above the brighter exposure for the land, and uses a mask, often a luminosity mask or a carefully refined sky selection, to reveal the sky from one frame and the foreground from another. Blending creates natural transitions, avoids the halos of some HDR algorithms and allows creative decisions, such as how bright the sky should be relative to the land. Window pulls in interior photography are a related technique: one exposure shows the room, another, often lit with flash, shows the view through the windows, and the two are blended (PHOT-311).
Panoramas
Panoramas stitch multiple overlapping images into a wider or higher-resolution image. Good panorama technique includes shooting in manual exposure, focus and white balance so that frames match; overlapping each frame by about 30 to 50 %; rotating the camera around the lens's entrance pupil, often called the nodal point, using a panoramic head, to avoid parallax errors between near and far objects; shooting vertically for taller panoramas; and keeping the camera level. Raw processors and Photoshop merge panoramas into a single file using projections such as spherical, cylindrical or perspective, with options to fill or crop the uneven edges. Multi-row panoramas create very high resolution images for large prints; 360-degree spherical panoramas create immersive virtual tours. Panoramas can also be combined with HDR brackets for each position.
Worked problem
Planning a panorama for a large print
A photographer wants a print 150 cm wide at 200 pixels per inch from a landscape panorama, using a 24-megapixel camera (6000 × 4000 pixels) in vertical orientation, with 40 % overlap between frames. How many frames are needed?
Show solution
- Required width: 150 cm ÷ 2.54 = 59.1 inches; 59.1 × 200 ≈ 11,800 pixels.
- In vertical orientation, each frame is 4000 pixels wide; with 40 % overlap, each additional frame adds about 2400 new pixels.
- Frames needed: 1 + (11,800 − 4000) ÷ 2400 ≈ 1 + 3.25, so about 5 frames.
- Shoot 6 frames to allow for cropping after stitching.
Answer: About 5 frames, so shoot 6 with 40 % overlap to allow for cropping.
Focus stacking for landscapes
Landscape photographers often want sharpness from a flower at their feet to distant mountains, which may exceed the depth of field available even at small apertures, and stopping down to f/16 or f/22 softens the whole image through diffraction. Focus stacking (Lesson 9) solves this: shoot several frames at an optimal aperture such as f/8 or f/11, focusing on the foreground, middle and background, and combine them in Photoshop or dedicated software. Wind moving plants between frames causes artefacts that need manual masking. Combined with exposure blending, focus stacking produces landscapes with exceptional detail throughout, though it is important that the result still looks like a plausible photograph rather than an artificially flat, hyper-real image.
Image averaging and stacking
Stacking many exposures of the same scene and averaging them reduces noise, since random noise averages out while the scene stays constant: averaging four frames improves the signal-to-noise ratio by a factor of two, sixteen frames by a factor of four. Astrophotographers stack dozens or hundreds of frames, aligned to the stars, for clean, detailed images of the night sky. Median stacking, which takes the median value of each pixel across frames, removes moving objects such as tourists walking through a scene, leaving only what remained still. Averaging frames of moving water or clouds simulates a long exposure without an ND filter. Photoshop's stack modes, available for smart objects containing several layers, and dedicated astrophotography software perform these operations.
Head swaps and group photos
In group photographs, someone almost always blinks or looks away. A common retouching task replaces a face or head with a better expression from another frame taken moments apart from the same position. The technique involves placing the replacement frame as a layer above the main image, aligning it carefully using reduced opacity or difference blend mode, masking in only the face or head with a soft brush, and matching any differences in light, colour or position. Photoshop's auto-align layers command helps. Shooting several frames of every group, on a tripod, makes this easy. For documentary or editorial work, head swaps are generally not acceptable, since they create a moment that did not happen; for portrait and event clients, they are a common, expected service.
Sky replacement
Replacing a dull or overexposed sky with a more attractive one is one of the most common composite techniques, and AI-powered sky replacement tools in Photoshop and other software automate selection, edge blending and colour adjustment of the foreground. A convincing sky replacement requires matching the direction and quality of light: a sunset sky behind a landscape lit by overhead midday sun looks wrong; matching perspective and horizon height, so that clouds are not seen from an impossible angle; matching colour temperature and brightness, adjusting the foreground to reflect the sky's colour; and attention to edges around trees, hair and fine structures. Many photographers maintain a library of their own sky images, shot at different times of day and with different lenses, rather than using stock skies. Sky replacement in documentary, news, real estate and travel images presented as accurate can mislead viewers (Lesson 12).
Building planned composites
Advertising, fine art and conceptual composites are planned from the start. The process typically begins with a sketch or concept; then a plan of the elements needed, the background plate, subjects, props and effects; and a lighting plan that ensures every element is lit from the same direction, with the same quality and colour, from a matching camera height and focal length. Each element is shot separately, often in a studio, with notes of camera position, lens and lighting. In Photoshop, elements are cut out, positioned, scaled and blended, with shadows and reflections added to ground them, followed by global colour grading to unify the image. Composites can contain dozens of layers and take days to complete.
Matching light, perspective, colour and grain
Composites succeed or fail on matching:
- Light: direction, hardness, colour and intensity must match across elements. Shadows must fall in the same direction and have similar softness. Highlights and reflections must make sense for the light sources in the scene.
- Perspective: camera height, angle and focal length should match, so that horizons align and objects appear at believable sizes and angles. Horizon lines and vanishing points can be drawn as guides.
- Colour: elements shot under different light must be matched with curves, colour balance and grading, including the colour of shadows and the ambient colour from surroundings.
- Contrast and black levels: blacks in each element should match; mismatched black levels reveal composites.
- Depth of field and focus: background elements should be as sharp or as blurred as the lens and aperture would make them.
- Grain and noise: elements from different cameras or ISO settings differ in noise; adding a uniform layer of grain unifies them.
- Edges: soft, natural edges matching the image's overall sharpness.
| Mismatch | How viewers notice | Fix |
|---|---|---|
| Light direction | Shadows in different directions | Reshoot elements or paint shadows to match |
| Perspective | Objects at wrong angle or scale | Match camera height and focal length |
| Colour | Elements look pasted on | Curves, colour balance, unified grade |
| Black levels | Shadows of different depth | Match blacks with levels or curves |
| Grain | Some areas cleaner than others | Add uniform grain over the composite |
Generative tools in compositing
Generative AI tools can now create backgrounds, extend scenes, add or remove objects and generate entire elements from text descriptions. They can speed compositing considerably, for example extending a background to fit a wider format, or filling gaps left after moving an element. They raise important questions: generated content may imitate the style or content of other artists' work, the legal status of generated material varies, some clients and competitions forbid generated elements, and audiences may be misled if realistic generated content is presented as photography. Using content credentials, disclosing generative elements where relevant, and checking client and publication policies are responsible practices (Lesson 12).
Light painting and multi-flash composites
Some photographers build images from many exposures lit separately. In architectural and automotive photography, a technique often called light painting or flash compositing involves photographing a subject from a fixed tripod position while moving a single light or flash to different positions for each frame, then combining the best-lit parts of each frame with masks and lighten or screen blend modes. The result looks as if the subject were lit by many large lights simultaneously, without the cost and logistics of a large lighting crew. The technique requires a perfectly stable camera, consistent exposure settings and careful masking, and can involve dozens or hundreds of frames for a single image.
Astrophotography composites
Night sky photographs often combine a long exposure or stack of the sky, tracked or aligned to the stars, with a separate exposure of the foreground, taken at blue hour or with longer exposure and lower ISO for cleaner detail. Blending the two creates images with sharp stars and detailed landscapes that a single exposure could not capture. Ethically, astrophotographers increasingly disclose when sky and foreground were taken at different times or places, since some composites place the Milky Way in positions impossible for the location or season, and competitions often have specific rules.
Matching perspective with guides
When compositing elements shot separately, drawing perspective guides helps ensure they belong together. Mark the horizon line, which sits at the camera's eye level, in each element; if the horizons do not align when placed together, the camera heights differed and the composite will look wrong. Draw vanishing lines along architectural edges or ground features to check that inserted objects follow the same perspective. Matching focal length matters too: wide-angle elements show exaggerated depth and distortion, while telephoto elements look compressed. Recording camera height, distance and focal length when shooting each element makes matching far easier.
Shadows and contact points
Shadows and contact points are where composites most often fail. Every object resting on a surface needs a contact shadow where it touches, darkest and sharpest at the point of contact and softening with distance, and a cast shadow consistent with the scene's light direction and softness. Reflections in shiny floors, water and glass must also be added. Studying how real shadows behave under different light, hard and soft, single and multiple sources, helps create convincing composites.
Common mistakes
MistakeAggressive HDR tone mapping.
InsteadMerge, then edit with restraint for natural results.
MistakeRotating around the wrong point for panoramas.
InsteadRotate around the entrance pupil to avoid parallax.
MistakeSky replacements with mismatched light.
InsteadMatch light direction, colour and perspective.
MistakeMixing elements with different grain.
InsteadAdd uniform grain to unify the composite.
MistakeHead swaps in documentary work.
InsteadReserve them for portrait and event clients.
Summary and key terms
- HDR merging combines brackets into a high-range raw file.
- Exposure blending with masks gives natural, controlled results.
- Panoramas need overlap, matched settings and rotation around the entrance pupil.
- Focus stacking and image averaging extend sharpness and reduce noise.
- Head swaps and sky replacements are common but context-dependent.
- Planned composites match light, perspective, colour, blacks, focus and grain.
- Generative tools speed compositing but raise disclosure and licensing questions.
- HDR merge
- Combining bracketed exposures into one file.
- Deghosting
- Handling moving elements in merged images.
- Exposure blending
- Combining exposures manually with masks.
- Window pull
- Blending an exposure for the view through windows.
- Panorama
- Image stitched from overlapping frames.
- Entrance pupil
- Rotation point that avoids parallax in panoramas.
- Median stacking
- Taking the median pixel value to remove moving objects.
- Head swap
- Replacing a face or head from another frame.
- Sky replacement
- Replacing the sky in an image.
- Composite
- Image built from multiple elements.
Practice problems
Work each problem on paper first, then reveal the answer to check.
What caused the old "HDR look"?
Show answer
Aggressive tone mapping.
Why use exposure blending instead of HDR merge?
Show answer
More control and natural transitions.
Recommended panorama overlap?
Show answer
About 30–50 %.
Why rotate around the entrance pupil?
Show answer
To avoid parallax errors.
Why focus stack at f/8 rather than shoot at f/22?
Show answer
To avoid diffraction softening.
SNR improvement from averaging 9 frames?
Show answer
Three times.
What does median stacking remove?
Show answer
Moving objects such as passers-by.
When are head swaps unacceptable?
Show answer
In documentary and editorial work.
Name three things to match in a composite.
Show answer
Light, perspective, colour, blacks, focus, grain.
Name a concern with generative tools.
Show answer
Disclosure, licensing, client policies, misleading viewers.
Lesson quiz · 5 questions
Score 60% or more to complete this lesson.
Create a free account to save your progress, take quizzes and earn a certificate.