
INS-210 · Lesson 3 of 12 · 23 min
Elbows by segment and gore methods
▶ Video coming soon A video version of this lesson is on the way.
The Kellerton header elbows were NPS 8, long radius, with 76 mm (3 in) of mineral wool, and there were six of them. On the first day of the outage, Devon had tried a three-piece mitre on the first one the way he had done on the Mountview heating water, and the result had gaps at the heel big enough to put a finger in. Marcel looked at it, said nothing, and handed him a calculator and a pad. "Big pipe, thick insulation, more pieces," he said. "Then I'll show you how Tomasz does it in the shop when he can't use pipe covering at all." By the end of the day the elbows had five pieces each, and Devon had his first gore pattern taped inside his notebook.
INS-130 showed how to insulate simple elbows with mitred sections cut from pipe covering, and how to work out the heel and throat of each piece. Those elbows were mostly two, three or four pieces on commercial pipe up to NPS 6. This lesson goes further: elbows on large pipe, elbows with thick or multi-layer insulation, and elbows insulated with flat or flexible material that has to be cut to a pattern. It covers two methods. In the segment method, the elbow is built from many short pieces of rigid pipe covering or block, each cut as a wedge. In the gore method, each piece is laid out as a flat pattern, a gore, and cut from sheet, board or blanket. Shops use the words differently, and some use them interchangeably; in this course, segment means a wedge cut from round covering and gore means a piece cut from flat material to a developed pattern.
A quick review
For an elbow of angle A made of n pieces, there are n − 1 joints. Each joint turns the pipe by θ = A ÷ (n − 1), and each cut face is set at θ ÷ 2 from square. For a middle piece, with R the centreline radius of the elbow and r the outside radius of the insulation:
End pieces are half as long. If R − r is negative, the elbow cannot be built from simple wedges. These rules apply to both methods in this lesson.
Why bigger elbows need more pieces
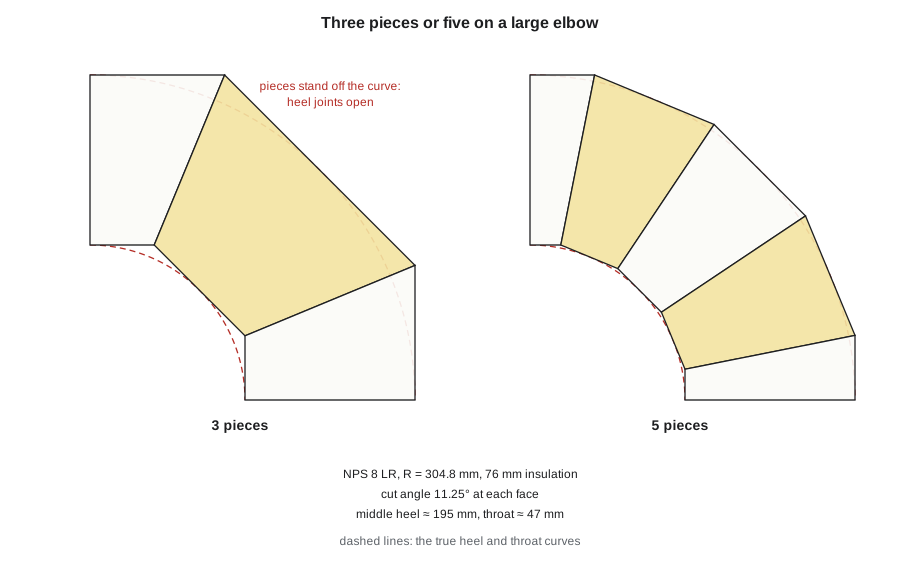
A mitred elbow is a polygon laid around a curve. With few pieces, the straight pieces stand away from the true curve at the middle of each piece and cut inside it at each joint, and the joints at the heel open up. On small pipe with thin insulation, the gap is small enough to fill. On big pipe with thick insulation, the heel is far from the centre of the bend, the pieces are long and the gaps grow. More pieces mean shorter pieces and smaller gaps.
There is no single rule for how many pieces to use, but shops and specifications follow similar habits. A common shop rule, which you should check against your own job, is:
| Pipe size | Typical pieces in a 90° elbow |
|---|---|
| Up to NPS 2 | Preformed cover, or 2 to 3 pieces |
| NPS 2 1/2 to NPS 6 | 3 to 4 pieces |
| NPS 8 to NPS 12 | 5 pieces |
| NPS 14 and larger | 5 to 7 or more, often from block or board |
Thick insulation pushes toward the larger number, because the heel of each piece is further out. Multi-layer insulation is built as separate elbows, one for each layer, with the joints of the outer layer staggered from the joints of the inner layer, the same way the straight sections are staggered.
The segment method on a large elbow
The segment method is the mitre of INS-130 with more pieces. Each piece is cut from pipe covering of the right bore and thickness, with the two faces cut at the cut angle.
Worked problem
A five-piece elbow on NPS 8
The Kellerton header elbows are NPS 8 long radius, R = 304.8 mm, with 76 mm mineral wool. NPS 8 pipe is 219.1 mm across. Find the heel and throat of the middle and end pieces of a five-piece 90° elbow.
Show solution
- Insulation outside radius: r = 219.1 ÷ 2 + 76 = 109.55 + 76 = 185.55 mm.
- Joints: 5 − 1 = 4; θ = 90 ÷ 4 = 22.5°; cut angle 11.25°; tan 11.25° = 0.1989.
- Middle heel: 2 × (304.8 + 185.55) × 0.1989 = 2 × 490.35 × 0.1989 ≈ 195.1 mm.
- Middle throat: 2 × (304.8 − 185.55) × 0.1989 = 2 × 119.25 × 0.1989 ≈ 47.4 mm.
- End pieces: heel ≈ 97.5 mm, throat ≈ 23.7 mm.
- Three middle pieces and two end pieces.
Answer: Middle pieces about 195 mm at the heel and 47 mm at the throat; end pieces about 98 mm and 24 mm. Check: the heels add to 3 × 195.1 + 2 × 97.5 ≈ 780 mm, a little more than the curved heel of π ÷ 2 × 490.35 ≈ 770 mm, as expected.
Compare this with the three-piece elbow Devon tried first. With three pieces, the middle heel would have been 2 × 490.35 × 0.4142 ≈ 406 mm, a long straight piece standing well off the curve, and the heel joints opened up because the covering could not bend to follow the fitting. Five pieces of about 195 mm (7 11/16 in) each follow the curve closely enough that the joints close.
Cutting technique matters more on big elbows than small ones. Mark the heel, throat and side lengths on the closed section with a felt marker, join them with a smooth line using a flexible straightedge or a strip of jacket material wrapped around the covering, and cut with a long, sharp knife or a fine-tooth saw, keeping the blade square to the surface all round. On rigid materials such as calcium silicate and cellular glass, use a saw or a band saw in the shop; a knife will crush the edge. Dry-fit all the pieces before securing any of them.
Segments from block
Very large pipe, NPS 14 and up, and many rigid materials are not made as pipe covering in every size, or the covering is too heavy to handle as a full section. For these, insulators use curved segments or flat block. Curved segments are pieces of rigid insulation shaped to the curve of the pipe, often one third or one quarter of the circumference, that are laid around the pipe like the staves of a barrel. On an elbow, each stave is tapered: it is longer on the heel side and shorter on the throat side, so the ring of staves turns with the elbow.
Another approach for large elbows is to build each segment of the elbow as a ring of staves, cut with angled ends the way a mitred piece is, so that the elbow is still a set of wedges but each wedge is made of several pieces. The geometry is the same as for pipe covering; the work is in cutting the staves to fit each other and the pipe. The gaps between staves are packed with loose insulation of the same kind, or filled with insulating cement, before the outer layer or the jacket goes on.
Note: ASTM C450 is the standard practice for prefabricating and field-fabricating thermal insulating fitting covers for NPS piping, and for vessel lagging and dished head segments. Its companion, ASTM C585, sets the inner and outer diameters of pipe insulation, which you used in INS-130. Shops that make fitting covers in quantity build them to C450.
The gore method: patterns from flat material
Some insulation comes flat: elastomeric sheet, mineral wool board and blanket, flexible glass fibre blanket, removable blanket fabric and metal jacketing. To cover an elbow with flat material, each piece must be cut to a flat shape that wraps around the pipe and meets its neighbours. That shape is a gore pattern. Laying out a gore is a small piece of sheet metal geometry called pattern development, and it is the same geometry the shop uses for elbow jacketing in INS-220.
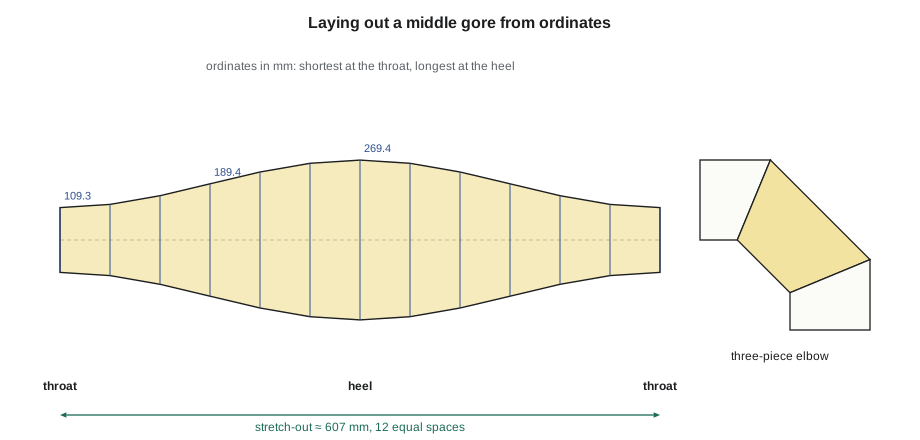
A gore is a short cylinder with angled ends. Wrapped around the pipe, its length varies smoothly from the throat, where it is shortest, to the heel, where it is longest. Unrolled flat, the cylinder becomes a rectangle whose width is the stretch-out, the circumference of the cylinder, and its two angled ends become curves. To lay out the curves, divide the stretch-out into equal parts, usually 12, and work out the length of the gore at each division. If φ is the angle around the pipe measured from the throat, the length of a middle gore at that angle is:
At the throat, φ = 0° and cos φ = 1, which gives the throat formula. At the heel, φ = 180° and cos φ = −1, which gives the heel formula. In between, the lengths follow a smooth curve. For an end gore, use half of each length. Which value of r to use depends on the material: for metal jacketing, it is the radius at the outside of the insulation; for a thick flexible sheet that is bent around the pipe, it is the radius at the middle of the sheet, because the inside is squeezed and the outside stretched, the same reason INS-130 gave for cutting elastomeric sheet to the mid-wall circumference.
Worked problem
A gore pattern for elastomeric sheet
At Friday material school, Tomasz has Devon lay out the middle gore of a three-piece 90° elbow for an NPS 6 long-radius elbow (R = 228.6 mm), using 25 mm elastomeric sheet. NPS 6 is 168.3 mm across. Find the stretch-out, the spacing of 12 divisions and the gore length at each 30° step from throat to heel.
Show solution
- Mid-sheet radius: r = 168.3 ÷ 2 + 25 ÷ 2 = 84.15 + 12.5 = 96.65 mm.
- Stretch-out: 2 × π × 96.65 ≈ 607 mm; 12 spaces of 607 ÷ 12 ≈ 50.6 mm.
- θ = 45°, tan 22.5° = 0.4142, so ℓ = 0.8284 × (228.6 − 96.65 cos φ).
- φ = 0°: 0.8284 × (228.6 − 96.65) ≈ 109.3 mm. φ = 30°: ≈ 120.0 mm. φ = 60°: ≈ 149.3 mm.
- φ = 90°: 0.8284 × 228.6 ≈ 189.4 mm. φ = 120°: ≈ 229.4 mm. φ = 150°: ≈ 258.7 mm. φ = 180°: 0.8284 × (228.6 + 96.65) ≈ 269.4 mm.
Answer: Draw a baseline 607 mm long and divide it into 12 spaces of 50.6 mm. Put the throat at both ends and the heel in the middle. At each division, mark half the gore length above the baseline and half below: 54.7 mm each way at the edges, 134.7 mm each way at the middle. Join the points with smooth curves. The end gores use half of each length, measured from a straight edge.
Laying the ordinates out symmetrically about a centreline, half above and half below, gives a middle gore with two curved ends that are mirror images. Laying them out from a straight baseline gives an end gore, with one straight end that meets the straight pipe insulation and one curved end. Either way, cut one gore, wrap it around the elbow or a piece of pipe of the same size to check it, and then use it as a template for the rest. Elastomeric sheet is glued at its seams and joints with the maker's contact adhesive, applied to both faces, allowed to tack and pressed together, as INS-130 described for sheet on straight pipe.
Fitting, securing and finishing large elbows
- Start with the end pieces or end gores, fitted tight to the straight insulation on each side, then work toward the middle of the bend.
- Close every joint at the heel first; it is the most visible joint and the one most likely to open as the pipe heats and moves.
- Fill small gaps at the throat with cut insulation of the same material; never leave a void.
- Secure rigid pieces with wire or bands at each piece, twisting the wire ends into the insulation, and secure flexible gores with adhesive at every seam.
- On multi-layer work, build and secure the inner elbow, then build the outer one with its joints staggered.
- Finish with the specified finish: a preformed cover, cement and cloth (lesson 9), or a metal jacket (INS-220). On cold work, the vapour retarder must be continuous over the whole elbow, sealed to the straight pipe jacket on each side.
Common mistakes
MistakeUsing a three-piece mitre on a large elbow with thick insulation.
InsteadUse more pieces: typically five or more from NPS 8 up.
MistakeUsing the pipe radius instead of the insulation outside radius for heel and throat.
InsteadUse r = half the pipe OD plus the insulation thickness; for thick sheet gores, use the mid-sheet radius.
MistakeCutting rigid block with a knife.
InsteadSaw rigid materials so edges stay square and uncrushed.
MistakeLining up the joints of inner and outer layers on a two-layer elbow.
InsteadStagger the outer joints from the inner joints.
MistakeCutting every gore freehand.
InsteadLay out one gore from ordinates, check it on the fitting and use it as a template.
Summary and key terms
- Large elbows need more pieces so the joints follow the curve: typically five or more from NPS 8 up.
- The segment method builds the elbow from wedges of pipe covering or block, using the heel and throat formulas.
- Very large or rigid work uses curved segments or staves, tapered from heel to throat, with gaps packed full.
- The gore method lays out each piece as a flat pattern: stretch-out divided into 12 parts, with a length at each division of 2(R − r cos φ) tan(θ/2).
- For thick flexible sheet, use the mid-sheet radius; for jacketing, the insulation outside radius.
- Fit end pieces first, close the heel joints, fill every gap, stagger layers and finish as specified.
- Segment method
- Building an elbow from wedge-shaped pieces cut from pipe covering or block.
- Gore
- In this course, one piece of an elbow cut from flat material to a developed pattern.
- Gore method
- Building an elbow from flat material cut to gore patterns.
- Pattern development
- Laying out the flat shape that wraps or bends into a three-dimensional part.
- Stretch-out
- The flat width of a pattern that wraps around a cylinder: its circumference.
- Ordinate
- A length measured at a division line on a pattern, used to plot a curve.
- Stave
- A curved or flat strip of rigid insulation laid lengthwise around a large pipe.
- ASTM C450
- The standard practice for prefabricating and field-fabricating thermal insulating fitting covers.
Practice problems
Work each problem on paper first, then reveal the answer to check.
How many joints does a five-piece 90° elbow have, and what is the cut angle?
Show answer
Four joints; each turns 22.5°, so each face is cut at 11.25°.
For R = 381 mm and r = 212.6 mm, find the middle heel of a five-piece 90° elbow.
Show answer
2 × 593.6 × 0.1989 ≈ 236 mm.
What is the stretch-out of a gore for jacketing over insulation 320 mm across?
Show answer
π × 320 ≈ 1,005 mm.
For a middle gore, where is the ordinate shortest and where longest?
Show answer
Shortest at the throat (φ = 0°), longest at the heel (φ = 180°).
Why is the mid-sheet radius used for a gore cut from thick elastomeric sheet?
Show answer
The inside of the sheet is squeezed and the outside stretched when it bends, so the middle keeps its length.
Lesson quiz · 5 questions
Score 60% or more to complete this lesson.
Create a free account to save your progress, take quizzes and earn a certificate.