
INS-210 · Lesson 2 of 12 · 25 min
Measuring fittings for layout
▶ Video coming soon A video version of this lesson is on the way.
Marcel's measuring kit fitted in a canvas bag: a 5 m (16 ft) tape, a cloth wrap tape, a combination square, a pair of outside calipers, a small protractor, a contour gauge, a notebook of printed sketch sheets and a felt marker. On the Monday after the outage, he and Devon went back to the Kellerton boiler house to measure every item on the survey for a quote on removable covers. "Anyone can measure a pipe," Marcel said. "Measuring a valve so a cover made in a shop forty kilometres away fits the first time, that's the skill." At the first valve he drew a quick sketch, lettered every dimension A to H and had Devon read each one back twice.
Every piece of fitting insulation starts with measurements. For an elbow made from pipe covering, you need the pipe size, the elbow's radius and its angle. For a valve, a strainer or a flange, you need enough measurements to describe a three-dimensional shape: lengths, diameters, heights and the clearances around it. For a removable cover made in a shop, the measurements must be complete and clear enough that someone who has never seen the fitting can build a cover that fits. This lesson covers the tools, what to measure on each kind of fitting, how to record it and the common mistakes that make covers fail to fit.
Tools for measuring fittings
- Tape measure: for lengths, face-to-face dimensions, heights and clearances. Hook the end on a firm edge and read square to the work.
- Wrap tape or a strip of paper: for circumferences of pipe, insulation, valve bodies and flanges. Divide by π to get the diameter, as in INS-130.
- Combination square: to measure from a flat face to a point, such as the centre-to-face dimension of an elbow, and to check right angles.
- Outside calipers: to measure the diameter of a valve body or bonnet where a tape cannot go straight across.
- Protractor or angle finder: for the angle of elbows and offsets that are not 90° or 45°.
- Contour gauge: a row of sliding pins that takes the profile of an odd shape, such as the side of a valve body or a strainer cap, so it can be traced onto paper.
- Sketch sheets and a marker: every fitting is drawn, lettered and photographed with the tape in the picture.
On hot systems, measure only what you can reach safely. A live steam valve is at the temperature of the steam, and a tape or a hand on it will burn. Measure cold systems or systems shut down for an outage where possible; on live systems, keep tools and gloves off the metal and take diameters from the circumference of nearby insulation or from the size marked on the fitting, then check later.
Measuring an elbow
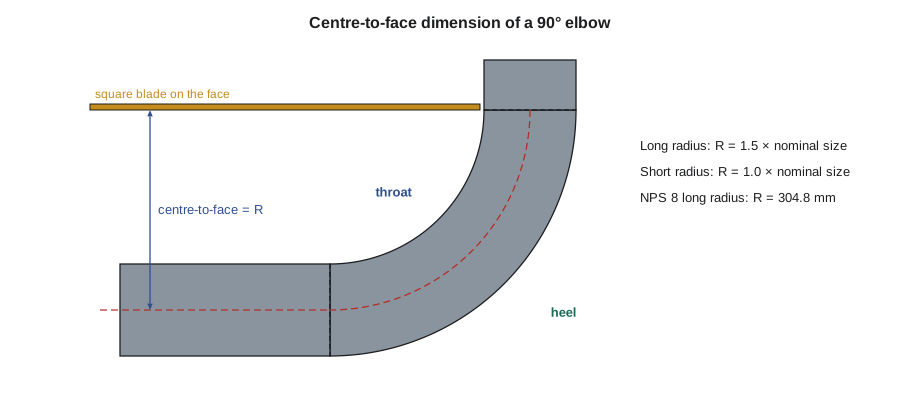
For an elbow made from pipe covering, three measurements fix everything: the pipe size, the angle and the centreline radius. INS-130 showed how the radius sets the heel and throat lengths of each piece. You can usually find the radius from the pipe size: a long-radius butt-welded elbow has a centreline radius of 1.5 times the nominal size, a short-radius elbow 1.0 times. But elbows are not always what the drawing says, so check on site.
The quickest check is the centre-to-face dimension. On a 90° elbow, it is the distance from the face of one end to the centreline of the other leg. For a 90° elbow, the centre-to-face dimension equals the centreline radius. Lay the blade of a square against the face of one end, or against the straight pipe beyond it, and measure from the blade to the centreline of the other leg, which is half the pipe's outside diameter in from its side.
Worked problem
Long radius or short?
On the Kellerton condensate return, Devon measures an NPS 8 elbow. From the square against the face of one end to the outside of the other leg is 415 mm. NPS 8 pipe is 219.1 mm across. Is the elbow long radius or short radius?
Show solution
- Centre-to-face = measurement to outside − half the pipe diameter = 415 − 219.1 ÷ 2 = 415 − 109.55 ≈ 305 mm.
- Long radius: 1.5 × 203.2 = 304.8 mm. Short radius: 203.2 mm.
- 305 mm matches long radius.
Answer: Long radius, R ≈ 305 mm. Devon writes "NPS 8 LR 90" on the sketch, with the measured 305 mm beside it so the shop does not have to trust the drawing.
Elbows that are not 90° or 45° turn up wherever pipe has been fitted to a building rather than to a drawing. A pipefitter may cut a 90° elbow down to make an offset. Measure the angle with a protractor laid along the two straight legs, or work it out from the rise and run of the offset.
Worked problem
An odd angle
A heating water offset in the Mountview penthouse rises 300 mm over a horizontal run of 520 mm between the centrelines of its two elbows. What angle are the elbows?
Show solution
- The offset leg makes an angle with the horizontal of arctan(rise ÷ run).
- arctan(300 ÷ 520) = arctan(0.577) ≈ 30.0°.
- Each elbow turns the pipe by that angle.
Answer: Each elbow is a 30° elbow, cut down from a 90°. For mitred insulation, the cut angles follow the INS-130 rule with A = 30°: for three pieces, 30 ÷ 4 = 7.5° at each face.
Measuring a valve
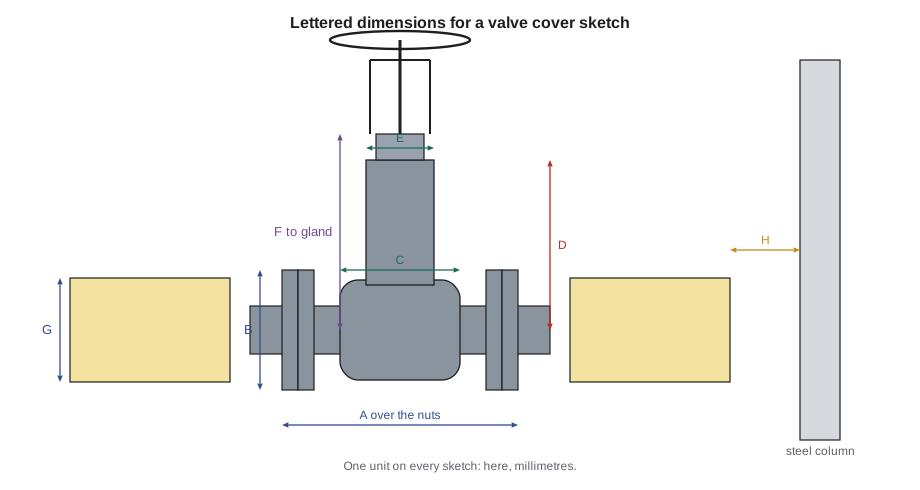
A valve is the most complicated fitting most insulators measure. The body is wider than the pipe, the bonnet rises above it, the flanges stick out at each end, and the stem, packing gland and handwheel must stay clear. For a permanent fabricated cover, a box or a removable blanket, measure:
- A: the length over the flanged joints, from the outside of the nuts at one end to the outside of the nuts at the other. On a flanged valve, this is the face-to-face length of the valve plus the mating pipe flanges and the bolts.
- B: the flange outside diameter, by circumference or across with calipers, and the length of the studs beyond the nuts.
- C: the body diameter at its widest point.
- D: the height from the pipe centreline to the top of the bonnet, where the insulation will stop.
- E: the bonnet diameter.
- F: the height to the packing gland and the stem: the insulation stops below the gland so it can be tightened and repacked.
- G: the outside diameter of the insulation on the pipe on each side, where the cover will overlap.
- H: clearances: the distance to walls, floors, steel and other pipes, and anything that limits how thick or how wide the cover can be.
Also record the valve type, the size and pressure class from the body markings, which way the stem points (straight up, sideways, at an angle or down), what kind of operator it has (handwheel, lever, chain wheel or actuator), the service and temperature, and whether the fitting is indoors or outdoors. A removable blanket maker needs all of these.
Worked problem
Sizing a valve cover
Devon measures an NPS 6 Class 150 gate valve on the Kellerton steam: length over the nuts A = 400 mm, flange outside diameter B = 279 mm. The pipe on each side has 76 mm of mineral wool. The cover is to fit 6 mm clear of the flanges all round, overlap the pipe insulation 50 mm at each end and be 76 mm thick. Find the cover length, its inside diameter at the flanges and its outside diameter.
Show solution
- Length: 400 + 2 × 50 = 500 mm.
- Inside diameter: 279 + 2 × 6 = 291 mm, say 292 mm.
- Outside diameter: 292 + 2 × 76 = 444 mm.
- Check the overlap: the pipe insulation is 168.3 + 2 × 76 ≈ 320 mm across, well inside the cover's 444 mm, so the cover ends need a closing collar or end flap from 320 mm out to 444 mm.
Answer: A cover about 500 mm long, 292 mm inside and 444 mm outside at the flanges, with end collars that close down onto the 320 mm pipe insulation. Devon also records the bonnet: D = 510 mm to the top of the bonnet, E = 190 mm across, and F = 470 mm to the bottom of the packing gland, where the cover's bonnet section must stop.
Measuring flanges, strainers and specialties
A flange pair needs fewer measurements: the flange outside diameter, the thickness of the pair over the nuts, the stud projection beyond the nuts on each side and the insulation diameter on the pipe on each side. The stud length matters because the insulation on each side of a flange must stop back far enough that the studs can be pulled out without cutting the insulation; lesson 6 covers the details.
A Y-strainer has a body, a screen chamber that sticks out at an angle and a cap or blowdown valve at the end of the chamber. Measure the body as you would a valve, then the chamber's length, diameter and angle, and the cap or blowdown fitting that must stay clear. Traps, gauges, thermometer wells, test ports, unions and expansion joints each have their own rules, which lesson 7 covers. For all of them, the first measurement is the one that tells you what must stay accessible.
Recording measurements
Measurements are only useful if someone else can read them. Coldstream uses a printed sketch sheet for each fitting, with these parts:
- Tag: a number for the item, such as KF-BH-017 for the seventeenth item in the Kellerton boiler house, also written on a tag wired to the fitting.
- Location: building, room, line number or service, elevation, and a note such as "east wall, above the condensate pump".
- Fitting: type, size, pressure class, maker if visible, stem direction and operator.
- Sketch: a simple side view and end view, with each dimension lettered and recorded in a table beside it, in one unit, stated.
- Service: fluid, temperature, indoor or outdoor, and any washdown, chemical or traffic exposure.
- Photograph: at least one photo of the fitting with the tape visible and the tag in view.
Write every number in one unit system. On Canadian jobs most specifications and suppliers work in millimetres, but many fittings are marked in inches and many shop patterns are drawn in inches; on US jobs the work is almost all in inches. Whatever the job uses, never mix the two on one sketch, and write the unit beside the table. A blanket made from a sketch where A was in inches and B in millimetres will not fit anything.
Common measuring mistakes
Covers and fabricated fittings that do not fit usually fail for a handful of reasons. The most common are:
- Measuring the pipe instead of the insulation where the cover will overlap, so the end collars are too small.
- Forgetting the bolts: measuring flange to flange instead of over the nuts and studs.
- Missing the stem direction or the operator, so the stem opening is in the wrong place.
- Not recording a nearby wall, beam or pipe that stops the cover from being as thick as planned.
- Trusting the drawing for elbow radius or valve type when the installed fitting is different.
- Measuring a hot fitting by guesswork because it could not be reached, and not marking the number as an estimate.
Note: On an outage or a new installation, measure after the fitting is installed and before anything else is fitted around it. Measurements taken from a fitting lying on the floor before it is bolted in miss the gasket thickness, the bolts and the clearances that only exist once it is in place.
Common mistakes
MistakeTaking the elbow radius from the drawing.
InsteadCheck the centre-to-face dimension on site; it equals R on a 90° elbow.
MistakeMeasuring a valve flange to flange.
InsteadMeasure over the nuts and studs, and record the stud projection.
MistakeMixing millimetres and inches on one sketch.
InsteadUse one unit on each sketch and write it beside the table.
MistakeLeaving out the stem direction and operator.
InsteadRecord the stem direction, the operator and the height to the packing gland.
MistakeRecording a measurement without a tag or location.
InsteadGive every item a tag number, a location and a photograph with the tape in view.
Summary and key terms
- Fitting insulation starts with measurements complete enough for someone else to build from.
- Use a tape, wrap tape, square, calipers, protractor, contour gauge and a sketch sheet; measure hot fittings only where it is safe.
- On a 90° elbow, the centre-to-face dimension equals the centreline radius; long radius is 1.5 × nominal size, short radius 1.0 ×.
- Odd angles can be measured with a protractor or found from the rise and run of an offset.
- For a valve, record the length over the nuts, flange and body diameters, bonnet height and diameter, height to the gland, adjoining insulation diameter and clearances.
- Record each fitting with a tag, location, type, sketch, one unit system, service details and a photograph.
- Centre-to-face dimension
- On an elbow, the distance from the face of one end to the centreline of the other leg; on a 90° elbow it equals the centreline radius.
- Face-to-face length
- The length of a flanged valve or fitting between the faces of its end flanges.
- Bonnet
- The part of a valve that rises above the body and carries the stem.
- Packing gland
- The part of a valve that compresses the packing around the stem to stop leaks.
- Contour gauge
- A tool with sliding pins that copies the profile of an irregular shape.
- Sketch sheet
- A form for drawing a fitting with lettered dimensions, a tag and service details.
- Tag
- A number given to each fitting on a survey, written on the sketch and wired to the fitting.
Practice problems
Work each problem on paper first, then reveal the answer to check.
What three measurements fix an elbow made from pipe covering?
Show answer
Pipe size, angle and centreline radius.
A square to the outside of the other leg of an NPS 6 elbow reads 313 mm. NPS 6 is 168.3 mm across. What is R?
Show answer
313 − 84.15 ≈ 229 mm, long radius (1.5 × 152.4 = 228.6 mm).
An offset rises 250 mm over a run of 250 mm. What angle are the elbows?
Show answer
arctan(1) = 45°.
Why is the length of a valve measured over the nuts rather than flange to flange?
Show answer
The cover must clear the bolts and studs, which stick out beyond the flanges.
Where should the bonnet section of a hot valve cover stop?
Show answer
Below the packing gland, so the gland can be tightened and repacked.
Lesson quiz · 5 questions
Score 60% or more to complete this lesson.
Create a free account to save your progress, take quizzes and earn a certificate.