
INS-130 · Lesson 7 of 12 · 25 min
Tees and branch connections
▶ Video coming soon A video version of this lesson is on the way.
The heating water main on the Mountview second floor had a branch every few metres, one to each fan coil and reheat coil along the corridor. Devon's first tee looked as if a dog had chewed it. He had cut a ragged hole in the main covering, pushed the branch covering against it and filled the gaps with scraps. Bernie took a marker and drew on the end of a fresh piece of branch covering: a curve that dipped at the sides and rose at the top and bottom. "The branch has to sit on a round main," she said. "So the end of the branch has to be round the same way. Cut it like a saddle and it'll sit there by itself."
Wherever a branch leaves a main, the insulation on the branch has to meet the insulation on the main with no gap. A tee joint in insulation is one of the most common places for heat loss on hot lines and for condensation on cold ones, because it is easy to leave a hidden gap where the pieces meet. This lesson covers how branches are made in piping, how to insulate them by notching the main covering and shaping the end of the branch covering, how to lay out the shape and when to use preformed tee covers.
How branches are made
Pipefitters and plumbers make branches in several ways, and each one shapes the insulation job:
- Tee fittings: a manufactured fitting with three openings. An equal tee has a branch the same size as the main; a reducing tee has a smaller branch. Tees in welded steel, threaded steel, grooved steel and soldered or pressed copper all look different but present the insulator with the same problem: a short stub where the branch leaves the main.
- Welded branch outlets: a fitting welded onto the main over a hole, such as a weld-on outlet or a stub-in branch. These leave the main straight with a short raised fitting at the branch.
- Mechanical tees and saddle outlets: clamped fittings on the main with a branch outlet, common on grooved and some copper systems.
Whatever the fitting, the insulation on the main runs past the branch, and the insulation on the branch runs from the main out along the branch pipe. The two meet at the outer surface of the main's insulation.
The basic method: notch the main, saddle the branch
The method Bernie showed Devon works on most commercial branches:
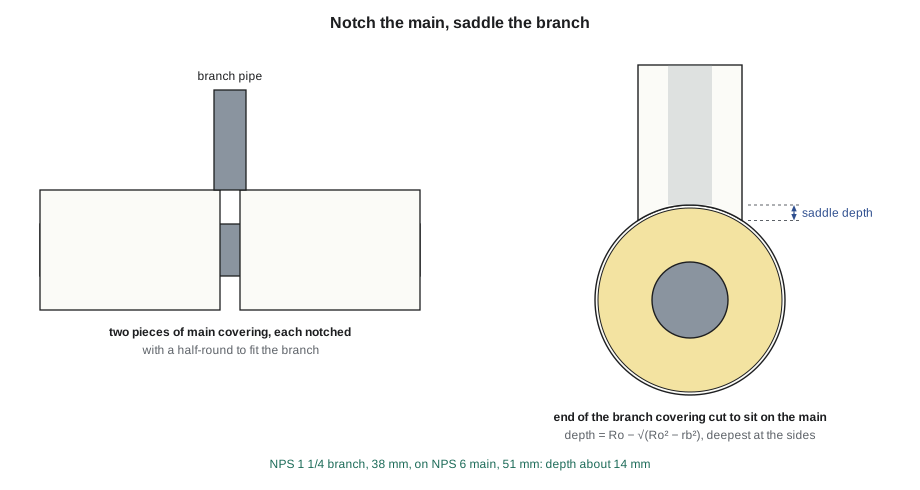
- Insulate the main up to the branch. At the branch, cut two pieces of main covering so their ends meet at the centreline of the branch, and notch each end with a half-round notch the size of the branch pipe, so together they form a round hole that fits snugly around the branch. On a larger branch fitting, notch to the fitting's outside size.
- Close the two pieces around the main, with the notches around the branch, and secure them. The main insulation is now continuous past the branch, with the branch pipe coming out through a tight hole.
- Cut the end of the first piece of branch covering to the shape of the main insulation's outside surface. This curved cut is called a saddle or a fish-mouth cut. It lets the branch covering sit tightly on the main covering all the way round.
- Fit the branch covering over the branch pipe and down onto the main covering. Fill any small gaps with cut insulation, then seal the joint and continue along the branch.
- Finish the joint as the specification requires: tape, a wrap of jacket material, mastic and glass cloth, or a preformed tee cover. On cold work, the vapour retarder must be continuous from the main to the branch and every joint sealed.
The shape of the saddle
The end of the branch covering has to follow the curve of the main insulation. Seen from the side of the main, the saddle is deepest at the two points that face along the main's sides and is not cut at all at the two points that face along the main's length. The depth at the sides is the amount the outside of the main insulation curves away over the width of the branch insulation. If Ro is the outside radius of the main insulation and rb is the outside radius of the branch insulation, the deepest cut is:
When the branch is much smaller than the main, the saddle is shallow and a small curve cut by eye often fits. When the branch is nearly as large as the main, the saddle is deep, and for an equal tee, where the two insulation outside diameters are the same, the depth equals the whole outside radius: the end of the branch covering is cut to a full half-round on each side, the classic fish-mouth.
Worked problem
Saddle depth for a reducing tee
On the Mountview second floor, an NPS 1 1/4 branch leaves an NPS 6 heating water main. The main has 51 mm insulation and the branch 38 mm. How deep is the saddle at its deepest point?
Show solution
- Main insulation outside radius: Ro = 168.3 ÷ 2 + 51 = 84.15 + 51 = 135.15 mm.
- Branch insulation outside radius: rb = 42.2 ÷ 2 + 38 = 21.1 + 38 = 59.1 mm.
- Ro² = 135.15² ≈ 18,265.5; rb² = 59.1² ≈ 3,492.8.
- Square root of the difference: √14,772.7 ≈ 121.54 mm.
- Depth: 135.15 − 121.54 ≈ 13.6 mm.
Answer: About 14 mm at the sides, tapering to nothing at the top and bottom. A straight cut would leave a 14 mm gap at each side of the joint.
Laying out the saddle
For a neat, tight fit on larger branches, insulators lay out the saddle with a few measurements instead of cutting by eye. The layout uses ordinates, measured depths at points around the end of the branch covering:
- Divide the circumference of the branch covering into 12 equal parts, and mark the 12 points around its end. Label the point that will face along the main 0°, then 30°, 60° and 90°, where 90° faces the side of the main.
- At each point, the depth of cut is Ro − √(Ro² − (rb × sin φ)²), where φ is the angle of the point. The depths repeat in each quarter: the same at 30° as at 150°, 210° and 330°, and so on.
- Measure each depth back from the square end of the covering along its length, mark it, and join the marks with a smooth curve.
- Cut along the curve with a sharp knife, then test the fit on the main and trim.
Worked problem
Ordinates for the saddle
For the NPS 1 1/4 branch on the NPS 6 main above, find the depths at 0°, 30°, 60° and 90°, and the spacing of the 12 marks around the branch covering.
Show solution
- 0°: sin 0° = 0, so depth 0 mm.
- 30°: rb × sin 30° = 59.1 × 0.5 = 29.55 mm; depth 135.15 − √(18,265.5 − 873.2) = 135.15 − 131.88 ≈ 3.3 mm.
- 60°: rb × sin 60° = 59.1 × 0.8660 = 51.18 mm; depth 135.15 − √(18,265.5 − 2,619.6) = 135.15 − 125.08 ≈ 10.1 mm.
- 90°: the full depth, 13.6 mm.
- Branch covering circumference: 2 × 3.1416 × 59.1 ≈ 371 mm; spacing of 12 marks: 371 ÷ 12 ≈ 30.9 mm.
Answer: Depths of 0, 3.3, 10.1 and 13.6 mm at 0°, 30°, 60° and 90°, with marks every 30.9 mm around the covering.
Tomasz keeps a card in the shop with the ordinates for the common main and branch combinations on Coldstream's commercial jobs, so crews do not have to work them out on a ladder. For very small branches on large mains, the saddle is so shallow that a straight cut with a little trimming fits well enough, and many insulators make it by pressing the branch covering against the main and cutting along the mark it leaves.
Equal tees and branches near fittings
An equal tee has the deepest saddle of all. Because Ro and rb are equal, the cut at the sides goes all the way to the centreline of the branch covering, and the piece looks like a fish's open mouth. On an equal tee, the main covering's notches must be large enough for the whole branch pipe or fitting, which may leave only narrow strips of main insulation at the sides of the branch. Many insulators prefer a preformed tee cover on equal tees in small and medium sizes, or build up the joint with cut pieces and finish with mastic and glass cloth.
Branches often leave the main close to an elbow, a valve or a hanger. When the space between the branch and the next fitting is shorter than a practical piece of covering, the pieces can be combined: a single piece of main covering notched for the branch and cut to fit the elbow at its other end, for example. Where a hanger is within a few hundred millimetres of a branch, check that the insert and shield will clear the branch insulation; if not, the hanger may need to move, which is the mechanical contractor's decision.
Valves on branches, such as the balancing valves and isolation valves on the Mountview fan coil branches, are covered in INS-210. For now, note that many specifications leave valve bodies and their handles accessible, with the branch insulation stopping at the valve and a removable cover or a separate fitting insulation applied later.
Preformed tee covers
Preformed PVC tee covers work like elbow covers: a moulded shell in two halves, sized for the main and branch, closed over a fibrous insert wrapped around the tee. They are quick and neat on small and medium commercial piping and on domestic water. The ends of the cover overlap the jacket of the main and branch covering and are sealed with tape or adhesive. On cold work, every seam and every end must be sealed so the vapour retarder is continuous.
Tee covers come in a limited range of sizes and insulation thicknesses. A cover for an NPS 2 tee with 25 mm (1 in) insulation will not fit over 38 mm (1 1/2 in), and a reducing tee often needs a cover sized for the main with the branch end trimmed to the branch, or a cover for the next size combination. As with elbows, if the specification requires full thickness on fittings, a cover that only fits thinner insulation is not acceptable.
Sealing the joint
However a tee is insulated, the joint between the main and the branch is three-dimensional and hard to seal with flat tape. The usual finishes are:
- On hot work with ASJ, short strips of ASJ tape applied in overlapping pieces around the joint, each pressed into the curve, or a wrap of jacket material cut to fit.
- On hot and cold work, a coat of mastic reinforced with glass cloth or a polyester fabric over the joint, lapping onto the jacket of the main and the branch. On cold work, this must be a vapour retarder mastic.
- A preformed tee cover, sealed at the seams and ends.
- On elastomeric foam, glued joints: the saddle end of the branch tubing is glued to the main tubing with the maker's adhesive, and the hole in the main is glued around the branch.
Bernie's test for a tee on a cold line is the same as for everything else on a cold line: "If air can get in, water will." Before closing up a tee, Devon learned to press around the joint with his fingertips and feel for soft spots or gaps under the finish.
Worked problem
Counting tees for an estimate
A 36 m length of the Mountview second floor heating water main has 11 branches to fan coils, each of which needs a tee joint in the insulation, and 4 elbows. Coldstream's estimating sheet allows 0.25 hours for each tee joint with a saddle on a main of NPS 4 or larger and 0.20 hours for each elbow, on top of the straight pipe. How many hours do the fittings add?
Show solution
- Tees: 11 × 0.25 = 2.75 hours.
- Elbows: 4 × 0.20 = 0.80 hours.
- Total: 2.75 + 0.80 = 3.55 hours.
Answer: About 3.5 hours for the fittings alone. On commercial work, fittings can take as long as the straight pipe they interrupt, which is why estimators count them one by one.
Common mistakes
MistakeCutting a ragged hole in the main covering and filling the gaps with scraps.
InsteadNotch two pieces of main covering to form a snug round hole around the branch.
MistakeCutting the end of the branch covering square.
InsteadCut a saddle so the branch covering sits on the curve of the main insulation.
MistakeMaking the saddle deepest at the top and bottom.
InsteadThe deepest cut is at the points facing the sides of the main; there is no cut at the points facing along the main.
MistakeUsing a tee cover made for thinner insulation.
InsteadUse a cover that fits the specified thickness, or build up the joint another way.
MistakeSealing a cold tee with a few strips of tape that leave gaps.
InsteadUse vapour retarder mastic and fabric, or a sealed cover, so the vapour retarder is continuous.
MistakeIgnoring a hanger next to a branch.
InsteadCheck that the insert and shield clear the branch insulation; report conflicts.
Summary and key terms
- At a branch, the main insulation runs past the branch and the branch insulation meets the outside of the main insulation.
- Notch two pieces of main covering to form a snug hole around the branch pipe or fitting.
- Cut the end of the branch covering to a saddle, deepest at the sides: depth = Ro − √(Ro² − rb²).
- For a neat fit, lay out the saddle with ordinates at 12 points around the branch covering.
- Equal tees have a full fish-mouth cut; small branches on large mains need only a shallow curve.
- Preformed tee covers are fast and neat but must match the insulation thickness and be sealed on cold work.
- Seal tee joints with tape strips, mastic and fabric or a sealed cover; on cold work the vapour retarder must be continuous.
- Equal tee
- A tee with a branch the same size as the main.
- Reducing tee
- A tee with a branch smaller than the main.
- Branch outlet
- A fitting welded or clamped onto a main to make a branch connection.
- Saddle cut
- A curved cut on the end of the branch covering so it sits on the round main insulation; called a fish-mouth on equal tees.
- Ordinate
- A measured depth at a point around the end of a piece, used to lay out a curved cut.
- Tee cover
- A preformed shell, usually PVC, that fits over a fibrous insert on a tee.
- Glass cloth
- A woven glass fabric embedded in mastic to reinforce a finish.
Practice problems
Work each problem on paper first, then reveal the answer to check.
Where is the saddle on a branch covering deepest?
Show answer
At the two points facing the sides of the main.
Find the saddle depth for Ro = 100 mm and rb = 60 mm.
Show answer
100 − √(10,000 − 3,600) = 100 − 80 = 20 mm.
For an equal tee, what is the saddle depth?
Show answer
The full outside radius of the insulation, a complete fish-mouth.
Branch covering with an outside radius of 50 mm is divided into 12 marks. How far apart are they?
Show answer
2 × 3.1416 × 50 ÷ 12 ≈ 26.2 mm.
Eight tee joints at 0.25 hours and six elbows at 0.20 hours add how many hours?
Show answer
2.0 + 1.2 = 3.2 hours.
Lesson quiz · 5 questions
Score 60% or more to complete this lesson.
Create a free account to save your progress, take quizzes and earn a certificate.