
INS-130 · Lesson 6 of 12 · 24 min
Simple elbows with mitred sections
▶ Video coming soon A video version of this lesson is on the way.
Tessa kept a scrap of plywood in her bucket with a single line drawn across it and three numbers written beside it in marker. "Heel, throat, centre," she said, and set a section of pipe covering on it. "Every elbow on this job is one of about six sizes. Work out the numbers once, write them down, and you're cutting elbows instead of guessing at them." By the end of the day Devon had his own board, and his elbows on the Mountview heating water mains closed without a gap at the heel.
Elbows change the direction of a pipe, and every change of direction needs insulation that follows the curve. On commercial work, elbows are insulated in one of three ways: with preformed fitting covers, with mitred sections cut from straight pipe covering, or with insulation shaped from blanket or cement. Larger and more complex fittings, and the segment and gore methods for big elbows, are covered in INS-210. This lesson covers the simple elbows that make up most of a commercial job: how elbows are described, how to cut mitred sections from pipe covering, how to work out their lengths and when a preformed cover is the better choice.
Describing an elbow
An elbow is described by its angle, usually 90° or 45°, and by its radius. The centreline radius is the distance from the centre of the bend to the centreline of the pipe through the elbow. For butt-welded steel fittings there are two common radii:
- A long-radius elbow has a centreline radius of 1.5 times the nominal pipe size. An NPS 4 long-radius elbow has a radius of 1.5 × 101.6 mm (4 in) = 152.4 mm (6 in).
- A short-radius elbow has a centreline radius equal to the nominal size: 101.6 mm (4 in) for NPS 4.
Long-radius elbows are standard in most welded piping. Threaded, grooved, soldered and pressed fittings on smaller pipe have much tighter bends; copper wrought elbows for water tube turn in a much shorter distance than long-radius steel elbows of the same size. The tighter the bend, the harder it is to insulate with mitred sections, for a reason the calculations below make clear.
Three other terms describe the insulation on an elbow:
- The heel is the outside of the bend, the longest line around the elbow.
- The throat is the inside of the bend, the shortest line.
- The tangent lines are the two points where the curve of the fitting meets the straight pipe. Lesson 2 described them as the end points for straight covering.
Mitred sections
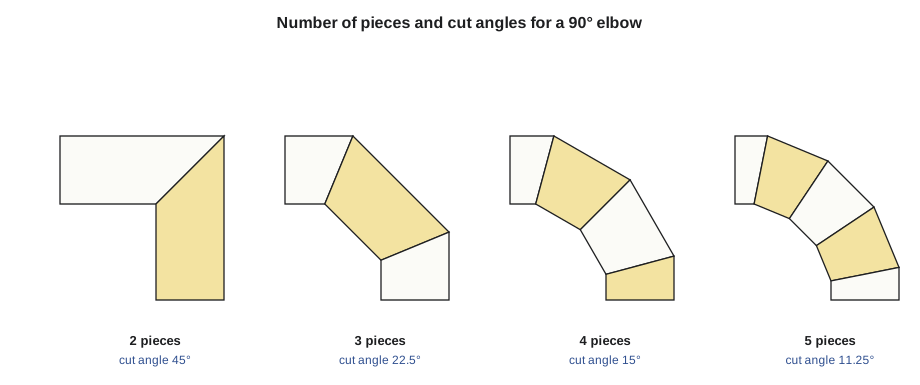
A mitred elbow is built from short pieces of straight pipe covering, cut at an angle at each end so that they fit together around the curve. Each piece is a segment. The two end segments are cut square at the end that meets the straight covering and at an angle at the other end. The middle segments are cut at an angle at both ends. A mitred elbow has an even number of half-segments: two end pieces, each the equivalent of half a segment, and any number of full middle pieces.
The more pieces, the closer the insulation follows the curve, but each extra piece is another joint to cut and seal. For simple 90° elbows on commercial pipe, three or four pieces are common; two-piece elbows, with one cut at 45°, are used only on small pipe where the result is hidden. The angles follow a simple rule. If an elbow of angle A is made of n pieces, there are n − 1 joints, each joint turns the pipe by A ÷ (n − 1), and each cut face is set at half of that from square.
| Pieces in a 90° elbow | Joints | Turn at each joint | Cut angle at each face |
|---|---|---|---|
| 2 | 1 | 90° | 45° |
| 3 | 2 | 45° | 22.5° |
| 4 | 3 | 30° | 15° |
| 5 | 4 | 22.5° | 11.25° |
Working out the segment lengths
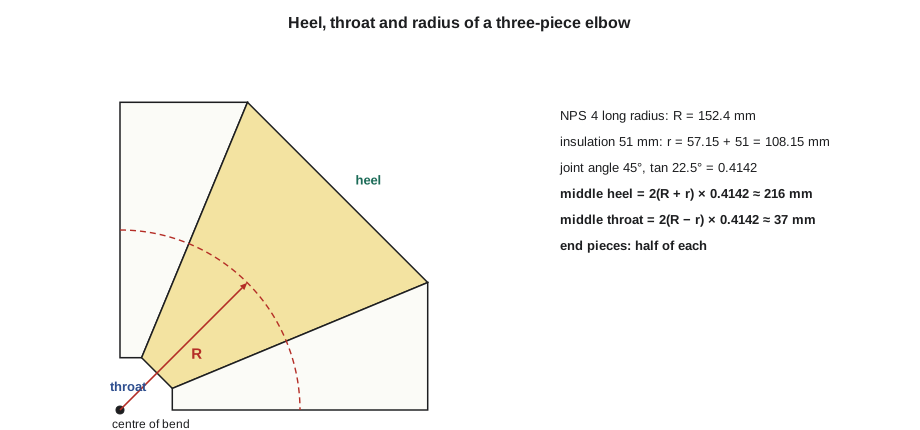
A segment is longest along the heel and shortest along the throat. Its length at any point depends on how far that point is from the centre of the bend. If R is the centreline radius of the elbow and r is the outside radius of the insulation, half the insulation outside diameter, then for each middle segment, with each joint turning the pipe by an angle θ:
Each end segment is half a middle segment: the same formulas without the 2. These lengths are measured along the outside of the section, at the heel, the throat and the side. The tangent of half the joint angle is 0.4142 for a three-piece 90° elbow (half of 45° is 22.5°) and 0.2679 for a four-piece elbow (half of 30° is 15°).
Worked problem
A three-piece elbow on NPS 4
Devon is insulating NPS 4 long-radius elbows on the Mountview heating water main with 51 mm glass fibre covering, three pieces to a 90° elbow. Find the heel, throat and centre lengths of the middle segment and the end segments.
Show solution
- Centreline radius: R = 152.4 mm.
- Insulation outside radius: r = 114.3 ÷ 2 + 51 = 57.15 + 51 = 108.15 mm.
- Joint angle: θ = 90 ÷ 2 = 45°; tan 22.5° = 0.4142.
- Middle heel: 2 × (152.4 + 108.15) × 0.4142 = 2 × 260.55 × 0.4142 ≈ 215.9 mm.
- Middle throat: 2 × (152.4 − 108.15) × 0.4142 = 2 × 44.25 × 0.4142 ≈ 36.7 mm.
- Middle centre: 2 × 152.4 × 0.4142 ≈ 126.3 mm.
- End segments are half: heel ≈ 107.9 mm, throat ≈ 18.3 mm, centre ≈ 63.1 mm.
Answer: Middle segment: about 216 mm at the heel and 37 mm at the throat. End segments: about 108 mm at the heel and 18 mm at the throat. Tessa writes these on her board for NPS 4 with 51 mm.
Worked problem
The same elbow in four pieces
For the same NPS 4 elbow with 51 mm covering, what are the heel and throat lengths if it is made in four pieces?
Show solution
- Joint angle: θ = 90 ÷ 3 = 30°; tan 15° = 0.2679.
- Middle heel: 2 × 260.55 × 0.2679 ≈ 139.6 mm; middle throat: 2 × 44.25 × 0.2679 ≈ 23.7 mm.
- End segments: heel ≈ 69.8 mm, throat ≈ 11.9 mm.
- Two middle segments and two end segments.
Answer: Two middle segments of about 140 mm heel and 24 mm throat, and two end segments of about 70 mm heel and 12 mm throat. The pieces are smaller, and the throat is thin enough that care is needed to keep it from breaking off.
A useful check: the heel lengths of all the pieces, added together, should be about the length of the heel curve, a quarter of the circle of radius R + r for a 90° elbow. For the three-piece elbow above, the heels add to 108 + 216 + 108 = 432 mm, a little more than the curved heel of π ÷ 2 × 260.6 ≈ 409 mm, as expected for straight pieces around a curve.
When the throat disappears
The throat formula has R − r in it. When the outside radius of the insulation is larger than the centreline radius of the elbow, the throat length comes out negative, which means the segments cannot be cut as wedges at all: the inside of the bend is too tight for the insulation to follow. This happens on short-radius elbows, on small pipe with thick insulation and on most threaded and copper fittings.
Worked problem
A tight elbow
An NPS 2 short-radius elbow has a centreline radius of 50.8 mm. It is to get 38 mm insulation. Can it be made from a three-piece mitre?
Show solution
- Insulation outside radius: r = 60.3 ÷ 2 + 38 = 30.15 + 38 = 68.15 mm.
- R − r = 50.8 − 68.15 = −17.35 mm, which is negative.
- Middle throat: 2 × (−17.35) × 0.4142 ≈ −14.4 mm.
Answer: No. The throat would be less than zero, so the pieces would overlap on the inside of the bend. Use a preformed fitting cover, or build the elbow from pieces cut to meet at the throat and fill the heel and sides with cut insulation, as the specification allows.
Cutting and fitting a mitred elbow
With the lengths known, cutting is quick. There are two common methods.
- By measurement: close a section on a straight piece of scrap pipe or a dowel of the right size, mark the heel length along the top and the throat length along the bottom, and mark the centre length on each side. Join the marks with a smooth line around the section and cut along it. For a middle piece, mark from a square end the full heel and throat lengths, then cut the second angle from the same marks so the piece is symmetrical.
- By mitre box: set the cut angle in the box, such as 22.5° for a three-piece 90°, and cut each face at that angle, with the section turned so the heel is at the long side. Measure the centre length between the two cuts of a middle piece.
To fit the elbow:
- Place the end segments first, square end against the straight covering, angled face toward the middle of the bend.
- Fit the middle segments between them. Trim, do not force, until each joint is closed from heel to throat.
- Keep the seams of the segments on the inside or side of the bend, where they are least visible, and line up the seams of adjacent pieces.
- Secure the segments with wire or tape until the finish goes on, and fill any small gaps at the throat with cut insulation.
- Finish as the specification requires: on commercial work, usually a preformed PVC fitting cover, a wrap of jacket material, or a layer of insulating cement or mastic with glass cloth. On cold work, the finish must be a continuous, sealed vapour retarder.
Preformed fitting covers
For most commercial piping up to medium sizes, the fastest way to insulate an elbow is a preformed fitting cover: a moulded PVC shell made for each pipe size and angle, used over a precut fibrous insert. The insert is wrapped around the fitting, the two halves of the cover close over it and the cover's ends overlap the jacket of the straight covering. The cover is held with tacks, tape or its own interlocking edge, and on cold work every seam and both ends are sealed with vapour retarder tape or a PVC adhesive to keep the vapour retarder continuous.
Covers and inserts are made for a range of thicknesses; a cover made for 25 mm (1 in) insulation will not fit over 51 mm (2 in). Many specifications require that the fitting insulation equal the straight pipe thickness, so where the cover range does not reach the specified thickness, an additional layer of insert is used inside an oversize cover, or the elbow is built from mitred sections. At Mountview, Coldstream used PVC covers on the domestic water and on chilled water branches up to NPS 2, and mitred sections with PVC covers over them on the heating and chilled water mains, as the specification required for those sizes.
Common mistakes
MistakeCutting every segment at the same angle regardless of the number of pieces.
InsteadUse the cut angle A ÷ (2 × (n − 1)): 22.5° for a three-piece 90°, 15° for a four-piece.
MistakeMeasuring segment lengths from the pipe radius instead of the insulation radius.
InsteadUse R + r at the heel and R − r at the throat, where r is the insulation outside radius.
MistakeTrying to mitre a tight elbow where R is less than r.
InsteadCheck R − r first; if it is negative, use a fitting cover or a different method.
MistakeForcing segments together until the throat crumbles.
InsteadTrim each piece until the joint closes without pressure.
MistakeUsing a fitting cover made for a thinner insulation.
InsteadMatch the cover and insert to the specified thickness, adding insert layers where needed.
MistakeLeaving fitting cover seams unsealed on cold work.
InsteadSeal every seam and both ends with vapour retarder tape or adhesive.
Summary and key terms
- Elbows are described by angle and centreline radius: long radius is 1.5 × the nominal size, short radius 1.0 ×.
- A mitred elbow is made of segments cut from straight covering; n pieces give n − 1 joints, each with a cut angle of A ÷ (2(n − 1)).
- Middle segment lengths: heel = 2(R + r)tan(θ/2), throat = 2(R − r)tan(θ/2), centre = 2R tan(θ/2); end segments are half.
- If R is less than r, the throat is negative and the elbow cannot be mitred as simple wedges.
- Cut by measurement or with a mitre box; fit end pieces first and trim rather than force.
- Preformed PVC fitting covers over fibrous inserts are fast and neat; match them to the insulation thickness and seal them on cold work.
- Centreline radius
- The radius of an elbow measured to the centreline of the pipe.
- Long-radius elbow
- A butt-welded elbow with a centreline radius of 1.5 times the nominal pipe size.
- Short-radius elbow
- A butt-welded elbow with a centreline radius equal to the nominal pipe size.
- Heel
- The outside, longest line of a bend.
- Throat
- The inside, shortest line of a bend.
- Mitred elbow
- Elbow insulation made of angled pieces of straight pipe covering.
- Segment
- One of the pieces of a mitred elbow.
- Fitting cover
- A preformed shell, usually PVC, that fits over a fibrous insert on an elbow or other fitting.
Practice problems
Work each problem on paper first, then reveal the answer to check.
What is the cut angle at each face of a five-piece 90° elbow?
Show answer
90 ÷ (2 × 4) = 11.25°.
What is the centreline radius of an NPS 6 long-radius elbow?
Show answer
1.5 × 152.4 = 228.6 mm.
For R = 228.6 mm and r = 84.15 + 38 = 122.15 mm, find the heel and throat of the middle piece of a three-piece 90°.
Show answer
Heel 2 × 350.75 × 0.4142 ≈ 290.6 mm; throat 2 × 106.45 × 0.4142 ≈ 88.2 mm.
Why can a tight copper elbow often not be mitred?
Show answer
Its radius is smaller than the insulation outside radius, so the throat length would be negative.
What must be done to a PVC fitting cover on a chilled water elbow?
Show answer
Seal every seam and both ends with vapour retarder tape or adhesive.
Lesson quiz · 5 questions
Score 60% or more to complete this lesson.
Create a free account to save your progress, take quizzes and earn a certificate.