
INS-130 · Lesson 11 of 12 · 25 min
Quality checks and common defects
▶ Video coming soon A video version of this lesson is on the way.
Every Friday afternoon at Mountview, Bernie walked the week's work with a clipboard, a tape and a flashlight, and Devon walked with her. In the second week of October they found a run of chilled water branch in a corridor ceiling where the insulation looked fine from the ladder but measured thin: someone had used 19 mm (3/4 in) covering where the schedule called for 38 mm (1 1/2 in). Two days later the engineer's field reviewer, Hollis Brandt, did his own walk and checked the same corridor. "He found nothing," Bernie said afterward, "because we found it first. That's the whole point of the clipboard."
Insulation is inspected several times: by the crew as it goes on, by the foreperson at the end of each area, by the general or mechanical contractor before ceilings are closed, and by the engineer or owner's representative as part of the project's quality review. Problems found by the crew cost minutes to fix; problems found by the engineer after the ceilings are closed cost days. This lesson describes what to check, the defects that turn up most often on pipe insulation, how to measure thickness on finished work and how to record inspections.
What good work looks like
Specifications usually describe acceptable pipe insulation in general terms: insulation of the specified material and thickness, continuous over the whole system including fittings and supports, tight joints, a neat finish and, on cold work, a continuous and sealed vapour retarder. In practice, good work means all of the following:
- The right product: material, size (IPS or CTS), thickness and jacket all match the schedule for the service and pipe size.
- Continuity: no gaps at butt joints, fittings, hangers, tees or terminations, and the insulation runs through supports with inserts where required.
- Tight fit: sections close fully on the pipe, butt joints are pushed tight and fittings are filled.
- Secure: laps and strips pressed down, ties and bands at the right spacing with ends turned in.
- Sealed on cold work: every lap, joint, fitting, penetration and termination sealed, vapour stops in place and no staples.
- Neat: laps aligned and out of sight, strips centred, no dirt, tears, tape marks or fingerprints on exposed work.
- Accessible where required: valves, test ports, traps and nameplates left accessible or with removable covers as specified.
- Identified: pipe markers and flow arrows applied where the specification calls for them.
Common defects
The same defects show up on job after job. Knowing them helps an apprentice avoid them and helps a foreperson find them quickly.
| Defect | What it looks like | Why it matters | Usual fix |
|---|---|---|---|
| Open butt joints | A line of bare fibre or a gap between sections | Heat loss; on cold work, a vapour leak | Push sections together, fill and seal with a butt strip |
| Lifted laps or strips | Edges of SSL laps or butt strips curling up | Opens over time; vapour leak on cold work | Clean, re-press or replace with new tape |
| Wrong thickness | Insulation that looks right but measures thin | Fails the specification; may sweat or waste energy | Remove and replace with the specified thickness |
| Wrong bore (IPS on copper or the reverse) | Loose, rocking sections, or sections that will not close | Air spaces, condensation, split sections | Replace with the correct size |
| Crushed insulation at hangers | Flattened insulation, torn jacket, metal touching the pipe | Heat loss or condensation at every support | Install inserts and shields; resize hangers |
| Gaps at fittings | Fittings left bare or loosely filled under covers | Hidden heat loss or condensation | Fill with inserts or cut insulation, refit and seal covers |
| Unsealed penetrations and terminations | Open edges around thermometer wells, valves and equipment | Vapour travels under the insulation on cold work | Seal with mastic and form vapour stops |
| Staples on cold work | Rows of staples through the ASJ | Each one is a hole in the vapour retarder | Seal each with mastic or tape, or replace the jacket |
| Physical damage | Dents, tears, crushed sections from ladders and trades | Opens the system and spoils appearance | Repair with matching material; report damage by others |
| Dirty or stained jacket | Drywall dust, paint overspray, fingerprints | Appearance; adhesives will not stick | Clean or replace; protect finished work |
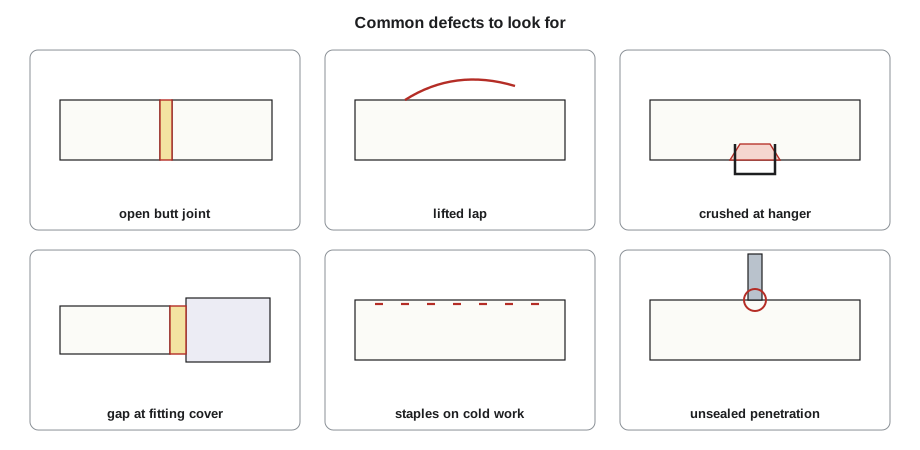
Checking thickness on finished work
Thickness is the defect that looks right from a ladder. A section of 19 mm (3/4 in) covering on a pipe looks much like 38 mm (1 1/2 in) unless it is next to the right thickness. On finished, jacketed insulation, the thickness cannot be measured directly without cutting into it, but it can be found from the outside circumference:
Because of the standard outside diameters set by ASTM C585, the result will rarely be exactly the nominal thickness. A result within a few millimetres of the nominal value is normal; a result half the nominal value is not. Inspectors also use a thin probe or a blunt pin pushed through the insulation to the pipe on fibrous materials, with the hole sealed afterward on cold work, and they look at the label on any spare sections left in the area.
Worked problem
Finding the thin insulation
The schedule calls for 38 mm on the NPS 4 chilled water branch in the corridor. Bernie wraps a tape around the finished insulation and reads 479 mm. What is the thickness, and does it meet the schedule?
Show solution
- Expected outside diameter: 114.3 + 2 × 38 = 190.3 mm, a circumference of about 3.1416 × 190.3 ≈ 598 mm.
- Measured outside diameter: 479 ÷ 3.1416 ≈ 152.5 mm.
- Thickness: (152.5 − 114.3) ÷ 2 ≈ 19.1 mm.
Answer: About 19 mm, half the specified 38 mm. The run fails and must be replaced. A tape check takes less than a minute and would have caught it the day it went on.
The thin run at Mountview, 14 m (46 ft) of branch, had been insulated from a carton of 19 mm (3/4 in) covering delivered by mistake with a shipment for the domestic water. Nobody had read the label. The replacement took Devon and Tessa most of a morning, and the leftover cartons went back to the supplier with a note on the delivery slip.
Inspecting cold work
Cold work gets a closer look, because its defects are hidden and do their damage slowly. On each run, the inspector looks and feels for:
- Laps pressed down along their full length, with no wrinkles or lifted corners.
- A butt strip on every joint, centred and pressed all the way round.
- Fitting covers sealed at every seam and both ends.
- Inserts at every hanger, with the vapour retarder lapped and sealed across them and the shield outside.
- Mastic around every penetration and vapour stops at every termination.
- No staples, or every staple sealed.
- No wet or soft insulation; on a line already in service, no sweating, no stains on the jacket and no ice.
On a system that is already running cold, an infrared thermometer or thermal camera can show places where the jacket surface is colder than its neighbours, which usually means a gap, thin insulation or a wet spot. Surface temperature near or below the dew point of the room, measured with a hygrometer, is a warning even before condensation appears.
Pipe identification
Most specifications require insulated piping to be identified with markers showing the service and the direction of flow, applied over the finished insulation. In Canada, many specifications follow CAN/CGSB-24.3, Identification of Piping Systems, which sets colours and lettering. Markers are usually placed at regular spacing on straight runs, at each branch and valve, on each side of walls and floors and at access doors. Who applies the markers varies: on some jobs it is the mechanical contractor, on others the insulator or a painting contractor. When it is the insulator, markers are applied last, on clean, finished insulation, with the arrows pointing the way the fluid flows.
Worked problem
Counting pipe markers
The Mountview specification calls for markers every 6 m on straight runs, plus one at each branch and one on each side of every wall. A 42 m chilled water supply main has 5 branches and passes through 2 walls. How many markers are needed for the supply main?
Show solution
- Straight run: 42 ÷ 6 = 7 spaces, so 8 markers including both ends.
- Branches: 5.
- Walls: 2 × 2 = 4.
- Total: 8 + 5 + 4 = 17.
Answer: 17 markers on the supply main, and the same again on the return. Where a branch marker and a spacing marker fall close together, the foreperson may combine them, as the specification allows.
Recording inspections
An inspection that is not written down did not happen, as far as a dispute is concerned. Coldstream's crews record inspections in three ways:
- A marked-up floor plan for each area, with each run highlighted when it is complete and initialled and dated when the foreperson has inspected it.
- Photographs of each area when complete, taken before ceilings close, with the date and area in the file name.
- The site's ceiling sign-off sheet, which Mountview adopted after drywallers closed in an uninsulated chilled water main in INS-110. The insulation foreperson signs that the insulation above a ceiling is complete and inspected before the ceiling trade may close it.
Deficiencies found by the engineer or the contractor are listed on a deficiency list, often called a punch list. Each item names the location and the problem. The foreperson assigns each item, the crew fixes it and the foreperson signs it off. Hollis Brandt's list for the Mountview third floor in late October had six items for Coldstream: two lifted butt strips on chilled water, a missing vapour stop at a pump, one fitting cover with an open seam, a dented section where a ladder had been leaned and a missing pipe marker. All six were done and signed within two days.
Self-inspection as you go
The best inspection is the one the installer does before calling a run finished. Bernie taught Devon a short routine for the end of every run, which takes a couple of minutes:
- Look along the run from one end, checking that laps line up and strips are centred.
- Run a gloved hand along it, feeling for lifted edges, gaps and sharp ends.
- Check each hanger: insert in place, shield centred, nothing crushed.
- Check each fitting: filled, covered and, on cold work, sealed.
- Tape-check the thickness at one point.
- Check the label on the carton you used against the schedule.
- Pick up offcuts and clean the area.
What a late defect costs
The reason to inspect early is simple arithmetic. A defect found by the installer is fixed with the material and tools already on the ladder. The same defect found after the ceiling is closed means removing ceiling tiles or cutting drywall, protecting the floor and furniture below, often working around occupants, and then paying another trade to restore the ceiling.
Worked problem
Early and late fixes compared
The thin chilled water branch at Mountview was 14 m long. Replacing it while the ceiling was open took Devon and Tessa 4.0 hours together. Coldstream's estimate for the same repair after the ceiling is closed adds 2.0 hours each for removing and replacing ceiling tiles and 1.5 hours each for protection and cleanup, plus a ceiling contractor's charge equal to 3.0 more hours. How many hours would the late repair have taken in all?
Show solution
- Insulation work: 4.0 hours.
- Ceiling tiles: 2.0 × 2 = 4.0 hours.
- Protection and cleanup: 1.5 × 2 = 3.0 hours.
- Ceiling contractor: 3.0 hours.
- Total: 4.0 + 4.0 + 3.0 + 3.0 = 14.0 hours.
Answer: About 14 hours instead of 4, three and a half times as much, and that is before any delay to other trades or to the owner. A tape check when the run went on would have taken a minute.
The same logic applies to cold work. A lifted butt strip found the day it is installed takes a minute to press down; found a year later as a ceiling stain, it means removing wet insulation, drying the pipe, reinsulating and replacing a stained ceiling tile, and explaining to an owner why the ceiling is stained.
Common mistakes
MistakeJudging thickness by eye.
InsteadMeasure the circumference and work out the thickness, or check the label.
MistakeInspecting only what can be seen from the floor.
InsteadCheck the far side of pipes, the tops of risers and every hanger and fitting.
MistakeLetting ceilings close before the insulation is inspected and signed off.
InsteadUse the ceiling sign-off sheet and inspect before closing.
MistakeFixing deficiencies without recording them.
InsteadSign off each item on the deficiency list when it is fixed.
MistakeApplying pipe markers on dirty or unfinished insulation.
InsteadApply markers last, on clean finished work, with arrows in the flow direction.
MistakePatching the outside of wet cold insulation.
InsteadRemove wet insulation and reinstall with a sealed vapour retarder.
Summary and key terms
- Insulation is inspected by the crew, the foreperson, the contractor and the engineer; early inspection is cheapest.
- Good work is the right product, continuous, tight, secure, sealed on cold work, neat, accessible where required and identified.
- Common defects include open joints, lifted laps, wrong thickness or bore, crushed insulation at hangers, gaps at fittings, unsealed penetrations and staples on cold work.
- Thickness on finished work is found from the circumference: thickness = (circumference ÷ π − pipe OD) ÷ 2.
- Cold work needs close inspection for seals, inserts, vapour stops and signs of moisture.
- Pipe markers follow CAN/CGSB-24.3 or the specification and are applied last.
- Record inspections with marked-up plans, photographs, sign-off sheets and signed deficiency lists.
- Inspection
- A planned check of finished work against the specification.
- Deficiency list
- A list of items that do not meet the specification, to be fixed and signed off; also called a punch list.
- Field reviewer
- The engineer or representative who reviews work on site for the design team or owner.
- Pipe marker
- A label on piping showing the service and the direction of flow.
- Ceiling sign-off
- A record that work above a ceiling is complete and inspected before the ceiling is closed.
- Infrared thermometer
- An instrument that measures surface temperature from a distance.
Practice problems
Work each problem on paper first, then reveal the answer to check.
A tape around finished insulation on NPS 2 reads 346 mm. What is the thickness?
Show answer
346 ÷ 3.1416 ≈ 110.1 mm; (110.1 − 60.3) ÷ 2 ≈ 24.9 mm, about 25 mm.
Name four things to check on cold work.
Show answer
Any four of: laps pressed, butt strips, fitting covers sealed, inserts and shields, penetrations sealed, vapour stops, no staples, no moisture.
A 30 m run with markers every 6 m, 3 branches and 1 wall needs how many markers?
Show answer
30 ÷ 6 = 5 spaces, so 6; plus 3 branches and 2 for the wall: 11.
Why are pipe markers applied last?
Show answer
So they go on clean, finished insulation and are not damaged or covered.
What should happen before a ceiling is closed?
Show answer
The insulation above it should be complete, inspected and signed off.
Lesson quiz · 5 questions
Score 60% or more to complete this lesson.
Create a free account to save your progress, take quizzes and earn a certificate.