
FAT-120 · Lesson 11 of 12 · 19 min
Device spacing and placement rules
Ravi's first layout drawings for the Willowbank addition are on the big table, and he wants Sasha to check every detector location before they go to the authority. 'Spacing is where most plan review comments come from,' he says. 'A detector three feet too far from a wall, a pocket between beams with nothing in it, a heat detector spaced for an eight-foot ceiling under a twenty-foot one. None of those show up when you look at the drawing from across the room. You have to measure.' This lesson brings together the placement rules for spot detectors: the basic spacing on smooth ceilings, the adjustments for ceiling height, slope, beams and air movement, and the places detectors should never go. Notification appliance placement was covered in Lessons 9 and 10.
Spacing on a smooth, flat ceiling
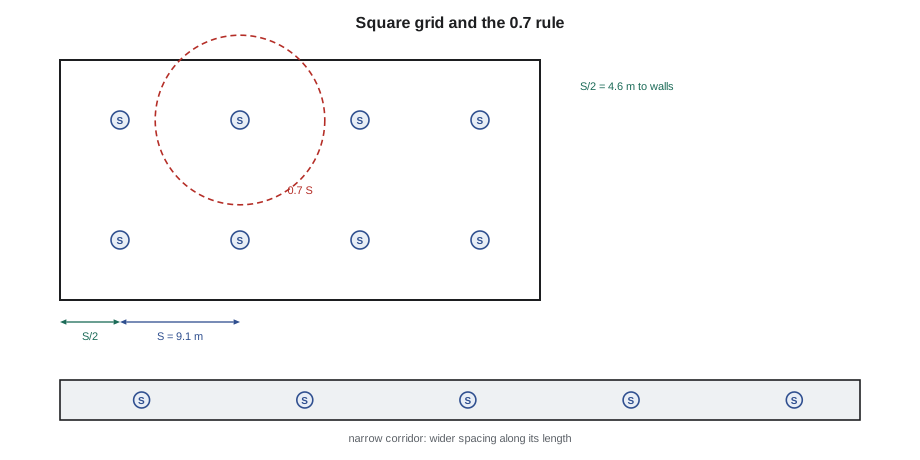
The starting point is the smooth, flat ceiling of normal height. For spot smoke detectors, CAN/ULC-S524 sets a maximum spacing that is commonly applied as 9.1 m between detectors, with no point on the ceiling more than half the spacing, 4.6 m, from a wall measured at right angles, and it sets the maximum area each detector may cover. For heat detectors, the listed spacing from the device's fire test is used, again with no more than half of it to a wall. These are maximums: closer spacing is always allowed and is often needed for room shapes, obstructions and air movement.
The geometry behind the 0.7 rule is simple. On a square grid of spacing S, the point farthest from any detector is at the centre of a square, a distance of S divided by the square root of 2 from each corner, which is about 0.707 S. A detector therefore protects a circle of radius 0.7 S, and in a narrow space such as a corridor, detectors can be farther apart along the length, as long as every point is within that radius. A corridor 3 m wide with detectors on its centreline can space them so that the far corner of each section is within 0.7 S of the nearest one.
# Detector count and corridor spacing on smooth flat ceilings
import math
S = 9.1                      # spacing (m)
def grid_count(L, W, S):
    return math.ceil(L / S) * math.ceil(W / S)
def corridor_spacing(w, S):
    r = 0.7 * S
    return 2 * math.sqrt(max(r * r - (w / 2) ** 2, 0))
for name, L, W in [("Classroom", 9.0, 8.0), ("Library", 15.0, 12.0), ("Workroom", 20.0, 9.0)]:
    print(f"{name:12s} {L} x {W} m: about {grid_count(L, W, S)} detectors on a square grid")
for w in [2.4, 3.0, 4.0]:
    sc = corridor_spacing(w, S)
print(f"corridor {w} m wide: detectors up to {sc:.1f} m apart on the centreline, ends within {sc / 2:.1f} m")Classroom 9.0 x 8.0 m: about 1 detectors on a square grid Library 15.0 x 12.0 m: about 4 detectors on a square grid Workroom 20.0 x 9.0 m: about 3 detectors on a square grid corridor 2.4 m wide: detectors up to 12.5 m apart on the centreline, ends within 6.3 m corridor 3.0 m wide: detectors up to 12.4 m apart on the centreline, ends within 6.2 m corridor 4.0 m wide: detectors up to 12.1 m apart on the centreline, ends within 6.0 m
The corridor results use the 0.7 geometry for illustration. CAN/ULC-S524 has its own rules for corridors and narrow spaces, and the designer applies those; the geometry explains why narrow corridors can have wider spacing along their length.
Ceiling height
Hot gases from a fire cool and spread as they rise, so detectors on higher ceilings respond later. For heat detectors, CAN/ULC-S524 reduces the listed spacing as the ceiling gets higher, using a table of reduction factors, so that a heat detector on a high ceiling is closer to its neighbours. For smoke detectors, the standard doesn't use a simple height table, but high ceilings bring other problems: smoke may stratify below the ceiling, and the time for smoke to reach the detector grows, so designers often choose beam or air-sampling detection for high spaces.
# Heat detector spacing reduced for ceiling height (factors as commonly tabulated)
factors = [  # (ceiling height up to, in m; multiplier)
    (3.0, 1.00), (3.7, 0.91), (4.3, 0.84), (4.9, 0.77), (5.5, 0.71), (6.1, 0.64), (6.7, 0.58), (7.3, 0.52), (7.9, 0.46), (8.5, 0.40), (9.1, 0.34),
]
listed = 15.2           # listed spacing (m)
for h in [2.7, 3.5, 4.5, 6.0, 8.0, 10.0]:
    f = next((m for top, m in factors if h <= top), None)
    if f is None:
        print(f"ceiling {h} m: above the table, other detection needed")
    else:
print(f"ceiling {h:4.1f} m: factor {f:.2f}, spacing {listed * f:5.1f} m, wall distance {listed * f / 2:4.1f} m")ceiling 2.7 m: factor 1.00, spacing 15.2 m, wall distance 7.6 m ceiling 3.5 m: factor 0.91, spacing 13.8 m, wall distance 6.9 m ceiling 4.5 m: factor 0.77, spacing 11.7 m, wall distance 5.9 m ceiling 6.0 m: factor 0.64, spacing 9.7 m, wall distance 4.9 m ceiling 8.0 m: factor 0.40, spacing 6.1 m, wall distance 3.0 m ceiling 10.0 m: above the table, other detection needed
A heat detector listed for 15.2 m (50 ft) on a normal ceiling may be placed only 5.2 m apart on a ceiling of 9 m (30 ft). Above the top of the table, heat detectors are not effective, and other detection is chosen.
Sloped and peaked ceilings
Smoke and heat collect at the highest part of a sloped ceiling. On a peaked ceiling, with slopes on both sides of a ridge, a row of detectors is placed along the peak, within a short distance of it measured horizontally, as the standard sets, and further detectors are spaced from that row down the slopes. On a shed ceiling, sloping one way, the first row goes along the high side. For heat detectors, the spacing down the slope may be based on the horizontal projection of the ceiling and increased by a factor for steep slopes, as the standard allows. Smoke detectors are spaced on the horizontal projection. The point is that detectors must be where the fire's gases go first, and a detector placed on the low side of a slope can be many minutes late.
Beams, joists and obstructions
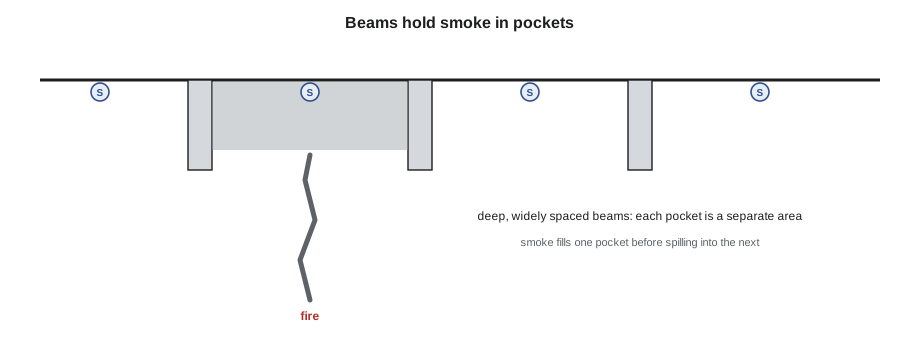
Solid projections from the ceiling, such as beams and joists, act as barriers that hold smoke and heat in the space between them until it fills and spills over. The standards distinguish joists, closely spaced solid members, from beams, more widely spaced ones, using a depth and a spacing to define each, roughly members more than 100 mm deep. For heat detectors on joisted or beamed ceilings, spacing perpendicular to the members is reduced, often to half of the smooth-ceiling spacing. For smoke detectors, the rules depend on the depth of the beams relative to the ceiling height and their spacing. Very deep beams, commonly more than about 460 mm deep and more than 2.4 m apart, turn each pocket between them into a separate area, and each pocket needs its own detector.
Other obstructions matter too. Ductwork, lighting fixtures, cable trays and storage close to the ceiling can block the flow of gases, and a wall or partition that reaches within a short distance of the ceiling divides a space for spacing purposes. In a warehouse with high-rack storage, ceiling detectors may never see a fire at the bottom of a rack until it is large, which is why the sprinklers, and sometimes in-rack detection, carry the protection.
Air movement and places to avoid
Ventilation affects detectors. Moving air can dilute smoke, blow it away from detectors or keep it from entering their chambers. Detectors are kept a set distance from supply diffusers, commonly about 1 m, and in rooms with high air change rates, such as computer rooms and clean rooms, smoke detector spacing is reduced in proportion to the air changes per hour using a table in the standard, so that each detector covers less area. Return air grilles can draw smoke toward a detector placed near them, which designers sometimes use deliberately.
Some places are poor locations for any spot detector: the dead-air corner where a wall meets the ceiling; directly above heaters, ovens or kettles; in the plume of exhaust; in places that are hotter or colder than the detector's listed range; inside unconditioned attics without listed devices; and where the device can't be reached safely for testing and service. Elevator lobbies, hoistways and machine rooms have their own placement rules tied to elevator recall and shunt trip. Stairwells usually have smoke detectors at the top, where smoke collects, when detection is required.
| Situation | Effect on smoke detectors | Effect on heat detectors |
|---|---|---|
| Higher ceiling | Slower; consider beam or air-sampling | Spacing reduced by the height factor |
| Peaked or sloped ceiling | Row at the peak or high side | Row at the peak; slope adjustments |
| Joists | Rules by depth and spacing | Spacing across joists often halved |
| Deep beams, widely spaced | Detector in each pocket | Detector in each pocket |
| High air change rate | Spacing reduced by air changes | Little effect |
| Supply diffuser nearby | Keep the required distance | Usually not affected |
Worked problem
Checking the library and the music room
The library is 15 m by 12 m with a flat ceiling 3 m high; the drawing shows four smoke detectors on a square grid. The music room is 12 m by 10 m with a ceiling sloping from 3 m to 6 m toward the back wall; the drawing shows four smoke detectors on a square grid at the room's centre lines. Are both layouts acceptable?
Show solution
- Library: with spacing S of 9.1 m, a square grid needs ceil(15/9.1) x ceil(12/9.1) = 2 x 2 = 4 detectors, placed so none is more than S/2 from a wall: the layout fits.
- Music room: the ceiling is a shed type, sloping one way, so smoke collects at the high side, along the back wall.
- The layout must include a row near the high side, with further detectors spaced from it on the horizontal projection, not a grid centred on the room.
- Sasha marks the music room for redesign: two detectors in a row near the high side and two more down the slope, within the spacing.
Answer: Ravi revises the music room. The plan reviewer's comment list comes back with nothing on detector spacing, which Ravi says is the first time in years.
Reading a layout drawing
A device layout uses standard symbols, a legend and a device schedule. Each symbol is tagged with its type and address or circuit, and the drawing shows ceiling heights, beams, bulkheads, diffusers and room names. When Sasha checks a layout, she works room by room: she reads the ceiling height and type, decides which rules apply, measures from each detector to the walls at right angles, checks the distances between detectors, and looks for diffusers, light fixtures and obstructions near each device. She marks every question on a copy, rather than correcting the drawing herself, and returns it to the designer with a short note on each. Most questions turn out to have answers, such as a diffuser that has moved on the latest mechanical drawing, but a few are real errors, and those are the ones that would have become deficiencies at verification.
Field changes are the other half of the job. Installers often find that a detector's drawn location lands on a light fixture or a sprinkler pipe. Moving it a short distance is usually fine, as long as the spacing and wall distances are still met and the move is recorded on the as-built drawings. Moving it farther, or dropping it, is a design change that goes back to the designer. Gerry's rule is that if the move changes which rule applies, or makes any point farther than allowed from a detector, it isn't the installer's decision.
Common mistakes
MistakeApplying smooth-ceiling spacing under beams or joists.
InsteadApply the standard's reductions or a detector in each pocket.
MistakeSpacing heat detectors for a low ceiling under a high one.
InsteadReduce the spacing by the ceiling height factor.
MistakePlacing detectors on the low side of a sloped ceiling.
InsteadStart at the peak or high side.
MistakeMeasuring the distance to the wall diagonally.
InsteadMeasure at right angles to the wall.
MistakeIgnoring high air change rates in computer rooms.
InsteadReduce smoke detector spacing as the standard's table requires.
Summary and key terms
- On smooth, flat ceilings, smoke detectors are commonly spaced at up to 9.1 m, with half that to walls; heat detectors use their listed spacing.
- The 0.7 S radius explains why corridors can have wider spacing along their length.
- Heat detector spacing is reduced for higher ceilings; smoke detection on high ceilings often moves to beam or air-sampling.
- Sloped ceilings start with a row at the peak or high side.
- Joists and beams reduce spacing or need a detector in each pocket.
- High air change rates reduce smoke detector spacing; keep away from diffusers and dead-air corners.
- Spacing
- The maximum distance between detectors, set by the standard or the listing.
- 0.7 rule
- Every point on the ceiling must be within 0.7 times the spacing of a detector.
- Horizontal projection
- The plan view of a sloped ceiling, used to space detectors on it.
- Beam pocket
- The space between deep beams, treated as a separate area for detection.
- Stratification
- Smoke stopping below a hot air layer under a high ceiling.
- Air change rate
- How many times per hour the air in a room is replaced.
Practice problems
Work each problem on paper first, then reveal the answer to check.
A room is 18 m by 9 m with a smooth flat ceiling. About how many smoke detectors does a 9.1 m square grid need?
Show answer
ceil(18/9.1) x ceil(9/9.1) = 2 x 1 = 2.
A heat detector is listed at 15.2 m. What spacing applies on a 6 m ceiling with a factor of 0.64?
Show answer
About 9.7 m.
Where does the first row of detectors go on a peaked ceiling?
Show answer
Along the peak.
Deep beams are widely spaced. How are the pockets treated?
Show answer
Each pocket is a separate area with its own detector.
Lesson quiz · 5 questions
Score 60% or more to complete this lesson.
Create a free account to save your progress, take quizzes and earn a certificate.