
DCT-320 · Lesson 8 of 12 · 19 min
Handling, inserting and cleaning optics
Optics fail for three reasons more often than any other: they are dropped or handled carelessly, their connectors are dirty, or they run too hot. All three are in a technician's hands. Roz Kerr reckons that most of the optic failures she has seen in twelve years on the campus started with someone in a hurry: an optic carried loose in a pocket, a dust cap left in a drawer, a cord plugged into a connector nobody inspected. This lesson is about doing the opposite, every time, and about reading the numbers the optic reports about itself, which tell a technician and an engineer whether the light in a link is healthy before anything fails.
Handling
An optic is a precision assembly of lasers, lenses, receivers and a circuit board in a small metal case. Its electrical contacts are gold fingers that can be damaged by static, and its optical port is a set of lenses or ferrules that a speck of dust can block. Handle it by the case, never by the contacts or the pull tab alone. Keep it in its antistatic bag until it is needed and wear a wrist strap connected to the cabinet's ground point when handling it, as DCT-120 Lesson 6 described for all electronic parts. Keep the dust cap in the optical port until the moment the cord goes in.
Never drop an optic, and if one is dropped, do not install it. A drop can crack a lens or misalign a fibre inside without any mark on the case, and a damaged optic may work for a week before it fails. Stonebridge's rule is that a dropped optic is tagged and returned to the owner's spares process with a note, and a new one is used.
Inserting and removing
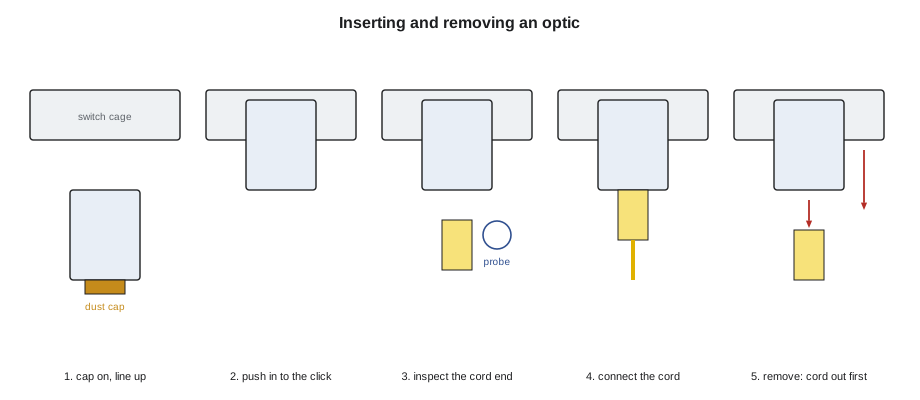
Each form factor has its own latch. SFP and QSFP modules usually have a bail, a wire or plastic lever around the front, or a pull tab; the latch releases when the bail is swung down or the tab is pulled straight back. OSFP modules have a pull tab. To insert, check the orientation, which is usually label side up on a top row and down on a bottom row in a belly-to-belly cage, line the module up with the cage and push it straight in with steady pressure until it clicks. Do not force it; a module that will not go in is the wrong form factor, upside down, or hitting a bent cage spring.
To remove, first disconnect the cord or trunk from the optic, then release the latch and slide the optic straight out. Pulling an optic out by its cord strains the cord and the connector. On a live switch, removing an optic drops that port's link at once, so only the optic named in the ticket is touched, with the contact watching, and the switch's other optics are not knocked in the process. A hot-swap of an optic is normal and does not harm the switch, but it is still a change to a live device.
Clean, inspect, connect
DCT-210 Lesson 8 and LVT-210 Lesson 9 taught inspection and cleaning of connectors to IEC 61300-3-35. The same discipline applies at the optic, with one rule that is easy to forget: both ends of every mated pair must be inspected, the cord's connector and the optic's port. The optic's port is harder to inspect, because it is inside the module, and probes with the right tip are needed for LC ports and for the MPO ports of parallel optics. If the port is dirty, it is cleaned with a cleaner made for ports, not with a swab pushed in hard, and inspected again.
The order on every connection is: inspect, clean if needed, inspect again, connect. A connector that has just come out of its cap is not necessarily clean; caps collect dust and some leave residue. And a connector that was clean an hour ago is not clean after being laid on a cabinet roof or touched. Corvid's procedure for Hall D, which Jamal follows, records an inspection image for every backend connection, because a single dirty fibre in an 800G link can raise errors enough to slow a training job.
Heat
An optic converts a few watts to heat in a space the size of a pack of gum. An 800G optic dissipates something like 15 to 18 watts and a 1.6T optic more, and optics are designed to run within a case temperature range, commonly up to about 70 °C (158 °F). The switch's fans keep them there, which is why the airflow rules of Lesson 2 matter so much. Empty cages and missing blanks change the airflow across the front panel, so many switches require blanks in empty cages, and some show higher optic temperatures in a port next to a gap.
Optics run hotter as they age, as dust builds up and when the inlet air is warm. A rising temperature is often the first sign of a problem, which is why it is one of the readings the optic reports.
Digital diagnostics
Every modern optic reports digital diagnostics, often called DDM or DOM: its case temperature, its supply voltage, and for each lane its laser bias current, its transmitted power and its received power. With each reading the optic also stores four thresholds set by its maker: high alarm, high warning, low warning and low alarm. A reading between the two warning thresholds is normal. A reading past a warning threshold is a sign to investigate; past an alarm threshold, the link is probably failing or about to fail. The switch shows these readings on request, and engineers often paste them into tickets.
| Reading | Unit | What a bad value usually means |
|---|---|---|
| Temperature | °C | Poor airflow, a hot inlet, a blocked cage or an ageing module |
| Supply voltage | V | A problem in the switch's cage power, rarely the optic |
| Laser bias current | mA | Rising bias: the laser is ageing and working harder for the same light |
| Tx power | dBm | Low: a failing laser in this optic |
| Rx power | dBm | Low: loss in the link or a weak transmitter at the far end; high: too short a link for a long-reach optic |
Power is given in dBm, decibels relative to one milliwatt, as DCT-210 explained for loss budgets: 0 dBm is one milliwatt, minus 3 dBm is half that, minus 10 dBm a tenth. Received power is the reading technicians use most. If every lane of an optic receives about the same power and one lane receives several decibels less, that one fibre has a problem: a dirty or damaged connector, a tight bend or a cracked strand.
# Check an optic's diagnostic readings against its thresholds (illustrative 800G DR8 values)
def to_unit(c): return c
thr = {  # reading: (low alarm, low warning, high warning, high alarm)
    "temp": (-5, 0, 70, 75), "volt": (3.0, 3.13, 3.47, 3.6), "bias": (10, 15, 85, 95),
    "tx": (-6.4, -5.4, 4.0, 5.0), "rx": (-9.4, -8.4, 4.0, 5.0),
}
reading = {"temp": 52.4, "volt": 3.29,
           "bias": [41, 42, 40, 43, 41, 44, 42, 41],
           "tx":   [1.2, 1.4, 1.1, 1.3, 1.2, 1.4, 1.3, 1.2],
           "rx":   [0.6, 0.4, 0.7, 0.5, -8.9, 0.6, 0.5, 0.4]}
def judge(v, t):
    la, lw, hw, ha = t
    if v <= la or v >= ha: return "ALARM"
    if v <= lw or v >= hw: return "warn"
    return "ok"
t = reading["temp"]
print(f"temperature {to_unit(t):.1f} °C: {judge(t, thr['temp'])};  supply {reading['volt']} V: {judge(reading['volt'], thr['volt'])}")
for k in ("bias", "tx", "rx"):
    vals = reading[k]
    bad = [(i + 1, v, judge(v, thr[k])) for i, v in enumerate(vals) if judge(v, thr[k]) != "ok"]
    spread = max(vals) - min(vals)
print(f"{k:4}: lanes {min(vals)} to {max(vals)} (spread {spread:.1f})", "| " + "; ".join(f"lane {i} {v} {j}" for i, v, j in bad) if bad else "| all ok")temperature 52.4 °C: ok; supply 3.29 V: ok bias: lanes 40 to 44 (spread 4.0) | all ok tx : lanes 1.1 to 1.4 (spread 0.3) | all ok rx : lanes -8.9 to 0.7 (spread 9.6) | lane 5 -8.9 warn
Lane 5 receives almost 9 dB less than its neighbours and sits just past the low warning threshold, while the far end's transmit power on all lanes was normal. The fault is in the path of lane 5: that fibre's position in the MPO connector at one end, a cassette, or the trunk. The usual first step is to inspect and clean both MPO ends, and Lesson 12 follows a case like this to the end.
Spares and returns
Optics are high-value parts, and data centres track them like cash. Each optic has a serial number recorded against the port it is installed in. A failed optic is removed, bagged and labelled with the port, the date, the ticket number and the fault, and returned through the owner's process; many owners send failed optics back to the maker for analysis. A spare is drawn from the owner's stock against the ticket. Loose optics in pockets, drawers or cabinet roofs are the first thing an auditor looks for, and the first source of mysterious faults.
Worked problem
An optic that ran hot
Corvid's monitoring shows the optic in port Ethernet1/41 of spine d4-spine-02 at 71 °C (160 °F), past its high warning, while its neighbours run at about 55 °C (131 °F). Carmen asks Jamal to look.
Show solution
- At the switch, Jamal sees that cages 42 and 43 next to it are empty and have no blanks; the blanks are missing from the cabinet.
- He checks the cabinet's inlet temperature with the hall sensor display: normal. The switch's fans all show healthy.
- He fits blanks from Corvid's spares in the two empty cages, as the switch maker's guide requires.
- Within ten minutes the optic in port 41 reads 58 °C (136 °F). Carmen keeps the ticket open for a day to confirm, and adds a check for missing cage blanks to Corvid's monthly walk.
Answer: Two missing blanks let air bypass the optic next to them. No optic needed replacing.
Trends in the readings
A single reading shows whether an optic is healthy now; a series of readings shows where it is heading. Most owners' monitoring systems record each optic's temperature, bias and received power every few minutes and draw them as graphs. Three patterns are worth recognizing. A received power that drops suddenly by several decibels on one lane and stays there usually follows a physical event: a connector disturbed, a cord bent or a cable crushed. A received power that falls slowly over weeks on all lanes of a link usually means contamination building up, or a far-end transmitter weakening. And a bias current that climbs slowly while transmit power stays steady means the laser is ageing; the owner may replace the optic at the next window rather than wait for it to fail.
# Look at a week of daily Rx readings (dBm) on one lane and classify the change
history = {
    "Eth1/12 lane 3": [0.4, 0.4, 0.3, 0.4, -5.8, -5.9, -5.8],
    "Eth1/14 lane 1": [0.6, 0.4, 0.2, 0.0, -0.3, -0.5, -0.8],
    "Eth1/20 lane 6": [0.2, 0.3, 0.2, 0.2, 0.3, 0.2, 0.3],
}
for name, days in history.items():
    steps = [b - a for a, b in zip(days, days[1:])]
    biggest = min(steps)
    total = days[-1] - days[0]
    if biggest < -3:
        kind = f"sudden drop of {-biggest:.1f} dB on day {steps.index(biggest) + 2}: look for a physical event"
    elif total < -1:
        kind = f"slow decline of {-total:.1f} dB in a week: contamination or a weakening transmitter"
    else:
        kind = "steady"
print(f"{name}: {kind}")Eth1/12 lane 3: sudden drop of 6.2 dB on day 5: look for a physical event Eth1/14 lane 1: slow decline of 1.4 dB in a week: contamination or a weakening transmitter Eth1/20 lane 6: steady
Documenting an optic change
Every optic installed, removed or swapped is recorded: the port, the old and new serial numbers, the part number, the reason and the ticket. The owner's asset system then knows which optic is in which port, which matters when the maker issues a notice about a batch of optics with a known fault, or when an optic that was removed as faulty turns out, on testing, to be healthy, which suggests the real fault was elsewhere. Jamal photographs the label of each optic he installs, because the serial number is printed small and is easily misread.
Common mistakes
MistakeCarrying optics loose in a pocket or a box.
InsteadKeep each optic in its antistatic bag with its dust cap until it goes in.
MistakeInstalling an optic that was dropped.
InsteadTag it for return and use a new one; internal damage may not show.
MistakePulling an optic out by its cord.
InsteadDisconnect the cord first, then release the latch and slide the module out.
MistakeInspecting only the cord's end.
InsteadInspect both ends of the mated pair, including the optic's port.
MistakeLeaving optic cages empty without blanks.
InsteadFit blanks where the switch maker requires them; airflow depends on it.
Summary and key terms
- Handle optics by the case, with a wrist strap, keeping the dust cap in until connection.
- A dropped optic is not installed.
- Insert straight in until it clicks; remove the cord first, then the module.
- Inspect, clean, inspect again, connect: on both ends, including the optic's port.
- Optics report temperature, voltage, bias, Tx and Rx power, with alarm and warning thresholds.
- One lane receiving much less than the others points to a fault in that lane's fibre path.
- DDM
- Digital diagnostic monitoring: the readings an optic reports about itself.
- Bias current
- The current driving an optic's laser; it rises as the laser ages.
- Rx power
- The optical power an optic receives on a lane.
- dBm
- Decibels relative to one milliwatt.
- Alarm and warning levels
- Thresholds stored in an optic; a warning calls for investigation before an alarm.
- Cage blank
- A cover fitted in an empty optic cage to keep the airflow correct.
Practice problems
Work each problem on paper first, then reveal the answer to check.
An optic's Rx power on all eight lanes is about 0.5 dBm except lane 3 at −7 dBm. What do you suspect?
Show answer
A dirty, damaged or misaligned fibre in lane 3's path.
The bias current on an optic has risen steadily for months. What does it suggest?
Show answer
The laser is ageing and may fail.
Why must both ends of a mated pair be inspected?
Show answer
Dirt on either end damages both when they are mated.
What do you do with an optic you have just dropped?
Show answer
Tag it for return and use a new one.
Lesson quiz · 5 questions
Score 60% or more to complete this lesson.
Create a free account to save your progress, take quizzes and earn a certificate.