
CINE-401 · Lesson 4 of 12 · 28 min
Camera tests and look development
A look book describes the intended image; tests prove it. Camera and lens tests, makeup and wardrobe tests and look development sessions with the colourist turn references into a working pipeline that will produce the right image every day on set. Tests also prevent expensive surprises: a lens that flares badly in the film's key night exterior, a costume that turns an unexpected colour under sodium street lights, a LUT that crushes darker skin tones. This lesson explains what to test, how to design tests so they answer real questions, how the LUT pipeline carries the look from camera to dailies to the final grade, and how to monitor exposure on set with consistent targets.
Why test
Testing costs time and money in prep, which is why it is sometimes squeezed. It is almost always cheaper than discovering a problem during production.
- Confirm that the camera, lenses and filters produce the look in the look book.
- Learn how the camera behaves at the exposure extremes the film will use, such as deep night or bright snow.
- Let costume, makeup, hair and production design see their work through the actual camera and look.
- Build and validate the show LUT and the colour pipeline before day one.
- Check technical requirements: delivery specs, VFX needs, data rates and storage.
Every test should start with a question. "Test the lenses" is not a question. "Which of these two lens sets renders Maya's close-ups more gently at T2 in tungsten light, and how much do they flare with a practical in frame?" is.
Camera and exposure tests
Course CINE-202 covered how sensors, log curves and dynamic range work. In a narrative prep, an exposure test checks the specific camera, settings and LUT the production will use.
- Latitude test: shoot a chart and a person at normal exposure, then at one-stop intervals over and under, from about four stops under to five or six over. Grade each back to normal in the intended pipeline and judge noise, colour and highlight behaviour.
- Exposure index (EI) choice: many digital cameras let you rate the sensor at different EIs; rating higher protects highlights, lower reduces visible noise. The test shows which rating suits the film.
- Mixed light: test skin under the film's real sources, such as tungsten practicals, LEDs, fluorescent tubes or street lights.
- Frame rate and shutter: check flicker with any practicals, screens or LED fixtures that will appear in shot (Course CINE-340).
Record every setting in a test log: camera, firmware, EI, white balance, lens, stop, filters, frame rate, shutter and LUT.
Lens tests
Lens tests compare candidate sets and check each individual lens. Rental houses usually allow test days in their prep bays.
- Character: sharpness, contrast, flare, bokeh, distortion and colour rendering across the set.
- Matching: lenses in a set should match closely in colour and contrast so cuts between focal lengths are invisible.
- Mechanical checks: focus scale accuracy against measured distances, back focus or flange depth, smooth rotation of focus and iris rings, and breathing (the change in image size when focus is pulled).
- Flare and practicals: shoot with a bare bulb or the sun at the edge of frame.
- Close focus and minimum object distance, important for inserts.
The camera assistants usually run the mechanical checks; the DP judges the image. Testing at the stops the film will actually use matters, because many lenses behave very differently wide open than stopped down.
Makeup, hair and wardrobe tests
These tests put actors, or stand-ins with similar complexions, in front of the camera in costume, makeup and hair, under light similar to the film's key scenes.
- Check how makeup reads at the intended sharpness and with any diffusion; shine, texture and colour all change on camera.
- Check costume colours and fabrics under each lighting condition. Some synthetic fabrics change colour under infrared contamination or certain LEDs; very fine patterns may cause moiré.
- Check hair under backlight and with the planned diffusion.
- Light and expose for every member of the cast. A setup that renders one actor beautifully may need a different fill or exposure approach for another, and the test is where you find out.
Course CINE-310 discussed the history of imaging systems biased toward lighter skin and the craft of rendering every complexion well. Tests are where a DP proves that the lighting approach, exposure targets and LUT work for the whole cast.
The colour pipeline from camera to grade
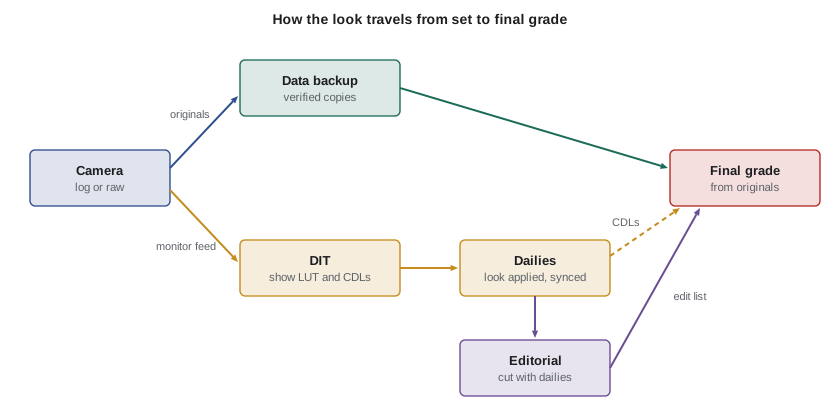
A pipeline describes how the image is transformed at each step. The goal is that the director, editor and producers see a consistent preview of the look throughout production, and that the colourist starts the final grade from the same intent.
- Camera: records log or raw footage with metadata. The camera also outputs a monitoring signal with a LUT applied.
- On-set monitoring: the DIT applies the show LUT and, often, per-scene adjustments stored as a colour decision list (CDL), a simple standard set of slope, offset, power and saturation values.
- Dailies: the lab or near-set dailies system renders editorial media with the LUT and CDLs applied, plus synced sound.
- Editorial: the editor cuts with the dailies look.
- Final grade: the colourist starts from the camera originals, uses the same LUT or colour management (often ACES or a camera-specific scene-referred workflow) and CDLs as a starting point, and refines the look.
Building the show LUT
The show LUT converts the camera's log image into a viewable image with the film's look. It is usually built by the colourist or DIT in prep, using test footage.
- Start from a technically correct transform for the camera and display, then add the creative look: contrast, colour bias, saturation and highlight roll-off.
- Keep the LUT gentle. A heavily stylized LUT can make exposure hard to judge and limits options in the grade.
- Check the LUT on all the test material: every skin tone, day and night, interiors and exteriors, highlights and deep shadows.
- Version the LUT clearly (for example SHOW_v03) and make sure the camera, monitors, DIT and dailies all use the same version.
Some productions use a small family of LUTs, such as one for day and one for night, rather than one LUT for everything. More LUTs add flexibility but also more chances for mistakes, so keep the family small and well documented.
Monitoring exposure: false colour and waveform targets
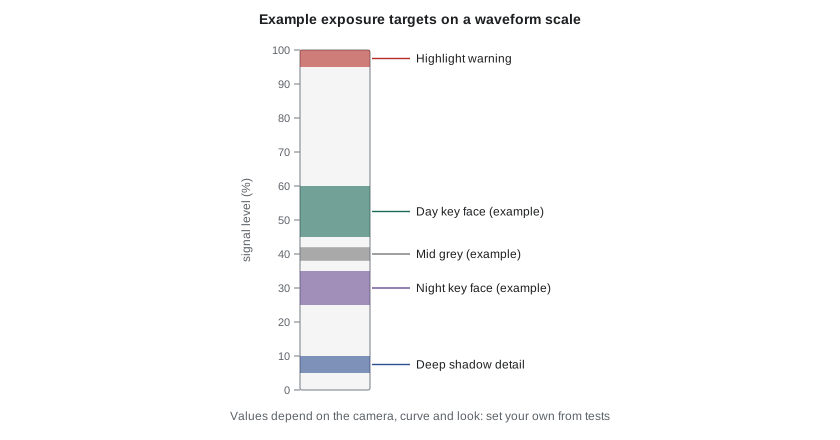
With the look defined, the DP needs consistent exposure targets so scenes shot days apart match. Two tools dominate: the waveform monitor, which plots brightness across the frame, and false colour, which paints brightness ranges in fixed colours over the image. Course CINE-202 explained how these tools read log and display signals. In narrative prep, the DP sets targets for the specific camera, LUT and look.
- Decide whether you judge exposure on the log signal or through the LUT. Many DPs judge key elements, such as faces, through the LUT and check highlights and shadows on the log waveform.
- Learn your camera's false colour key: which colours mark clipping, mid-grey, skin range and black.
- Set targets by scene type: a day interior key, a night exterior key, a low-key dramatic close-up.
- Use the targets as a starting point, not a cage. A deliberately dark scene may place faces well below the normal range.
Worked problem
Setting exposure targets from a test
In the test, the colourist and DP preferred a day interior close-up where the brightest part of the key side of the actor's face read about 55 % through the show LUT, and a night interior close-up where it read about 30 %. On the first shooting day, a night scene reads 42 % on the key side. How far, in stops, is it from the target, and what should the DP consider?
Show solution
- Through a display-referred LUT, the relationship between percentage and stops is not linear, so read the change with the camera's tools: many DPs use the stop markings of the false colour key or a quick test of one stop of iris to see how far the level moves.
- Suppose the test showed that one stop moved the face about 10 percentage points in this range. Then 42 − 30 = 12 points ≈ 1.2 stops over target.
- Options: close the iris by about one stop, add ND, dim the key or move it further away. If the scene was meant to feel slightly brighter than other night scenes, the DP may keep it, but should note it for the colourist.
Answer: The scene is about one stop brighter than the night target. The DP should adjust exposure or lighting to stay consistent with the agreed look, or deliberately accept the change and record it.
Designing a test day
Test days are short and expensive, so design them carefully. A typical prep might include one or two camera and lens days and one makeup and wardrobe day.
| Block | Time | What is tested | Who is needed |
|---|---|---|---|
| Lens set comparison | 1.5 h | Two candidate sets at T2 and T4, flare, bokeh, skin | DP, camera assistants, stand-in |
| Latitude and EI | 1 h | Chart and stand-in at −4 to +6 stops, two EIs | DP, DIT, camera assistants |
| Mixed light | 1 h | Tungsten, LED, fluorescent and sodium-style sources on skin and costumes | DP, gaffer, costume |
| Makeup and wardrobe | 2 h | Each principal actor in key costumes, day and night set-ups | Actors, makeup, hair, costume, director |
| Night exterior sim | 1 h | Moonlight ambience level, practicals and street lights | DP, gaffer, DIT |
| Review in grading suite | 2 h | Grade samples, build LUT version | DP, director, colourist |
That is 8.5 hours of activity before set-up and breaks, so a test day needs a 10- to 12-hour booking or careful trimming. Prioritize the tests that answer the most expensive questions.
Worked problem
Budgeting a test
A test day needs a camera package at a daily rental of 1,800, a lens set at 900, a small lighting package at 700, a grading suite for 2 hours at 350 an hour, and crew of DP, two camera assistants, DIT, gaffer and one electric at an average of 600 each for the day. Ignore actors, food and transport. What is the cost, and what share is crew?
Show solution
- Equipment: 1,800 + 900 + 700 = 3,400.
- Grading suite: 2 × 350 = 700.
- Crew: 6 × 600 = 3,600.
- Total: 3,400 + 700 + 3,600 = 7,700. Crew share: 3,600 ÷ 7,700 ≈ 47 %.
Answer: About 7,700 in the production's currency, with crew roughly half. Many rental houses offer test days at reduced or no charge when the production rents the package for the shoot, which can cut equipment costs sharply.
In Canada, rates are quoted in Canadian dollars and GST or HST applies to most rentals; the figures above are illustrative only.
Reviewing tests
Review tests on a calibrated display in a grading suite or a well-set-up review room, not on a laptop. Watch them with the director and, where possible, the colourist, production designer and costume designer. Make decisions on the spot and record them: lens set chosen, EI, filtration, LUT version, exposure targets and any changes for specific scenes. Share a short test report and selected stills with heads of department. The test report becomes part of the look book.
Documenting the pipeline
Before shooting, write a one-page pipeline document listing camera, firmware, recording format, resolution, frame rate, EI, white balance strategy, LUT names and versions, CDL workflow, monitoring setups, dailies format and delivery to editorial. Share it with the camera department, DIT, post supervisor, editor, dailies lab and colourist. Most pipeline problems on set come from someone using a different LUT or setting than everyone else; a clear document prevents that.
Common mistakes
MistakeTesting without a specific question
InsteadDesign each test to answer a decision the production must make
MistakeTesting lenses only at their best stop
InsteadTest at the stops the film will actually use, especially wide open
MistakeLighting and exposing tests only for one actor
InsteadTest every principal actor's complexion under the planned light and LUT
MistakeBuilding a heavily stylized LUT that hides exposure
InsteadKeep the show LUT gentle and judge exposure with consistent tools
MistakeReviewing tests on a laptop screen
InsteadReview on a calibrated display with the director and colourist
Summary and key terms
- Tests turn the look book into a working pipeline and prevent costly surprises.
- Exposure tests check latitude, EI, mixed light and flicker for the actual camera and settings.
- Lens tests compare character and matching and check mechanical accuracy at the stops the film will use.
- Makeup, hair and wardrobe tests let other departments see their work through the camera and must cover every principal complexion.
- The show LUT and per-scene CDLs carry the look from set to dailies to the final grade.
- Exposure targets on the waveform or false colour keep scenes consistent, but can be broken deliberately.
- A short pipeline document keeps camera, DIT, dailies, editorial and the colourist on the same settings.
- Latitude test
- A test that shoots a subject over and under exposed to see how much the camera can recover
- Exposure index (EI)
- The sensitivity rating at which a digital camera is exposed and monitored
- Breathing
- The change in image size when a lens is focused
- Show LUT
- The look-up table that converts log footage into the film's preview look
- CDL
- Colour decision list: a standard set of slope, offset, power and saturation values used to pass grades between systems
- DIT
- Digital imaging technician, who manages on-set image quality, LUTs and data
- False colour
- A monitoring mode that paints brightness ranges in set colours over the image
- Waveform monitor
- A display that plots signal brightness across the width of the frame
- Pipeline document
- A written summary of capture, monitoring, dailies and delivery settings
- Moiré
- An interference pattern caused when fine detail conflicts with the sensor's pixel grid
Practice problems
Work each problem on paper first, then reveal the answer to check.
Turn "test the camera" into a specific test question.
Show answer
For example: at EI 1280, how much highlight detail survives in a window five stops over, graded back through the show LUT?
What range of stops might a latitude test cover?
Show answer
From about four stops under to five or six stops over normal
What is lens breathing and why does it matter?
Show answer
The change in image size when focus is pulled; it is distracting in focus pulls and should be checked in tests
Why test costumes under the film's real light sources?
Show answer
Fabrics and colours can change under different sources, and some LEDs or infrared contamination shift colours
Name the four basic CDL values plus saturation.
Show answer
Slope, offset, power and saturation
Why keep the show LUT gentle?
Show answer
A heavy LUT can hide exposure problems and limit choices in the final grade
A night face reads 38 % against a 30 % target, with 10 points per stop. How far off is it?
Show answer
About 0.8 of a stop over
What belongs in a pipeline document?
Show answer
Camera, firmware, format, resolution, frame rate, EI, white balance, LUT versions, CDL workflow, monitoring, dailies and editorial delivery
Why review tests with the costume designer?
Show answer
So costume decisions are made with the actual camera, light and LUT in view
Equipment 2,500, suite 600 and crew 3,000: what is the total and crew share?
Show answer
6,100 total; crew about 49 %
Lesson quiz · 5 questions
Score 60% or more to complete this lesson.
Create a free account to save your progress, take quizzes and earn a certificate.