
BLR-120 · Lesson 4 of 12 · 20 min
Mobile cranes and load charts
The reboiler shell will be lifted by a large all-terrain crane, a hydraulic crane on a multi-axle carrier that can drive on roads, set up on its outriggers and lift in all directions. The day before the lift, Wade Kozak sits down with Kiera and the crane company's lift engineer, Sunita Rao, and opens the crane's load chart. Kiera has seen small load charts in her core course. This one is a book: dozens of pages of tables for different boom lengths, counterweights, outrigger settings and jib configurations, with notes on every page. This lesson explains how mobile cranes carry a load, how to read a load chart properly, and why the radius is the number that matters most.
Types of mobile crane
Mobile cranes on industrial projects fall into a few families. Hydraulic cranes have a telescoping boom extended by hydraulic cylinders; they set up quickly and include all-terrain cranes, rough-terrain cranes for site work, truck cranes and boom trucks. Lattice boom cranes have a boom built from bolted or pinned steel lattice sections; they take longer to assemble but can carry far more at long radius, and the largest are crawler cranes, mounted on tracks, which are covered in lesson 5. Each family has its own load chart conventions, but they all answer the same question: how much can this crane lift, in this configuration, at this radius?
| Crane | Typical use on a turnaround | Set up |
|---|---|---|
| Boom truck | Small loads, material handling, short radius | Outriggers, minutes |
| Rough-terrain hydraulic | General site lifts, valves, small exchangers | Outriggers on site roads, minutes |
| All-terrain hydraulic | Exchangers, heads, reboilers, tailing small vessels | Outriggers, counterweight delivered by truck, hours |
| Lattice crawler | Heavy vessels, coker drums, reactors, long reach | Assembled on site over days, travels on tracks |
How a crane carries a load
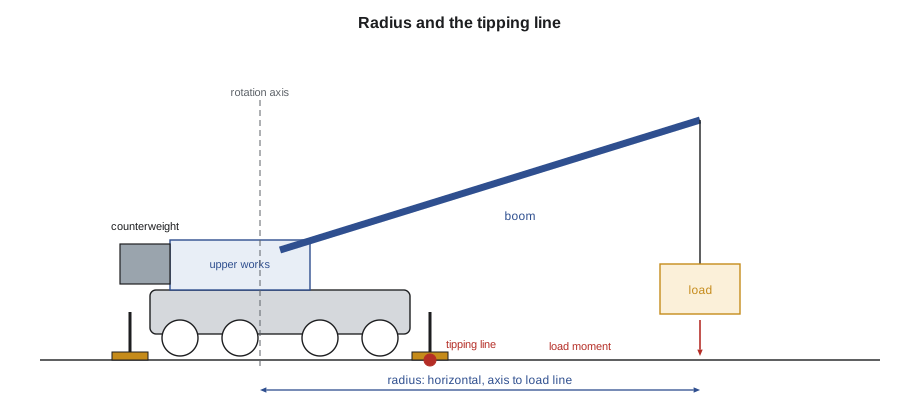
A mobile crane is a lever balanced on a tipping line. On outriggers, the tipping line is the line between the two outrigger floats nearest the load; on tracks, it is the edge of the track. The load, acting at the end of the boom, tries to tip the crane forward over that line; the crane's own weight and counterweight, acting behind it, resist. As the radius grows, the load's lever arm grows and the capacity falls. A crane can fail in two ways: it can tip over, when the load's moment exceeds the crane's resisting moment, or it can break, when a part of the boom, the boom hoist, the outriggers or the slewing ring is overloaded.
Load charts include both limits. At short radius, the chart values are set by the strength of the crane's structure, and an overload can break the boom or the outriggers without any sign of tipping. At long radius, the chart values are set by stability, typically as a fixed percentage of the load that would tip the crane: for most mobile cranes on outriggers, the chart is set at no more than 85 percent of the tipping load, and for crawlers at no more than 75 percent. Many charts shade the structural region or mark it with a line or asterisks. An operator who relies on the feeling that the crane is starting to get light is relying on the stability limit, and in the structural region there is no such warning.
Radius and boom length
Radius is the horizontal distance from the crane's centre of rotation to the centre of the hook, with the load suspended. It is not the boom length and not the distance from the edge of the crane. When a load is lifted, the boom deflects and stretches under the weight, and the radius grows. On a hydraulic crane with a long boom, the radius can increase by several percent as the load comes off the ground, and the planned radius must allow for it. The radius also grows if the load swings out, if the operator booms down, or if the load is set at a point farther away than planned.
Boom length and boom angle are related to radius but are not the same. For a given boom length, raising the boom angle shortens the radius; for a given angle, a longer boom has a longer radius and a lower capacity, because the boom's own weight is carried farther out. Many charts are organized by boom length across the top and radius down the side; some show boom angle as well. The operator's computer, the rated capacity limiter or load moment indicator, calculates the radius and the percentage of capacity continuously, but it does so from the configuration the operator has entered, and it is only as good as that entry.
Reading a load chart
A load chart is valid only for the exact configuration it describes. Before reading any number, the operator and the lift planner confirm the counterweight installed, the outrigger extension (fully extended, intermediate or retracted), the working area (over the rear, over the side or 360 degrees), the boom length, any jib or extension stowed or erected, and the number of parts of line reeved on the hook block. Change any of these, and the chart page changes.
Three rules apply to every chart. First, never interpolate between values: if the radius falls between two lines on the chart, use the capacity at the next longer radius, and if the boom length falls between two columns, use the next longer boom. Second, chart values are gross capacities, which include everything below the boom tip: the hook block, the overhaul ball, slings, shackles, spreader bars and lifting beams, and allowances for any jib that is stowed on the boom or erected. These are deducted to find what is left for the load. Third, the notes on the chart are part of the chart. They set wind limits, ground conditions, levelness, and the conditions in which capacities must be reduced. Alberta's Code requires the load chart to be on the crane and its values never to be exceeded.
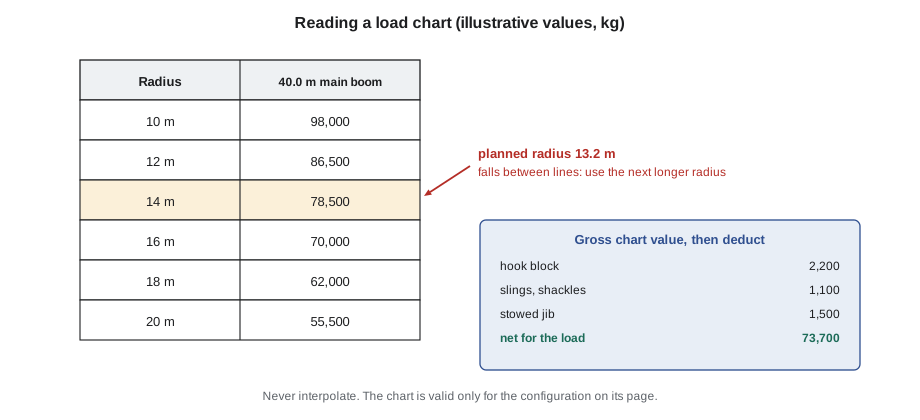
For the reboiler shell, the crane will be set up with a 40.0 m boom, full counterweight and outriggers fully extended, working 360 degrees. The planned radius at the set is 13.2 m. The chart excerpt below is illustrative; it is not from a real crane.
# Net capacity from a load chart (metric; chart values are illustrative, not from a real crane)
# gross capacity by radius for one configuration: 40.0 m main boom, full counterweight, outriggers fully extended, 360 deg
chart = {10: 98_000, 12: 86_500, 14: 78_500, 16: 70_000, 18: 62_000, 20: 55_500, 22: 49_000, 24: 44_000}
deduct = {"hook block": 2_200, "slings and shackles": 1_100, "stowed jib allowance": 1_500}
load = 41_000
radius = 13.2
# never interpolate: use the next longer radius on the chart
r_used = min(r for r in chart if r >= radius)
gross = chart[r_used]
net = gross - sum(deduct.values())
total = load + sum(deduct.values())
print(f"planned radius {radius} m -> read the chart at {r_used} m: gross capacity {gross:,} kg")
for k, v in deduct.items():
    print(f"  deduct {k:<22} {v:>7,} kg")
print(f"net capacity for the load {net:,} kg; load {load:,} kg")
print(f"total lifted {total:,} kg = {100 * total / gross:.1f} % of the gross chart value")
for r in sorted(chart):
    if r >= radius:
print(f" if the radius grows to {r:>3} m: {100 * total / chart[r]:5.1f} %")planned radius 13.2 m -> read the chart at 14 m: gross capacity 78,500 kg deduct hook block 2,200 kg deduct slings and shackles 1,100 kg deduct stowed jib allowance 1,500 kg net capacity for the load 73,700 kg; load 41,000 kg total lifted 45,800 kg = 58.3 % of the gross chart value if the radius grows to 14 m: 58.3 % if the radius grows to 16 m: 65.4 % if the radius grows to 18 m: 73.9 % if the radius grows to 20 m: 82.5 % if the radius grows to 22 m: 93.5 % if the radius grows to 24 m: 104.1 %
The radius of 13.2 m falls between the 12 m and 14 m lines, so the chart is read at 14 m, giving 78,500 kg gross. After the deductions, the crane can lift 73,700 kg of load, and the total lifted, 45,800 kg, is 58.3 percent of the chart. That looks comfortable. The table of growing radius shows why the radius matters: if the load were set or swung several metres farther out than planned, the lift would pass 75 percent by 20 m and exceed the crane's chart at 24 m. Wade marks the maximum allowed radius on the lift plan as 16 m, with the set point marked on the ground, and the crane is positioned so that the swing from the truck to the saddles never takes the radius beyond it.
Parts of line and the hook block
The crane's chart gives the capacity of the crane's structure and stability, but the hoist rope has its own limit. Each part of line, each fall of rope between the boom tip sheaves and the hook block, can carry only so much, and the hook block is reeved with enough parts that the load per part stays within the rope's rating. The chart's notes give the line pull per part and the number of parts needed for a given load. A hook block reeved with too few parts can be overloaded even when the crane itself is well within its chart; a block reeved with more parts than needed is slower and heavier. The block's own capacity, stamped on it, must also equal or exceed the load.
For the reboiler shell, the hook block is reeved with six parts of line; at the chart's allowable line pull of 8.2 t per part, that is 49 t, enough for the 45.8 t total.
Working area and outriggers
Many cranes are not equally strong in every direction. A crane on outriggers is most stable over the rear, where the counterweight is, and least stable over the front or side, depending on the carrier. Charts give separate capacities for different working areas, or a 360-degree chart that applies everywhere. Outriggers set at intermediate extension reduce capacity sharply, and some modern cranes allow different extensions on each side, with the crane's computer limiting capacity as it slews. A lift that passes through a weak area on its way to the set must be checked at the worst point, not only at the pick and the set.
The crane must also be level. Load charts assume the crane is level within a small tolerance, often 1 percent, and a crane that is out of level loses capacity rapidly because the load swings outward and the radius grows on the downhill side. Before every lift, the operator checks the level indicator, and the riggers check that the outrigger floats and mats have not settled.
Rated capacity limiters
Modern cranes have a rated capacity limiter, also called a load moment indicator, that measures the load, boom length and angle and compares the load with the chart for the configuration entered. It warns the operator as the load approaches the chart and, on most cranes, stops motions that would increase the load moment. The limiter is a valuable safety device, but it is not a substitute for planning. It does not know if the configuration entered is wrong, if the ground is soft, if the wind is strong, or if the rigging weighs more than assumed. Alberta's Code requires load indicators on many cranes and requires them to be working.
Worked problem
Net capacity for a top head lift
A crane will lift a coker drum top head at a radius of 21 m. The chart, for the configuration in use, gives 52.5 t at 22 m and 58.0 t at 20 m. The hook block weighs 1.4 t and the rigging 0.6 t. The head weighs 24 t. What percentage of chart is the lift?
Show solution
- The radius falls between chart lines; use the next longer radius: 22 m, 52.5 t.
- Total lifted: 24 + 1.4 + 0.6 = 26.0 t.
- Percentage of chart: 26.0 / 52.5 = 49.5 percent.
- The lift is under half of the chart at the planned radius, but the planned radius must allow for boom deflection and any swing.
Answer: About 50 percent of chart. Had the planner interpolated or used the shorter radius, the margin would look larger than it is.
Common mistakes
MistakeInterpolating between chart values.
InsteadUse the next longer radius and the next longer boom.
MistakeTreating the chart value as the load the crane can lift.
InsteadDeduct the hook block, rigging, beams and jib allowances first.
MistakeMeasuring radius from the edge of the crane or along the boom.
InsteadRadius is horizontal, from the centre of rotation to the load line.
MistakeRelying on the crane getting light as a warning.
InsteadIn the structural region the crane can fail without any sign of tipping.
MistakeTrusting the rated capacity limiter over the plan.
InsteadThe limiter only knows the configuration entered; the plan must be right first.
Summary and key terms
- Hydraulic cranes include boom trucks, rough-terrain and all-terrain cranes; lattice crawlers handle the heaviest loads.
- A crane can fail by tipping or by structural overload; charts include both limits.
- Radius is the horizontal distance from the centre of rotation to the load line, and it grows as the load is lifted.
- Use the chart for the exact configuration, never interpolate, and deduct everything below the boom tip.
- Check the parts of line, the hook block rating, the working area, the outriggers and the crane's levelness.
- The rated capacity limiter helps but does not replace the plan.
- Radius
- The horizontal distance from the crane's centre of rotation to the centre of the hook with the load suspended.
- Gross capacity
- The chart value, which includes everything below the boom tip.
- Net capacity
- Gross capacity less the hook block, rigging and other deductions; what is left for the load.
- Tipping line
- The line about which a crane would tip, through the outrigger floats or track edge nearest the load.
- Parts of line
- The number of falls of hoist rope between the boom tip and the hook block.
- Rated capacity limiter
- A system that measures the load and boom position and warns or stops the crane near its chart.
Practice problems
Work each problem on paper first, then reveal the answer to check.
The planned radius is 17 m. The chart gives values at 16 m and 18 m. Which do you use?
Show answer
The 18 m value, the next longer radius.
A chart gives 30 t at the radius. The block weighs 0.9 t and the rigging 0.4 t. What net capacity is left for the load?
Show answer
30 − 0.9 − 0.4 = 28.7 t.
Why must the radius allow for the lift itself?
Show answer
The boom deflects under load and the load may swing, so the radius grows.
What is the difference between the structural and stability regions of a chart?
Show answer
At short radius the structure limits capacity; at long radius stability does.
Lesson quiz · 5 questions
Score 60% or more to complete this lesson.
Create a free account to save your progress, take quizzes and earn a certificate.