
AUTO-130 · Lesson 6 of 12 · 22 min
Disc brakes: calipers, pads and rotors
Van 2 is still on the lift in bay 5, its front wheels off and its fluid now fresh. Kiran lays the old front pads on the bench in the order they came off: left outer, left inner, right inner, right outer. The left pads have about 2 mm of friction material left. The right inner pad has none, and its steel backing plate has cut a groove into the rotor; the right outer pad still has 3 mm. “Don't order anything yet,” Marty says. “Pads tell stories. Read them first.”
This lesson explains how disc brakes work: the two main kinds of caliper, how a caliper piston applies and releases, what pads are made of and how they wear, the kinds of rotors, and how a disc brake job is done properly, from reading the old pads to bedding in the new ones. Lesson 7 covers measuring and machining rotors.
Why discs
A disc brake clamps a rotor, a flat disc of cast iron that turns with the wheel, between two pads. Disc brakes replaced drums on the front of almost all cars by the 1970s and are now used on all four wheels of most light vehicles. Their main advantage is cooling: the rotor's friction faces are open to the air, and a vented rotor pumps air through itself as it turns. They also resist fade better than drums, because the rotor expands toward the pads rather than away from them; they shed water quickly, because the pads wipe the rotor; and they are easier to inspect and service.
Floating and fixed calipers
The caliper is the part that holds the pads and squeezes them against the rotor. There are two main designs.
A floating caliper, also called a sliding caliper, has its piston or pistons on the inboard side only. It is mounted on a caliper bracket, also called an anchor, which is bolted to the steering knuckle or axle and takes the braking force from the pads. The caliper body slides on two guide pins in the bracket. When pressure is applied, the piston pushes the inboard pad against the rotor; the reaction pushes the caliper body the other way, sliding it on its pins, so that the body's outer fingers pull the outboard pad against the other face. Because both pads are applied by one set of pistons, floating calipers are compact and cheap, and they are by far the most common type. Their weakness is the slides: if the guide pins corrode or their rubber boots fail and they seize, the caliper cannot slide, and only the inboard pad presses on the rotor.
A fixed caliper is bolted rigidly to the knuckle and has pistons on both sides of the rotor, typically two, four or six in total. It does not need to slide, so it applies both pads evenly and is stiffer, which gives a firm pedal; it is heavier and more expensive and is used on performance cars and some heavy trucks.
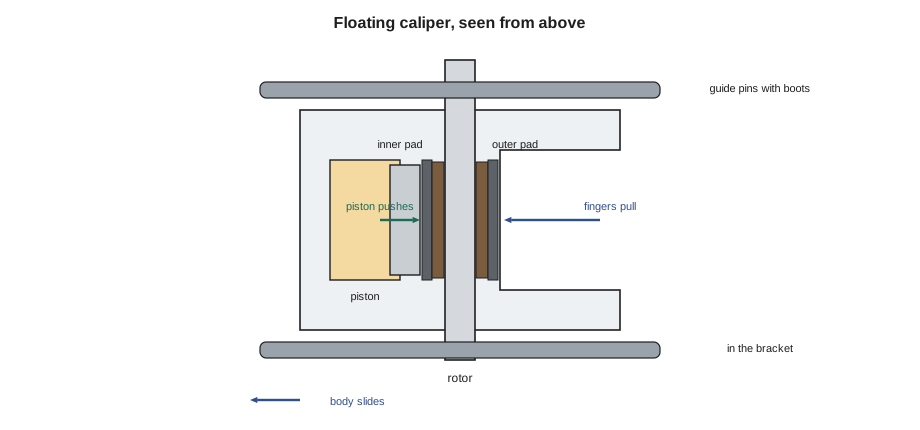
Kiran's pads now tell their story. The left caliper wore both its pads about equally, so it slid freely. The right caliper wore its inner pad to the steel while its outer pad still had material, the classic sign of a caliper that could not slide. When she pulls the right caliper's guide pins, one is seized with rust and the other has a torn boot. Pads that wear unevenly in other ways tell other stories. A pad worn into a taper, thicker at one end than the other, points to a caliper that is cocked, often because of a worn pin bushing or bracket. Both pads on one side worn far faster than the other side can mean a sticking piston or a restricted hose that keeps that brake dragging, which Lesson 3 described.
# Reading van 2's pad wear: thickness of friction material when removed
UNITS = "metric"
new = 12.0                                    # mm, new pad friction thickness
pads = {"left":  (2.1, 2.4),                 # (inner, outer)
        "right": (0.0, 3.0)}
for side, (inner, outer) in pads.items():
    diff = abs(inner - outer)
    print(f"{side:<6} inner {inner:4} mm, outer {outer:4} mm, difference {diff:.1f} mm", end="  ")
    if diff <= 1.0:
        print("-> even wear: caliper slides freely")
    elif inner < outer:
        print("-> inner much thinner: caliper not sliding (check guide pins and boots)")
    else:
        print("-> outer much thinner: check the caliper fingers, bracket and outer pad clips")
left_avg = sum(pads["left"]) / 2; right_avg = sum(pads["right"]) / 2
print(f"side-to-side average difference: {abs(left_avg - right_avg):.1f} mm")left inner 2.1 mm, outer 2.4 mm, difference 0.3 mm -> even wear: caliper slides freely right inner 0.0 mm, outer 3.0 mm, difference 3.0 mm -> inner much thinner: caliper not sliding (check guide pins and boots) side-to-side average difference: 0.8 mm
How a caliper piston applies and releases
Each caliper piston is sealed in its bore by a square-section rubber seal that sits in a groove in the bore. When pressure pushes the piston out, the seal grips the piston and twists slightly. When the pressure is released, the seal untwists and pulls the piston back a very small distance, a fraction of a millimetre, which gives the pads just enough clearance to stop dragging. As the pads wear, the piston slides through the seal a little further each time, so the caliper adjusts itself automatically. A rubber dust boot fitted to the piston and the caliper keeps water and grit out of the bore.
If the boot tears, water gets in, the piston rusts and the seal cannot retract it, so the brake drags; in the worst case the piston seizes. A seized piston, a leaking seal or a damaged bore means rebuilding or replacing the caliper. Most shops today replace calipers with remanufactured units, in pairs on an axle, rather than rebuilding them, because the labour costs more than the part.
To fit new, thicker pads, the piston must be pushed back into its bore. On a front caliper, that is done with a C-clamp or a piston compression tool, slowly and squarely. Many manufacturers and Ridgeline's own procedure call for opening the bleeder screw while the piston is pushed back, with a hose into a catch bottle, so that the old fluid in the caliper goes into the bottle rather than back through the anti-lock unit, where any dirt or corrosion it carries could damage the valves. Rear calipers with an integrated parking brake have pistons that must be screwed back in with a special tool, or retracted electrically with a scan tool on vehicles with an electronic parking brake; Lesson 9 explains why.
Brake pads
A pad is a block of friction material bonded or riveted to a steel backing plate. The friction material is a mixture of fibres for strength, fillers, abrasives, lubricants such as graphite, and a resin binder, pressed and baked into shape. Manufacturers blend these to balance friction level, wear, noise, dust, rotor wear and how the friction changes with temperature. Three broad families are sold.
| Type | Typical use | Strengths | Weaknesses |
|---|---|---|---|
| Non-asbestos organic (NAO) | Light cars, gentle driving | Quiet, gentle on rotors | Wears faster, fades sooner when very hot |
| Semi-metallic and low-metallic | Trucks, vans, towing, many original-equipment fronts | Handles heat well, strong friction | Noisier, more dust, more rotor wear |
| Ceramic | Most passenger cars and light trucks | Quiet, low dust, stable friction, long life | Higher cost; some grades less suited to heavy hauling |
Since 2021, brake pads sold in the United States have been covered by an agreement between brake manufacturers, the US Environmental Protection Agency and the states to reduce copper, which washes off roads into rivers and harms fish. It is based on Washington's and California's laws: pads must contain less than 5 percent copper by weight from 2021 and less than 0.5 percent from January 2025, and they must contain no asbestos, cadmium, chromium, lead or mercury. Compliant pads carry a LeafMark symbol of three leaves on the box and an edge code on the pad; the 2025 level shows all three leaves dark. Because Canadian parts come from the same manufacturers, pads sold in Canada are almost all made to the same standard.
Most pads have a wear indicator. A mechanical indicator is a small steel tab on the backing plate that touches the rotor when the friction material is nearly gone, making a high-pitched squeal that warns the driver. An electronic indicator is a wire loop embedded in the pad that wears through and turns on a dash warning; it is replaced with the pads. Van 2's right inner pad had a squealer tab, but the driver had heard squeals for weeks and assumed they were normal for a van. Pads also have shims, thin layered plates on the back that damp vibration, and many have chamfers and slots in the friction material that reduce noise and let gas and dust escape.
# Pad life estimate for the courier vans from measured wear
UNITS = "metric"
new, minimum = 12.0, 3.0                    # mm friction material
measured = 2.25                              # mm left after the interval below
interval = 52000                               # km since the pads were new
rate = (new - measured) / interval * 10000     # mm per 10,000
usable = new - minimum
life = usable / rate * 10000
print(f"wear rate {rate:.2f} mm per 10,000 km -> about {life:,.0f} km from new to the minimum")
print(f"at about 60,000 km a year, that is {life / 60000 * 12:.0f} months")wear rate 1.88 mm per 10,000 km -> about 48,000 km from new to the minimum at about 60,000 km a year, that is 10 months
The minimum pad thickness is set by the manufacturer, and many shops replace pads at a slightly higher figure, because the last part of the friction material wears fastest and the vehicle may not be back for months. At van 2's rate, front pads last a little under a year, which matches Hal's experience. Marty suggests a heavy-duty pad formulation designed for delivery fleets, and a mid-interval brake inspection, to Hal through Simone.
Rotors
Rotors are cast iron, usually grey iron with flake graphite that conducts heat well and damps noise. Solid rotors, a single plate, are used on the rear of many cars. Vented rotors have two friction plates joined by vanes, and are used on the fronts of almost all vehicles and on the rears of heavier ones. Vanes may be straight, or curved so that they pump more air; curved-vane rotors are directional and must be fitted on the correct side. Many rotors are of hat design, with a central section that fits over the hub and is clamped by the wheel; some trucks use hub-and-rotor assemblies, in which the rotor and hub are one part with the wheel bearing inside. Drilled and slotted rotors, often sold as upgrades, help shed gas and water but can crack under hard use and are not a substitute for the right pads.
Many rotors today have a protective coating on their non-friction surfaces, and sometimes on the friction faces too, to stop rust on the hat and vanes. The coating on the faces wears off in the first few stops. A rotor that is used very little, such as the rear rotors of an electric car that does most of its braking by regeneration, can rust heavily on its faces, a problem Lesson 7 returns to with Dr. Singh's car.
Doing a disc brake job right
Marty's checklist for a pad and rotor job turns the principles into a routine. Kiran works through it on van 2.
- Road test if safe, inspect, measure and record: pad thickness at both ends of each pad, rotor thickness and runout (Lesson 7), caliper slides, boots, hoses and fluid.
- Remove the caliper and hang it with a hook; remove the pads and the bracket's abutment clips.
- Clean the bracket's pad abutments down to bare metal with a wire brush or file, because rust there pushes the pad and makes it bind; fit the new clips supplied with the pads.
- Clean and inspect the guide pins and boots; replace any that are seized, corroded or torn; lubricate them with the high-temperature silicone or synthetic grease the manufacturer specifies, never with ordinary chassis grease or anti-seize, which swells rubber boots.
- Clean the hub face of rust, so that the new rotor sits flat; fit the new or machined rotors.
- Retract the pistons with the bleeder open; fit the pads with their shims, apply a thin film of the specified brake grease only where the instructions show, and keep grease and fingerprints off the friction surfaces.
- Torque the bracket bolts and guide pin bolts to specification, fit the wheels and tighten the wheel nuts in a star pattern to specification with a torque wrench, never with an impact wrench alone.
- Pump the pedal until it is firm, check the fluid level, and bed in the pads on a road test.
Bedding in, also called burnishing, transfers an even layer of pad material onto the rotor faces and brings the pads up to temperature gradually, which gives smooth, quiet braking with the full friction level. A typical procedure is a series of moderate stops from about 60 to 10 km/h, without stopping completely, followed by a cooling drive; the pad manufacturer's procedure takes priority. Hard stops on new pads, or holding the brakes on hard at a stop while they are very hot, can leave a patch of pad material on the rotor that later feels like a pulsation.
# Van 2's front brake job: parts and recorded measurements for the work order
UNITS = "metric"
parts = ["front pads, heavy-duty fleet formula, with clips and shims",
         "2 front rotors (vented)", "right caliper guide pin kit (pins, boots, bushings)",
         "brake fluid DOT 4 LV for the flush (done in Lesson 4)"]
for p in parts:
    print("part:", p)
record = {"left rotor thickness": "29.4 mm", "right rotor thickness": "28.6 mm (grooved by the backing plate)",
          "rotor minimum (discard)": "28.0 mm", "wheel nut torque": "204 N m, star pattern"}
for k, v in record.items():
print(f"{k:<26} {v}")part: front pads, heavy-duty fleet formula, with clips and shims part: 2 front rotors (vented) part: right caliper guide pin kit (pins, boots, bushings) part: brake fluid DOT 4 LV for the flush (done in Lesson 4) left rotor thickness 29.4 mm right rotor thickness 28.6 mm (grooved by the backing plate) rotor minimum (discard) 28.0 mm wheel nut torque 204 N m, star pattern
Worked problem
Why did only one pad wear out?
Explain van 2's pad wear to Hal, and what was done to stop it happening again.
Show solution
- The right front caliper is a floating caliper that must slide on two guide pins to apply its outer pad.
- One pin had seized with rust and the other's boot was torn, so the caliper could not slide; the piston kept pressing the inner pad on the rotor while the outer pad did little work.
- The inner pad wore to the steel, and the steel cut a groove in the rotor; the squeal the driver heard for weeks was the wear indicator.
- New pins, boots and bushings, cleaned abutments, new pads and new rotors fix it, and the van's brakes will be inspected halfway through the pads' expected life.
Answer: A seized guide pin stopped the caliper from sliding; the slides were rebuilt with the pads and rotors, and the van gets a mid-interval inspection.
Common mistakes
MistakeReplacing pads without reading the old ones.
InsteadUneven wear shows a caliper, slide or hose problem that new pads will not fix.
MistakeLubricating guide pins with chassis grease or anti-seize.
InsteadUse the specified high-temperature brake grease that is safe for the boots.
MistakePushing pistons back with the bleeder closed.
InsteadOpen it so old fluid goes to the bottle, not the anti-lock unit.
MistakeTightening wheel nuts with an impact wrench only.
InsteadUse a torque wrench in a star pattern.
MistakeIgnoring a squeal from a wear indicator.
InsteadIt means the pads are nearly gone.
Summary and key terms
- Disc brakes cool well, resist fade and shed water.
- Floating calipers slide on guide pins to apply both pads from one side; fixed calipers have pistons on both sides.
- A square-cut seal retracts the piston slightly and lets the caliper adjust as the pads wear.
- Pad wear patterns show sliding, cocking and dragging problems.
- Pads are organic, semi-metallic or ceramic; US pads must now contain less than 0.5 percent copper.
- A proper job includes cleaning abutments and hubs, servicing slides, correct torque and bedding in.
- Floating caliper
- A caliper with pistons on one side that slides on guide pins to apply both pads.
- Fixed caliper
- A caliper bolted rigidly in place, with pistons on both sides of the rotor.
- Caliper bracket
- The mounting that holds a floating caliper and takes the pads' braking force.
- Guide pins
- The pins on which a floating caliper slides.
- Wear indicator
- A tab or sensor that warns when the pad friction material is nearly gone.
- Vented rotor
- A rotor with two friction plates joined by cooling vanes.
- Bedding in
- Running in new pads with controlled stops to transfer pad material to the rotor.
Practice problems
Work each problem on paper first, then reveal the answer to check.
A floating caliper's inner pad is worn much more than its outer pad. What is likely wrong?
Show answer
The caliper is not sliding; check the guide pins, bushings and boots.
Why is the bleeder opened when retracting a caliper piston?
Show answer
So that old fluid and dirt go into the bottle instead of back into the anti-lock unit.
What is the copper limit for pads sold in the US from 2025?
Show answer
Less than 0.5 percent by weight.
Why are curved-vane rotors directional?
Show answer
The vanes must face the right way to pump air through the rotor.
Lesson quiz · 5 questions
Score 60% or more to complete this lesson.
Create a free account to save your progress, take quizzes and earn a certificate.