
ARCH-310 · Lesson 1 of 12 · 24 min
Envelope functions
The first class of the third-year envelope course does not meet in the studio. Professor Marguerite Lavoie, who spent twenty years investigating failed walls and roofs for a building science firm before she began teaching, takes Wren, Callum, Ingrid and Joon-ho to a three-storey apartment block a few streets from the school. It is fifteen years old. Scaffolding covers the north wall, and a crew is stripping the cladding. Behind the siding, the sheathing is black and soft; a screwdriver sinks into it with no effort. Around every window, the wood is worse. 'The owners are spending more on this repair than the whole wall cost when it was built,' Lavoie says. 'Nothing exotic happened. Rain got in at the windows, it could not get out, and the wall stayed wet for years. Every material in this wall was good. The wall as a system was not.' This course is about envelopes as systems: the walls, roofs, windows and foundations that separate the inside of a building from the outside, how they fail and how architects design and detail them so that they do not.
What the envelope must do
The building envelope, also called the building enclosure, is the set of assemblies that separates conditioned space from the outdoors and from the ground. In 1963, Neil Hutcheon of the National Research Council of Canada set out the requirements of an exterior wall in a short paper that is still read today. His list, slightly extended, describes what every part of the envelope must do. It must control heat flow, so that the interior can be heated and cooled economically and its surfaces stay comfortable. It must control air flow, both to save energy and to keep moist indoor air out of cold parts of the assembly. It must control water vapour, so that moisture does not accumulate where it can condense. It must control rain and groundwater. It must control light, solar radiation and views. It must control noise, fire, insects and intruders. It must be strong and stiff enough to resist wind, snow and its own weight, and to accommodate movement of the structure. It must be durable, buildable, maintainable and affordable. And it must look the way the architect intended for as long as the building stands.
No single material does all of this. A wall is a set of layers, each doing one or two jobs well, arranged so that together they do everything. The art of envelope design is choosing the layers, putting them in the right order and, above all, making them continuous at every edge, corner, opening and joint, because that is where almost all failures begin.
Separating heat, air, vapour and water
Building scientists describe four principal control functions and the layers that perform them. The water control layer stops liquid water: rain, melting snow and groundwater. The air control layer, usually called the air barrier, stops air from flowing through the assembly. The vapour control layer, usually called the vapour retarder or vapour barrier, slows the diffusion of water vapour through materials. The thermal control layer, the insulation, slows the flow of heat. In some assemblies one material performs two or three functions: a self-adhered membrane on the sheathing can be the water, air and vapour control layer at once, and a closed-cell spray foam can be air barrier, vapour retarder and insulation. In others, each function has its own layer. Either way, the designer should be able to point to each control layer on every section and trace it without a break around the whole building.
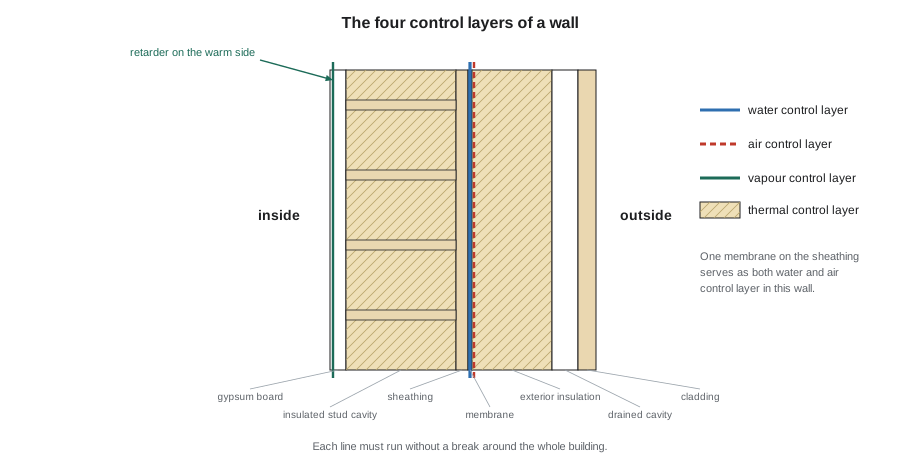
The order of the layers matters as much as their presence. In a cold climate, the layers that resist vapour must be on the warm side of most of the insulation, so that moisture cannot reach a cold surface; the layers that shed water must be on the outside, where rain arrives; and layers that are very vapour-tight must not be placed on the cold side, where they would trap moisture that does get in. Lavoie calls this the perfect wall: cladding and a drained cavity outside, then insulation, then a single membrane that controls water, air and vapour on the face of the structure, then the structure itself, warm and dry on the inside. 'Everything that matters is protected by the insulation,' she says. 'The structure lives at room temperature. Nothing is wet, and nothing is cold.' Many real walls depart from this ideal for good reasons, and the rest of the course shows how to make those departures safely.
Loads on the envelope
Each control function has a load to resist. The heat load is the temperature difference across the envelope, which in Winnipeg reaches more than 50 kelvins on a design winter night and reverses in summer, when sun on a dark roof can raise its surface far above the air temperature. The air load is the pressure difference across the envelope, caused by wind, by the stack effect of warm air rising inside a tall heated building, and by fans. The vapour load is the difference in vapour pressure between warm humid indoor air and cold dry outdoor air in winter, and between hot humid outdoor air and cooled indoor air in summer. The water load is rain, especially rain driven by wind against walls, snow, ice and groundwater. The structural loads are wind pressure and suction, snow, the weight of the envelope itself and the movement of the frame as it shortens, deflects and sways.
These loads are not constant. A wall faces dozens of freeze-thaw cycles a year, daily swings of surface temperature of 40 kelvins or more on a sunny face, rain on a few dozen days a year and sun every clear day. The envelope must survive all of this for decades with only modest maintenance. That is why its durability, the subject of the last lesson of the materials course, depends so much on the arrangement of layers: materials are protected from the loads they cannot bear by the layers outside them.
Where the energy goes
A useful first step in designing any envelope is to see where its heat goes. The heat lost through each element is its area times its U-factor times the temperature difference, and the heat carried by air leaking through the envelope is proportional to the leakage rate and the volume of the building. The following calculation does this for one of the four-storey blocks of the Greenway Homes scheme from the housing studio, with walls, roof, windows, ground floor and air leakage at values close to current code minimums.
# Where the heat goes: one four-level apartment block on a design winter night
dT = 54                       # indoor minus outdoor design temperature (C)
parts = [
    # element          area     U-factor
    ("walls",          1850,    0.21),
    ("windows",        520,    1.6),
    ("roof",           1100,    0.16),
    ("ground floor",   1100,    0.28),
]
volume = 12100                  # heated volume (m3)
ach = 0.25                      # natural air leakage, air changes per hour
air_factor = 0.33               # heat per unit volume per degree per air change
loss = {name: area * u * dT for name, area, u in parts}
loss["air leakage"] = air_factor * ach * volume * dT
total = sum(loss.values())
for name, q in loss.items():
    print(f"{name:13s} {q / 1000:7.1f} kW  {100 * q / total:4.0f} of every 100")
print(f"{'total':13s} {total / 1000:7.1f} kW")
area_total = sum(a for _, a, _ in parts)
print(f"envelope area {area_total:,.0f} m2, volume {volume:,.0f} m3, ratio {area_total / volume:.2f} per m")walls 21.0 kW 14 of every 100 windows 44.9 kW 31 of every 100 roof 9.5 kW 7 of every 100 ground floor 16.6 kW 11 of every 100 air leakage 53.9 kW 37 of every 100 total 145.9 kW envelope area 4,570 m2, volume 12,100 m3, ratio 0.38 per m
The result is typical of a modern building that just meets the code. The windows, with little more than a quarter of the wall area, lose more heat than all the opaque walls together. Air leakage, invisible on every drawing, is the largest single share of the total. The roof, with well over half the area of the walls, loses less than half as much heat, because insulation is cheap to add to a roof and the code asks for more of it. Three conclusions follow. Windows deserve the most attention per unit area. Airtightness is an energy measure as important as insulation. And the ratio of envelope area to volume, a measure of compactness, matters: a building with many corners, setbacks and projections has more envelope to lose heat through, and more edges where control layers can fail.
Where envelopes fail
Forensic engineers who investigate envelope failures find the same causes again and again. Most water damage starts at interfaces: where a window meets a wall, where a wall meets a roof or a balcony, where the cladding stops at a soffit or a grade line. Most air leakage passes through joints and penetrations rather than through the field of a wall. Most condensation occurs where warm moist air leaks into a cold cavity, not where vapour diffuses through a solid layer. Most thermal bridges are at slab edges, balconies, parapets, shelf angles and window frames. The field of the wall, the flat expanse shown on the typical wall section, is rarely the problem.
Lavoie's crew at the apartment block confirms this. The rot is worst below each window, spreading downward in a fan shape. The windows were installed without sill pans; water that leaked through the window frame corners ran down the inside of the rough opening, soaked the sheathing below and could not drain out because the siding was nailed directly to the house wrap with no cavity. Above the windows, where the head flashing was installed correctly, the sheathing is sound. The fix is not a better material but a better sequence of layers and a continuous path for water to drain out.
Envelope failures are expensive for two reasons. The damage is hidden until it is advanced, and repairing it requires removing the finishes and cladding that were installed over it. Studies of the leaky condominium crisis in British Columbia in the 1990s, where thousands of new buildings suffered rot within a few years, estimated the cost of repairs in the billions of dollars. The causes there were the same as in Lavoie's example: face-sealed walls with no drainage cavity, poor window installation, complex forms with many interfaces, and a wet coastal climate that gave the walls little chance to dry. The response, which included mandatory rainscreen walls and new professional practices for envelope consultants, changed construction across the country.
Durability, drying and redundancy
Perfect envelopes do not exist. Every wall will get wet at some point, during construction, through a failed sealant or by condensation on a cold morning. A durable envelope is therefore one that tolerates small amounts of water: it deflects most water at the surface, drains what gets past the surface, allows what remains to dry out, and uses materials that survive being wet for a while. Building scientists sum this up as the four Ds: deflection, drainage, drying and durable materials. The balance between wetting and drying, not the absence of wetting, decides whether an assembly will last.
Redundancy is the second principle. A wall that depends on a single line of sealant to keep water out will fail when the sealant fails, as all sealants eventually do. A wall with a drained cavity behind its cladding has a second line of defence: the water resistive barrier on the sheathing. Experienced designers ask of every joint what happens when its first line fails, and make sure the answer is a path out of the wall rather than into it.
Who designs the envelope
The architect is responsible for the envelope's design: the selection of assemblies, their layers and the details at every interface. On larger projects, a building envelope consultant, usually an engineer or architect specializing in building science, reviews the design, develops critical details, writes the envelope specifications and later reviews construction, in some provinces under mandatory programs. The structural engineer designs anchors and supports, the mechanical engineer sets the interior humidity and pressure the envelope must resist, and the energy modeller tests the thermal performance. The contractor and its trades, the framers, roofers, glaziers and cladding installers, build it. Because so many hands touch the envelope, the interfaces between trades are as vulnerable as the interfaces between materials. A window installer who leaves before the air barrier is installed, or a roofer who seals a parapet before the wall membrane is lapped onto it, can undo the best design. Good details are drawn in the sequence in which they will be built.
Worked problem
Tracing the control layers of the warming hut
The warming hut at Kestrel Point, from the first-year studio and the technology and materials courses, has wood stud walls with mineral wool between the studs, plywood sheathing, a self-adhered membrane, 75 mm of mineral wool board outside the membrane, vertical strapping and cedar boards. Inside, it has a polyethylene sheet behind the wood panelling. Identify each control layer and judge whether the order suits a cold climate.
Show solution
- Water control layer: the self-adhered membrane on the sheathing, protected by the cladding and drained by the cavity behind the strapping.
- Air control layer: the same membrane, if its laps, penetrations and connections at the roof, floor and windows are sealed. The polyethylene could act as a second air barrier, but only if it is sealed at every edge, which panelling makes difficult.
- Vapour control layer: the polyethylene on the warm side.
- Thermal control layer: the cavity insulation and the exterior board.
- Check the order: the membrane is very vapour-tight and sits partway through the insulation. With about a third of the insulation outside it, the membrane stays warmer than if it were at the outside, but the vapour retarder inside is still prudent, and the membrane's position must be checked in Lesson 4.
Answer: All four control layers are present and in a sensible order. The two critical questions, continuity of the membrane at every joint and the temperature of the membrane on a design cold day, are answered in later lessons.
Exercise 1: the control layer drawing
This exercise takes about a week and continues through the term.
- Choose a building you designed in an earlier studio, preferably your mixed-use building from Design Studio V.
- Draw one wall section, one roof edge, one window head and sill, and the junction of the wall with the ground, at a scale of 1 to 10 or larger.
- Trace each control layer with a separate marker: blue for water, red for air, green for vapour and yellow for insulation.
- Check that each line is continuous around the whole section; circle every break and propose a fix.
- Estimate where the heat goes in your building using the method above, and rank the elements by their share of the loss.
Common mistakes
MistakeThinking of the envelope as a list of good materials.
InsteadDesign it as a system of continuous layers, each with a job.
MistakeDrawing only the typical wall section.
InsteadMost failures are at interfaces; draw every edge, corner and opening.
MistakeAssuming the wall will never get wet.
InsteadDesign for deflection, drainage, drying and durable materials.
MistakeRelying on a single line of sealant.
InsteadProvide a second line of defence and a path for water to drain out.
MistakeIgnoring the order of construction.
InsteadDraw details in the sequence in which trades will build them.
Summary and key terms
- The envelope separates indoors from outdoors and must control heat, air, vapour, water, light, sound and fire while carrying loads and lasting decades.
- Four control layers, for water, air, vapour and heat, must each be continuous around the whole building.
- The order of layers matters; the perfect wall puts insulation outside a single membrane on the structure.
- Windows and air leakage often lose more heat than the opaque walls; compact forms have less envelope and fewer edges.
- Most failures occur at interfaces; durable envelopes deflect, drain and dry water and provide redundancy.
- Building envelope
- The assemblies separating conditioned space from the outdoors and the ground; also called the building enclosure.
- Control layer
- A layer whose job is to control the flow of heat, air, vapour or water.
- Water resistive barrier
- The layer behind the cladding that stops liquid water reaching the structure.
- Air barrier
- The continuous system of materials that stops air flowing through the envelope.
- Vapour retarder
- A layer that slows the diffusion of water vapour.
- Interface
- A junction between assemblies, materials or trades, where most failures begin.
- Four Ds
- Deflection, drainage, drying and durable materials: the principles of moisture control.
Practice problems
Work each problem on paper first, then reveal the answer to check.
Name the four control layers of an envelope.
Show answer
Water, air, vapour and thermal control layers.
Why did the sheathing rot below the windows of Lavoie's apartment block but not above them?
Show answer
Water leaked at the window corners, ran down inside the rough opening with no sill pan and could not drain because the siding had no cavity; the head flashing above worked.
In the Greenway calculation, why do the windows lose more heat than the walls despite their smaller area?
Show answer
Their U-factor is several times higher than the wall's.
What is the perfect wall?
Show answer
Cladding and a drained cavity outside, insulation, a single membrane controlling water, air and vapour on the structure, and the structure warm and dry inside.
Give two reasons envelope failures are expensive.
Show answer
The damage is hidden until advanced, and repair requires removing the cladding and finishes over it.
Lesson quiz · 5 questions
Score 60% or more to complete this lesson.
Create a free account to save your progress, take quizzes and earn a certificate.