
WLD-220 · Lesson 9 of 12 · 17 min
Supplementary symbols, contours and finishes
The weld symbol says what type of weld to make and its dimensions say how big. Around them, a set of small supplementary symbols adds the rest: whether the weld goes all the way around the joint, whether it is made in the field, whether the root must show through, what shape the finished face must have and how it is to be finished. A welder who reads only the weld symbol and its numbers will make the right weld in the wrong condition, such as a convex cap where a flush surface was needed for a bearing plate to sit on, or a shop weld that should have been left for the erection crew. This lesson goes through the supplementary symbols, the contour and finish symbols and how they changed in the current edition of the standard, and how to read a welding symbol with several reference lines and combined symbols.
The supplementary symbols
The standard supplementary symbols are few, and each has a fixed place on the welding symbol.
| Symbol | Where it goes | Meaning |
|---|---|---|
| Weld-all-around: a circle | At the junction of the arrow and reference line | The weld continues around the whole joint |
| Field weld: a flag | At the junction of the arrow and reference line | The weld is made on site, not in the shop |
| Melt-through: a filled half-circle | On the side opposite the groove symbol | Visible root reinforcement is required on the back side |
| Backing: a rectangle | On the side opposite the groove symbol | A backing strip is used; R inside means remove it |
| Spacer: a rectangle across the line | Inside the groove symbol, across the reference line | A spacer is placed in the root of a double groove |
| Consumable insert: a square | On the side opposite the groove symbol | A consumable insert is placed at the root |
| Contour: a line or curve | Beside the weld symbol, away from the line | The required shape of the finished weld face |
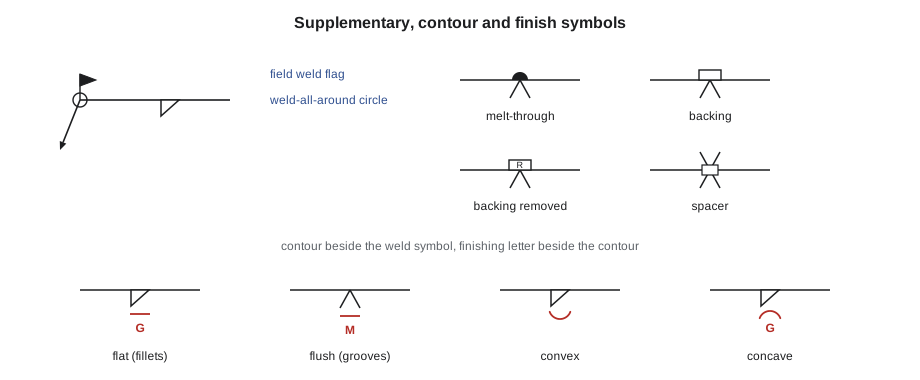
Weld-all-around
The weld-all-around circle tells the welder to carry the weld continuously around the whole joint, changing direction at corners. Without it, a weld symbol pointing at one face of a joint means that face only. The circle is used on the perimeters of tube posts on base plates, pipe supports, nozzles and pads, around clip angles and anywhere the weld must seal the joint. It does not make an intermittent weld continuous; a symbol with both a pitch and the circle is contradictory, and the drawing should be queried.
The circle applies to the welds on the reference line it sits on. On a symbol with several reference lines, it applies to all of them unless the drawing says otherwise. When a joint has different weld sizes on different faces, the drawing will use separate symbols for each face rather than the circle.
Field welds
The field weld flag marks welds to be made at the erection site. It matters to everyone in the chain: the shop must not make them, the shipping crew must make sure loose pieces and fit-up aids go with the steel, the erector must have qualified welders and procedures on site, and the inspector must plan to be there. On many drawings, field welds are also listed on the erection drawings, and the welding procedure in the tail may be a field procedure for a different process or position from the shop procedure for the same weld size.
On the Riverside bridge, the girder field splice is bolted, but the bearing clips at the abutments and the railing post bases are field welded with self-shielded flux-cored wire, and the shop drawings for those pieces show the flag on every symbol. The shop's job is to prepare the bevels on the post bases and ship them clean and primed with a weldable primer, with the weld areas masked.
Melt-through, backing, spacers and inserts
The root-side symbols were introduced in the lesson on groove symbols. The rule for reading them is the same in every case: they go on the opposite side of the reference line from the groove symbol, because they describe what happens at the back of the joint. Melt-through means the root must be visibly penetrated, often with a height of reinforcement given to the left of the half-circle. Backing means a strip is fitted under the root; R in the backing rectangle means it must be removed after welding, usually by gouging or grinding, and the root then back-welded or ground as shown. A spacer goes in the root of a double groove and is removed when the second side is back-gouged. A consumable insert goes in the root of a pipe joint and is fused by the root pass.
Contour symbols
A contour symbol tells the welder what shape the finished face of the weld must have. It is drawn beside the weld symbol, on the side away from the reference line.
- Flat: a straight line. In the current edition of AWS A2.4, the flat symbol is used only for fillet welds, meaning a fillet whose face is flat rather than convex or concave.
- Flush: a straight line used for groove, plug, slot and other welds that must be level with the surrounding surface. In the 2020 edition, flush replaced flat for these welds.
- Convex: an arc bulging away from the line, meaning the face must be convex, with reinforcement.
- Concave: an arc curving toward the line, meaning the face must be concave, usually on fillets in fatigue-loaded joints where a smooth transition at the toe reduces stress.
A contour symbol without a finish letter means the contour is to be made as welded, without later finishing, if the welder can do it. The current edition says the contour can be achieved by any method, welding or mechanical, unless a finish letter is given.
Finish symbols
A finishing letter beside the contour symbol says how the contour is to be obtained when it is not to be left as welded. The letters are:
| Letter | Method |
|---|---|
| C | Chipping |
| G | Grinding |
| H | Hammering |
| M | Machining |
| R | Rolling |
| U | Unspecified, any method |
A finish letter tells the method, not the quality. Where the surface must meet a roughness or a direction of grinding, as on the fatigue-sensitive splices of a bridge girder, the specification says so. On the Riverside flange splices, the symbol shows flush with G, and the specification adds that grinding marks must run parallel to the direction of stress and that the weld must not be ground below the plate surface by more than a small amount.
On the Coldwater base frame, the mounting pads for the pump and motor sit on PJP groove welds that must be flush so the pads bear evenly before machining. Their symbols show flush with M: weld, then machine. The machinist mills the whole top of each pad after welding, taking the weld reinforcement off with it. Devon's job is to make the weld full and sound to the top of the groove, without undercut at the edges, because the machine will reveal any hole.
Multiple reference lines and sequence
When a joint needs more than one operation, the welding symbol can carry two or more reference lines stacked on one arrow. The line nearest the arrow is the first operation; each line further away is the next. Each line has its own weld symbol, dimensions and supplementary symbols. Common uses are:
- A groove weld followed by a reinforcing fillet.
- A backing weld, then the groove weld.
- A groove weld, then back gouging and a back weld.
- A weld followed by a nondestructive examination symbol.
Information in the tail applies to the whole symbol unless it is tied to a particular line. Supplementary symbols such as the field flag and the all-around circle sit at the junction and apply to every line. Where a groove weld wraps around a joint without a clear change in joint type, the 2020 edition allows several sub-reference lines to describe it.
Combined weld symbols
Several weld symbols can be combined on one reference line. A bevel groove with a fillet on top is drawn with the fillet triangle stacked on the bevel symbol. A double-bevel groove with different depths on each side shows each depth to the left of its own symbol. The 2020 edition also allows a combination groove, for example a flare-bevel and a bevel in one joint, to be shown with one groove symbol drawn to look like the actual edge shapes, even if that means drawing it backwards. A welder reading a combined symbol should take it apart, one weld symbol at a time, then put it back together in the order of welding.
Checking a symbol for sense
Raj runs every welding symbol through the detailing software's checks, but some mistakes are only caught by people. Lucia teaches the apprentices to sanity-check symbols the way an inspector would: does every element make sense with every other?
# Sanity checks an inspector runs on welding symbols (2020 edition contour rules)
GROOVES = {"square", "v", "bevel", "u", "j", "flare-v", "flare-bevel"}
def check(sym):
    issues = []
    t = sym["type"]
    if sym.get("contour") == "flat" and t != "fillet":
        issues.append("flat contour is for fillets; use flush on a groove or plug weld")
    if sym.get("contour") == "flush" and t == "fillet":
        issues.append("flush is for groove, plug and slot welds; a fillet uses flat")
    if sym.get("all_around") and sym.get("pitch"):
        issues.append("all-around with a pitch is contradictory: continuous or intermittent?")
    if t in GROOVES and sym.get("side") == "arrow" and not sym.get("size") and not sym.get("cjp"):
        issues.append("groove with no size and no CJP note: confirm penetration with the detailer")
    if t in ("bevel", "j") and not sym.get("broken_arrow"):
        issues.append("bevel or J with a straight arrow: either member may be prepared - confirm")
    if t in ("stud", "surfacing") and sym.get("side") != "arrow":
        issues.append(t + " welds are always on the arrow side")
    if sym.get("finish") and not sym.get("contour"):
        issues.append("finish letter without a contour symbol")
    return issues or ["no problems found"]
symbols = [
    {"id": "SK-204 W12", "type": "v", "side": "arrow", "contour": "flat", "finish": "G", "cjp": True},
    {"id": "SK-204 W17", "type": "fillet", "side": "both", "size": "1/4", "pitch": "2-6", "all_around": True},
    {"id": "SK-205 W3", "type": "bevel", "side": "arrow", "cjp": True, "broken_arrow": True},
    {"id": "SK-206 W9", "type": "surfacing", "side": "other", "size": "1/4"},
    {"id": "SK-207 W2", "type": "bevel", "side": "arrow"},
]
for s in symbols:
    for msg in check(s):
print(f"{s['id']:11} {msg}")SK-204 W12 flat contour is for fillets; use flush on a groove or plug weld SK-204 W17 all-around with a pitch is contradictory: continuous or intermittent? SK-205 W3 no problems found SK-206 W9 surfacing welds are always on the arrow side SK-207 W2 groove with no size and no CJP note: confirm penetration with the detailer SK-207 W2 bevel or J with a straight arrow: either member may be prepared - confirm
Four of the five symbols in this list would have reached the shop with a question in them. In practice, a symbol like SK-204 W12 drawn to an older edition is not wrong in the sense of being unsafe; a flat contour with G on a groove weld is understood everywhere to mean ground flush. The point of the checks is that every question goes to the detailer before the welder strikes an arc.
Reading a full symbol
Devon practices on the vessel saddle pad joint, which has the busiest symbol on the base frame drawings: two reference lines on one arrow. The first line has a bevel symbol below with a broken arrow toward the pad, a depth and groove weld size to its left, a 45 degree angle below, and a flush contour with M. The second line has a fillet below it with its size. The junction has no flag and no circle. The tail gives the data sheet number. He reads it out: bevel the pad edge on the arrow side to the depth shown at 45 degrees, weld the groove to the effective throat shown, then add the fillet; the groove is to be machined flush, which means the fillet goes on after machining on the side face, not the top. He stops, because that does not make sense, and asks Raj. Raj checks and finds that the flush contour belongs on the top face of a different joint, and issues revision D of SK-206 the same afternoon.
Common mistakes
MistakeTreating a contour symbol with no finish letter as optional.
InsteadThe contour is required; without a letter it may be obtained by welding or any method.
MistakeUsing G to decide the quality of finish.
InsteadThe letter gives the method; the specification gives the finish required.
MistakeMaking a field-flagged weld in the shop to save a trip.
InsteadField welds are planned for site; making them in the shop can stop the piece fitting at erection.
MistakeReading the reference lines of a stacked symbol from the top down.
InsteadThe line nearest the arrow is the first operation.
MistakeApplying the 2012 flat-for-everything rule to a 2020 drawing without thinking.
InsteadUnder the 2020 edition, flat is for fillets and flush for groove and plug welds.
Summary and key terms
- The weld-all-around circle and field weld flag sit at the junction of the arrow and reference line.
- Melt-through, backing, spacer and insert symbols describe the root side, opposite the groove symbol.
- Contour symbols are flat, flush, convex and concave; in the 2020 edition flat is for fillets and flush for other welds.
- Finishing letters C, G, H, M, R and U give the method, not the degree of finish.
- Multiple reference lines show operations in order, nearest the arrow first.
- Combined symbols should be taken apart and read one weld at a time.
- Supplementary symbol
- A symbol added to a welding symbol to give information other than weld type and size.
- Contour symbol
- A symbol showing the required shape of the finished weld face.
- Finish symbol
- A letter showing the method used to obtain a weld contour.
- Flush
- Level with the adjacent base metal surface.
- Multiple reference lines
- Stacked reference lines on one arrow showing a sequence of operations.
- Field weld
- A weld made at the erection site rather than in the shop.
Practice problems
Work each problem on paper first, then reveal the answer to check.
A groove symbol has a straight line beside it with G. What is required?
Show answer
The weld is to be finished flush by grinding.
A symbol has two reference lines: a bevel groove on the first and a fillet on the second. Which is welded first?
Show answer
The bevel groove, on the line nearest the arrow.
What does a concave contour symbol on a fillet ask for?
Show answer
A fillet with a concave face, often for a smooth toe on fatigue-loaded joints.
Lesson quiz · 5 questions
Score 60% or more to complete this lesson.
Create a free account to save your progress, take quizzes and earn a certificate.