
ROOF-230 · Lesson 9 of 12 · 26 min
Flashing premium roofs
▶ Video coming soon A video version of this lesson is on the way.
The Penhallow carriage house had one complication: a small brick chimney, 18 in wide, rising from the north slope 3 ft below the ridge, left from the stove that once heated the coach house. Its old aluminum step flashings were pitted white and its counterflashing was a smear of roofing cement along a mortar joint. On Thursday, October 1, Bram drove over from the yard with a bundle of copper soakers and counterflashing bent in Theo's shop, and spent the afternoon showing Rory how a chimney is flashed on a shake roof.
Flashing is where premium roofs leak, and the work is the same in principle as on an asphalt roof (ROOF-130), with three differences: the materials must last as long as the covering, the pieces must suit the thickness and shape of the covering, and many of the methods are traditional ones that heritage work requires. This lesson covers the principles, valleys, walls and chimneys, penetrations, and metal roof flashings, with copper as the usual premium metal. ROOF-320 goes much deeper into flashing details of every kind.
Principles
- Lap with the flow of water: every piece laps over the piece below it, and every joint is covered by the piece above.
- Two parts where the roof meets a wall or chimney: a base flashing (or step flashings) fastened to the roof only, and a counterflashing fastened to the wall only, lapping over it. The two can move independently as the building settles and the roof expands and contracts.
- Fasten flashings with cleats or at their concealed edges, not through the parts that carry water.
- Use metals that last as long as the roof and are compatible with each other, the fasteners and the covering: copper, lead-coated copper, stainless steel, or heavy prefinished steel matching a steel roof. Aluminum and light galvanized steel do not belong on a century roof.
- Allow for movement: loose-locked seams, cleats and expansion joints in long runs of metal, especially copper.
- Sealant is maintenance, not flashing. A joint that depends on sealant will leak when the sealant ages.
Valleys
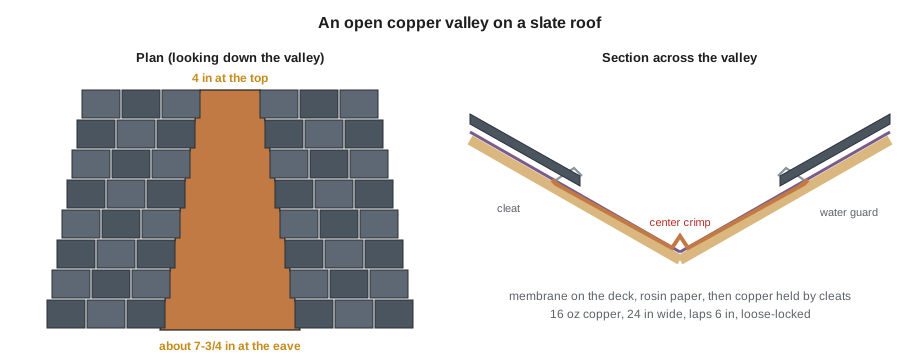
Valleys carry the water of two slopes and are the most common place for premium roofs to fail. The main types:
- Open valleys: a metal lining runs down the valley and the covering on each side is cut back along a line, leaving the metal exposed. Standard for slate, tile, wood, metal shingles and heritage work. The open width usually widens toward the eave because the flow grows as the valley collects water; a common rule for slate is to widen it by about 1/8 in per foot of valley length.
- Closed valleys: the covering meets or crosses in the valley over a metal or membrane lining, with no metal showing. Used with some slate and shingle work, but harder to repair.
- Valley metal profiles: on a valley where two slopes of different pitch or size meet, the faster water from one side can shoot across and under the covering on the other. A raised center rib (a W or crimped valley) stops it. Hemmed or folded edges (water guards) along the sides of the lining catch any water that gets that far.
- Fastening: the lining is held by cleats folded over its edges and nailed to the deck, never by nails through the metal, so it can move along its length. Long runs are made in pieces lapped at least 6 in, with the upper piece over the lower.
On tile roofs, the valley metal often has raised ribs along each side and the tiles are cut along a line and fastened, sometimes with a closure or mortar bedding at the cut edge as the tile manual allows. On standing seam roofs, the valley is a pan with hemmed edges; each panel is cut at the valley angle, its end hemmed and hooked onto a cleat or Z-closure on the valley pan, so water flows over the hem into the valley.
Worked problem
Valley open width at St. Brendan's
Each north transept valley is 30 ft long. The open width will be 4 in at the top and will widen by 1/8 in per foot toward the eave. What is the open width at the bottom? With a 24 in wide copper lining centered in the valley, how far does the copper run under the slate on each side at the bottom?
Show solution
- Widening = 30 × 1/8 = 3.75 in.
- Bottom width = 4 + 3.75 = 7.75 in.
- Copper under the slate on each side = (24 − 7.75) ÷ 2 = 8.1 in.
Answer: About 7-3/4 in at the bottom, with about 8 in of copper under each side, more than enough to carry water that runs under the cut slate edges to the water guards.
Walls and chimneys
Where a slope runs alongside a wall or chimney, slate, tile and wood use step flashings (soakers): one piece of metal per course, bent at a right angle, with one leg under the covering and one up the wall. Each soaker is laid on top of a slate or shake and under the next one, so every course has its own flashing lapped over the one below. A counterflashing let into the wall covers the upturned legs.
- Soakers for slate and wood are flat L-shaped pieces. Their length up the slope is the exposure plus the headlap plus a little extra, so each soaker laps the one below.
- For tile, deeper profiles make simple soakers impractical; tile roofs often use a pan or channel flashing with a raised outer edge under the tiles beside the wall, with a dressable or soft metal apron shaped over the tile surface, as the tile manual shows.
- At the head of a slope against a wall (a headwall), an apron flashing runs across the top course and up the wall, covered by counterflashing.
- Behind a chimney, the uphill side needs a back pan or, on wide chimneys, a cricket (saddle) to divert water around it (ROOF-130).
- Counterflashing on masonry is let into a reglet, a slot cut into a mortar joint, folded back into the slot, wedged and pointed with mortar or sealant as specified. Stepped counterflashing follows the brick courses up the slope.
Worked problem
Soakers for the chimney
The chimney side runs 32 in up the slope. Shakes are at 10 in exposure. How many soakers per side, and how long should each be if it covers the exposure plus 4 in of lap and 1 in extra?
Show solution
- Courses along the side = 32 ÷ 10 = 3.2, so 4 soakers.
- Length = 10 + 4 + 1 = 15 in.
Answer: Four soakers per side, each 15 in long, plus an apron at the front and a back pan at the back, eight soakers in all. Bram had Theo bend ten so two could be fitted where the brick was out of line.
Worked problem
Soakers for slate
At St. Brendan's, a buttress wall runs 10 ft along the slope beside the slate, at 8.5 in exposure and 3 in headlap. How many soakers, and how long is each at exposure plus headlap plus 1 in?
Show solution
- Soakers = 120 ÷ 8.5 = 14.1, so 15.
- Length = 8.5 + 3 + 1 = 12.5 in.
Answer: Fifteen soakers about 12-1/2 in long, cut from 16 oz copper. Their width is set so the roof leg reaches well under the slate and the wall leg rises at least as high as the counterflashing laps.
At the carriage house chimney, Bram removed the aluminum, chipped the old cement off the brick, and cut new reglets with a grinder fitted with a masonry blade, with Rory holding the vacuum and wearing a respirator (silica dust, ROOF-110). The front apron went on first, over the course below the chimney. Then each soaker went in with its shake course, nailed to the deck at its top corner only, never to the chimney. The back pan, a single piece of copper folded and soldered at the corners in the shop, went under the course above. Last came the stepped counterflashing, let into the reglets and wedged with folded copper wedges, then pointed with mortar. Copper and cedar suit each other: cedar's natural acids attack galvanized steel and aluminum but not copper.
Penetrations
- On slate, tile and wood, pipes and vents are flashed with a metal boot (copper or lead-coated copper on heritage work) whose flange runs under the courses above and over the course below, like a large soaker, with a collar around the pipe, counterflashed or capped at the top.
- On standing seam roofs, small pipes get a flexible boot (EPDM or silicone) with a base that bends to the panel and is sealed and fastened to the panel flat as its maker shows. The boot goes in the flat of a pan, never across a seam. Larger penetrations get a welded or soldered curb with a diverter on the uphill side, so water is guided around it, and the curb is attached to the panels so it moves with them.
- Wherever possible, penetrations should be moved, combined or placed high on the roof, near the ridge, where less water flows.
- Satellite dishes and other equipment should be mounted on walls or on proper mounts designed for the roof covering, never bolted through tile or slate, as the Basile roof showed.
Metal roof flashings
Standing seam roofs have their own trims, usually made from the same coil as the panels. On the Corrigan porch, the low roof met the house wall at a headwall. Ines installed it this way:
- The panel ends at the wall were turned up into an end dam with a hand tool, so water could not be blown over the end.
- A Z-shaped closure sealed with tape and sealant to the top of the panels, as the maker shows, closed the gaps between the panel ribs.
- The headwall flashing sat over the closure, fastened through the closure into the seams (not into the deck behind), and turned up the wall behind the building wrap and siding, which laps over it.
- At the end of the headwall, where the porch roof ended against the wall, a kickout diverted water away from the siding.
Sidewall flashings on standing seam roofs work similarly, with the trim fastened to a cleat or the seam so the panel can move beneath it. Every trim is lapped in the direction of the water and at least the maker's minimum lap, usually with sealant tape in the lap.
Worked problem
Headwall pieces
The porch headwall is 20 ft long. Prefinished headwall flashing comes in 10 ft lengths, and each lap takes 4 in. How many pieces are needed?
Show solution
- Two pieces cover 10 + (10 − 4 ÷ 12) = 19.67 ft, which is short of 20 ft.
- Three pieces cover 10 + 2 × 9.67 = 29.33 ft, so three pieces, one cut.
Answer: Three pieces. Two lengths exactly matching the wall look as if they should be enough, until the lap is counted. Ines put the cut piece in the middle, so both ends of the run used factory-finished ends.
Copper work
Copper is the premium flashing metal, and much of it is shaped and joined in the shop. Theo Barnes made the St. Brendan's valley linings the week before the church job: 16 oz cold-rolled copper, cut to 24 in wide, with folded water guards along both edges, in lengths of 10 ft to lap in the valleys. Joints in copper are made in three ways:
- Loose-lock seams, folded together without solder, which allow movement. Used along the length of valleys and long flashings.
- Flat-lock seams folded and soldered, which are watertight and rigid. Used for small pans, back pans, boots and corners where movement is small.
- Lapped joints with sealant, used only where the specification allows.
Soldering copper is skilled work: the metal is cleaned, fluxed, pre-tinned and soldered with a heavy soldering iron, then the flux is washed off so it does not stain or corrode. Traditional solder contains lead; lead-free solders are also used. Long soldered runs must have expansion joints, or the solder cracks.
Common mistakes
MistakeFastening valley metal with nails through the lining.
InsteadHold valley linings with cleats folded over their edges.
MistakeNailing soakers or base flashings to the wall.
InsteadFasten them to the roof only, and fasten counterflashing to the wall only.
MistakeUsing aluminum or light galvanized steel on a slate or copper roof.
InsteadUse copper, lead-coated copper, stainless steel or heavy matching metal that lasts as long as the roof.
MistakePlacing a pipe boot across a standing seam.
InsteadLocate boots in the flat of a pan, and use a curb with a diverter for large penetrations.
MistakeCounting lengths of flashing without the laps.
InsteadSubtract each lap from the coverage before counting pieces.
Summary and key terms
- Premium flashings follow the same principles as all flashing but must last as long as the covering and suit its shape.
- Open metal valleys widen toward the eave, are held by cleats and have water guards; uneven slopes need a center rib.
- Slate, wood and tile walls use step flashings or pans with counterflashing let into reglets.
- Penetrations get boots that lap like the covering; on standing seam, boots go in the flat and curbs get diverters.
- Standing seam headwalls use end dams, closures, headwall trim and kickouts.
- Copper is joined with loose-lock seams where it must move and soldered flat-lock seams where it must be watertight.
- Open valley
- A valley in which the metal lining is left exposed between the cut edges of the covering.
- Water guard
- A folded edge along the side of a valley lining that stops water from passing under the covering.
- Soaker
- A step flashing laid with each course of slate, wood or tile beside a wall.
- Counterflashing
- Flashing fastened to the wall that laps over the base or step flashings.
- Reglet
- A slot cut into masonry to receive counterflashing.
- Back pan
- A flashing at the uphill side of a chimney that carries water around it.
- Loose-lock seam
- A folded seam without solder that allows movement.
- Kickout
- A flashing that diverts water away from a wall at the bottom of a roof-to-wall joint.
Practice problems
Work each problem on paper first, then reveal the answer to check.
A valley 20 ft long widens 1/8 in per foot from 4 in. What is the bottom width?
Show answer
4 + 20 × 1/8 = 6.5 in.
A wall runs 5 ft along a slope with shakes at 7-1/2 in exposure. How many soakers?
Show answer
60 ÷ 7.5 = 8.
Where is a pipe boot placed on a standing seam roof?
Show answer
In the flat of a pan, not across a seam.
Which seam allows copper to move?
Show answer
A loose-lock seam.
Why is the counterflashing fastened only to the wall?
Show answer
So the roof and the wall can move independently.
Lesson quiz · 5 questions
Score 60% or more to complete this lesson.
Create a free account to save your progress, take quizzes and earn a certificate.