
ROOF-230 · Lesson 3 of 12 · 25 min
Standing seam metal roofs
▶ Video coming soon A video version of this lesson is on the way.
The Corrigan house stood on a new street at the edge of Powell: two stories, board-and-batten siding, a simple gable main roof at 8 in 12 and a long front porch with a low roof at 2 in 12. Neil and Tamsin Corrigan had chosen a charcoal standing seam steel roof because they wanted something that would outlast their mortgage, shed snow, and look like the farmhouses Tamsin grew up near. The builder had framed and sheathed the roof with 5/8 in plywood and left it under a temporary underlayment. Crew 6 had the roof from Monday, September 21, to Friday noon.
This lesson follows the Corrigan job to explain standing seam roofs: how they work, the main seam types, clips and thermal movement, roll forming on site, layout, seaming, ends and trims, and oil-canning. Underlayment, fastening for wind, flashings and snow guards each have their own lesson later in the course.
How a standing seam roof works
A standing seam roof is made of long metal panels, each running in one piece from the eave to the ridge, with raised edges (legs) along both sides. Each panel's legs join the next panel's legs in a seam that stands up above the flat of the roof, well above the water flowing down the pans between seams. The panels are held down by clips hidden inside the seams, so no fasteners pass through the flat of the panel in the field of the roof. With no laps across the slope and no exposed screws, a standing seam roof can shed water at slopes far lower than shingles, and it can last half a century or more.
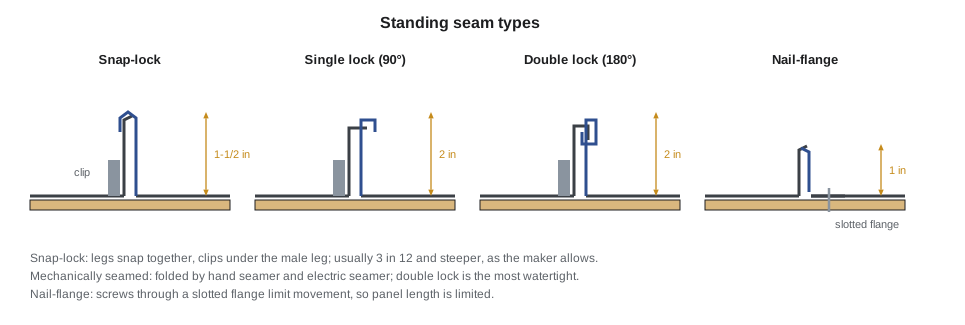
- Snap-lock panels have a male leg and a female leg that snap together by pressing down along the seam. Clips under the male leg hold the panel. They install quickly without seaming tools and suit residential roofs at moderate slopes, usually 3 in 12 and steeper, though the maker sets the limit.
- Mechanically seamed panels are joined by folding the legs together with a hand seamer and then an electric seaming machine run along the seam. A single-lock seam is folded 90 degrees; a double-lock seam is folded 180 degrees and is the most watertight, used at the lowest slopes, often with sealant factory-applied inside the seam.
- Nail-flange (or nail-strip) panels are fastened with screws through a slotted flange along one leg, which the next panel covers. They are cheaper and simple, but the screws limit how far the panel can move, so makers limit their length.
- Batten seam and other architectural profiles are used on heritage and high-end work, often in copper or zinc, with the seams formed over wood battens or caps.
Seam height varies with the profile, usually 1 to 2-1/2 in. Taller seams hold more water in the pan before it can reach the seam, and they stiffen the panel. On the Corrigan house, the main roof had 1-1/2 in snap-lock panels, 16 in wide, and the porch had 2 in double-lock mechanically seamed panels with sealant in the seam, which the maker allows down to 1/2 in 12.
Clips and thermal movement
Metal expands when it warms and shrinks when it cools. A dark steel panel can range from below −15 °F on a winter night to above 160 °F on a summer afternoon. Over the length of a panel, that movement is several millimeters for steel and twice that for aluminum. If the panel is fastened rigidly at both ends, the movement has nowhere to go: the panel buckles, the fasteners tear their holes, or the seams work open.
Standing seam systems handle movement in two ways:
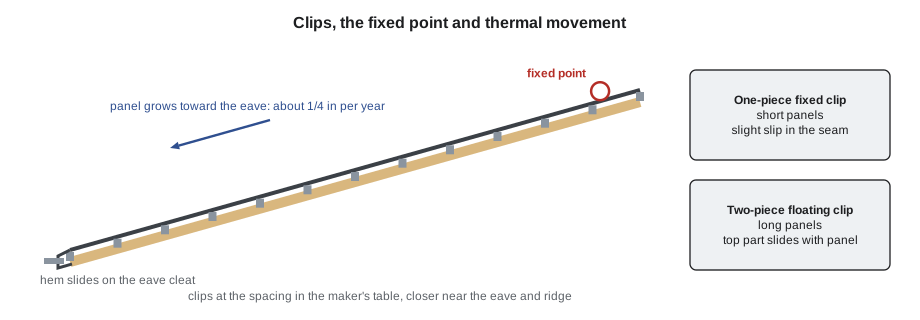
- Each panel is fixed at one point or one line along its length, so its position cannot creep down the roof. The maker decides where: at the eave, at the ridge, or at mid-length on long panels.
- Everywhere else, the panel is free to slide. One-piece fixed clips allow a small amount of slip in the seam and suit short panels; two-piece floating (sliding) clips have a part that moves with the panel and are used on longer panels. Makers typically call for floating clips once panels exceed about 30 to 40 ft, depending on the profile and metal.
Trims at the ridge, eave and walls must allow the same movement. A ridge cap fastened through both slopes' panels into the deck would pin the panels at the top; that is correct only if the maker fixes the panels there. The eave hem hooks over a continuous eave cleat so the panel can slide on it.
Worked problem
How much does a panel move?
A steel panel is 18 ft long. Steel expands 0.0000065 per degree Fahrenheit. If the panel temperature ranges from −20 °F to 170 °F, how much does its length change? How much for an aluminum panel, at 0.0000128 per degree?
Show solution
- Temperature range = 170 − (−20) = 190 °F.
- Length = 18 × 12 = 216 in.
- Steel: 216 × 0.0000065 × 190 = 0.27 in, a little over 1/4 in.
- Aluminum: 216 × 0.0000128 × 190 = 0.53 in, about 1/2 in.
Answer: About 1/4 in for steel and 1/2 in for aluminum over the year. On a 50 ft commercial panel, steel would move about 3/4 in, which is why long panels need floating clips.
For the Corrigans' 18 ft panels, the maker allowed one-piece clips and fixed each panel near the ridge with a row of fasteners through the panel flat, hidden under the ridge cap, so the panels grow and shrink toward the eave, where their hems slide on the cleat.
Roll forming on site
Panels can be made at a factory and trucked to the job, or formed on site from a coil of prefinished steel using a portable roll former, a machine that bends the flat strip into the panel profile through a series of rollers and cuts it to length. Ridgecap owns one, which Ines runs. Forming on site means panels can be as long as needed, without the transport limits of factory panels, and lengths can be measured from the actual roof.
On Tuesday morning, Ines set the roll former in the driveway on level blocks, loaded the coil, and ran test pieces until the legs were straight and the panel width measured exactly 16 in. Then she ran 62 main roof panels at 18 ft each, and 16 porch panels on the double-lock head. Callum and Rory caught each panel as it came out, carried it on edge to padded sawhorses, and stacked it with the protective film still on.
- Measure every slope at several points before forming: walls and roofs are rarely perfectly square or equal in length.
- Run test pieces and check the profile and width before production.
- Keep the coil and the panels dry: water trapped between stacked panels causes white rust and staining within days.
- Leave the strippable film on until the panel is installed, but remove it the same day, because sunlight can bake it onto the finish.
Worked problem
How many panels?
The main roof is 40 ft 6 in along each eave. Panels cover 16 in. How many panels per slope, and how wide is the last one?
Show solution
- 40 ft 6 in = 486 in; 486 ÷ 16 = 30.4 panels.
- So 31 panels per slope: 30 full panels cover 30 × 16 = 480 in, leaving 6 in, so the last panel is ripped to about 6 in.
- Both slopes: 62 panels.
Answer: A 6 in strip at the rake looks narrow. Bram split the difference by ripping the first and last panels so the two edge panels were equal, about 11 in each, which looks deliberate from the street.
Layout
Standing seam panels make any error in the roof's squareness visible, because the seams are straight lines that must run square to the eave. Before the first panel, Bram checked each slope's diagonals with a tape: if the two diagonals are equal, the slope is a rectangle. On the south slope they differed by 3/4 in. That meant the rake was slightly out of square to the eave, so starting the first panel tight to the rake would leave the seams running off square. Instead, Bram snapped a chalk line square to the eave near the rake, set the first panel to the line, and let the rake trim hide the small taper.
- Check diagonals on each slope before starting.
- Snap a line square to the eave for the first panel; do not trust the rake.
- Check the panels against the line or a measured mark every few panels, measuring along the eave and the ridge, so they do not creep out of square.
- Plan the layout so that panels and seams fall sensibly at skylights, vents and chimneys, avoiding a seam right beside a penetration.
Installing the panels
The Corrigan roof went on in the order Ridgecap uses for most standing seam work:
- Underlayment: a high-temperature self-adhered membrane over the whole roof (lesson 7).
- Eave trim and eave cleat, fastened to the deck, with the drip edge out past the fascia.
- First panel set to the layout line, its hem hooked over the eave cleat, and clipped along its male leg at the spacing the maker's wind uplift table calls for (lesson 8).
- Each following panel: hook the hem, lower the female leg over the previous panel's male leg, snap it down from eave to ridge, then clip its own male leg.
- Panel ends at the ridge turned up with a hand tool to form a dam, so wind cannot drive water past the end under the ridge cap.
- Ridge: a vented ridge assembly with closures shaped to the panel profile, fastened as the maker shows.
- Rake trims fastened to a cleat, not through the panel flat.
Snap-lock seams need care at the ends and wherever the seam must be crimped, and the maker's hand seamers close them at the eave. On the porch, the double-lock panels were placed and clipped, the legs were bent with hand seamers for the first 12 in at each end, and then the electric seamer, a heavy machine that rides along the seam, folded the rest in one pass. Rory guided the seamer's power cord while Ines walked behind it; a seamer that jumps off a seam halfway leaves a kink that cannot be fully undone.
Worked problem
Clips for the main roof
The maker's table for this house calls for clips at 12 in within 4 ft of the eave and ridge, and 24 in elsewhere, with a clip at each end of each zone. How many clips does an 18 ft panel need? How many for 62 panels, with 5 in 100 extra?
Show solution
- End zones: 4 ÷ 1 = 4 spaces at each end, 8 spaces in all.
- Middle: 18 − 8 = 10 ft; 10 ÷ 2 = 5 spaces.
- Spaces = 8 + 5 = 13; clips = 13 + 1 = 14 per panel.
- Total = 62 × 14 = 868; with 5 in 100 extra, 868 × 1.05 = 911.4, so 912 clips.
Answer: 912 clips, so four boxes of 250. The clips are never spaced wider than the table allows.
Oil-canning
Oil-canning is waviness in the flat pans of metal panels, seen most in low sun from the side. It is a cosmetic issue, not a leak, and most makers say so in their warranties, but owners notice it. It comes from stresses rolled into the coil at the mill, uneven decks, clips fastened too tight, panels pinned so they cannot move, and wide, flat pans. Ways to reduce it:
- Choose narrower panels, heavier gauge, and pans with small stiffening ribs (striations) or a slight profile.
- Make sure the deck is flat and the underlayment has no lumps or laps under the pans.
- Keep clips snug, not crushing, and let the panels move.
- Use the roll former correctly, with the coil fed straight and the rollers adjusted.
The Corrigans had chosen striated pans, partly on Ines's advice, and the finished roof showed no waviness even in the low evening light that Bram uses as his test.
The finished roof
By Thursday afternoon, both main slopes and the porch were finished, with the snow retention rail installed over the front steps (lesson 10) and the headwall flashing where the porch roof meets the house wall (lesson 9). Friday morning was the punch list: film off every panel, filings swept, touch-up on two scratches, ridge closures checked, and the gutters cleaned of offcuts. Neil Corrigan walked around the house with Bram and asked only one question: whether the roof would be noisy in the rain. Bram explained that over a solid plywood deck with a membrane underlayment and an insulated attic, rain on steel is a soft patter, not the drumming of a barn roof over open purlins.
Common mistakes
MistakeFastening panels rigidly at both ends.
InsteadFix each panel at the one point or line the maker specifies and let it slide everywhere else.
MistakeStarting the first panel tight to an out-of-square rake.
InsteadCheck diagonals and snap a line square to the eave.
MistakeSpacing clips wider than the maker's table.
InsteadUse the table spacing for each roof zone and round up the number of spaces.
MistakeLeaving the protective film on for days.
InsteadRemove the film the same day the panel is installed.
MistakeStacking panels where they can get wet.
InsteadKeep panels dry and covered to prevent staining and white rust.
Summary and key terms
- Standing seam panels run eave to ridge in one piece, joined by raised seams and held by hidden clips.
- Snap-lock seams snap together; mechanically seamed panels are folded to single or double lock; nail-flange panels are screwed through a slotted flange.
- Panels must be fixed at one point and free to move elsewhere, with clips and trims that allow thermal movement.
- Roll forming on site makes long panels to measured lengths.
- Layout starts from a line square to the eave, checked often against creep.
- Oil-canning is cosmetic waviness, reduced by panel choice, flat decks and correct clipping.
- Standing seam
- A metal roof of long panels joined by raised seams and held by concealed clips.
- Snap-lock seam
- A seam whose legs snap together without folding tools.
- Double-lock seam
- A mechanically seamed joint folded 180 degrees.
- Floating clip
- A two-piece clip that lets the panel slide as it expands and contracts.
- Fixed point
- The place along a panel where it is pinned so it cannot creep down the slope.
- Roll former
- A machine that forms panels from a coil of flat metal.
- Eave cleat
- A continuous strip at the eave over which the panel hem hooks.
- End dam
- An upturn formed at a panel end under a ridge or headwall to stop wind-driven water.
Practice problems
Work each problem on paper first, then reveal the answer to check.
How much does a 13 ft steel panel move over a 180 °F range, at 0.0000065 per degree?
Show answer
156 × 0.0000065 × 180 = 0.18 in.
A roof is 32 ft long at the eave and panels cover 16 in. How many panels?
Show answer
384 ÷ 16 = 24 panels, so 25 to allow for squaring.
What does it mean if the two diagonals of a roof slope differ?
Show answer
The slope is out of square.
Which seam is the most watertight?
Show answer
The double-lock mechanically seamed seam.
Why does a ridge cap fastened through the panels into the deck matter?
Show answer
It pins the panels at the ridge, which is correct only if the maker fixes them there.
Lesson quiz · 5 questions
Score 60% or more to complete this lesson.
Create a free account to save your progress, take quizzes and earn a certificate.