
PLB-420 · Lesson 4 of 12 · 21 min
Camera inspection and locating
On a rainy Tuesday, Grace and Maya cleared a sewer lateral at a 1950s brick house for the third time in two years. The cable came back with fine roots and a sliver of clay. "We can keep doing this every year," Grace told the homeowner, Mr. Okafor, "or we can find out exactly what's wrong." She went back to the van for the camera. Twenty minutes later, the three of them were watching a screen as the camera head crept along the inside of the clay pipe: a cracked joint at 6 meters with a curtain of roots, a sag holding water from 9 to 11 meters, and an offset joint at 14 meters where the pipe met the city connection. Grace marked each defect on the lawn with paint after locating the camera head from above. For the first time, Mr. Okafor understood what he was paying to fix.
Drain cameras and locators changed service plumbing. Before them, plumbers diagnosed buried and hidden pipes by experience, by what came back on a cable, or by digging. Today, a plumber can see the inside of a drain, measure the distance to a defect, find its location and depth from the surface, record the inspection for the customer and the insurer, and verify that a repair was done properly. This lesson covers how cameras and locators work, how to run an inspection, how to recognize common defects, and how to report what you find.
Inspection camera systems
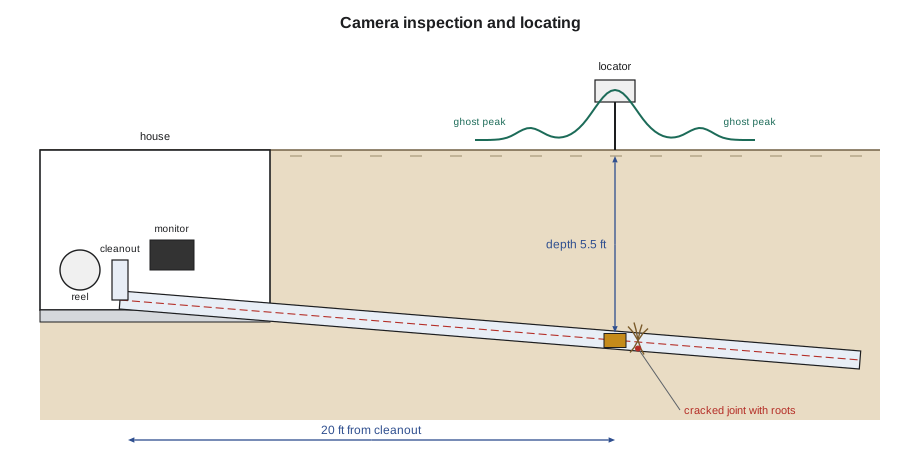
A drain inspection system has four main parts: a camera head, a push cable, a reel with a distance counter, and a monitor and recorder. The camera head is a small, waterproof housing with a lens, LED lights and, usually, a built-in transmitter called a sonde. The push cable is a semi-rigid fiberglass rod with wires inside that carries power and the video signal and is stiff enough to push the head through long runs and around bends. The reel stores the cable and measures how much has been pushed out, so the screen shows the distance from the entry point. The monitor displays the image and records video and still photos, often with text notes and distance overlays.
Cameras are sized for the pipe they inspect. A small camera head about 1 in across with a thin, flexible cable can travel through 1-1/2 in to 3 in lines and tight fittings such as P-traps. A mid-size head about 1-1/4 in to 1-1/2 in across with a stiffer cable inspects 3 in to 6 in building drains and laterals for distances of 200 ft or more. Larger crawler cameras on wheels inspect municipal sewers. Self-leveling heads keep the image upright as the cable rotates, which makes it much easier to tell the bottom of the pipe from the top.
Running an inspection
A good inspection starts before the camera goes in. Grace's routine was consistent.
- Clear the line first if it is blocked or full of water. A camera cannot see through standing sewage, and pushing it into a blockage risks damaging it. Flushing water through the line afterwards helps clear debris off the pipe walls.
- Choose the entry point. A cleanout close to the area of interest is best. A roof vent, a toilet flange or a fixture trap can also be used for smaller cameras.
- Zero the distance counter at the entry point and note where that is, such as the cleanout at the front wall of the basement.
- Push slowly and steadily, keeping the head centerd if possible. Stop at every joint, fitting, change in direction and defect, and record a photo or note with the distance.
- Locate the camera head from the surface at key points, such as defects, changes of direction and the property line, and mark them.
- Record the full inspection so that the customer, an insurer or the municipality can see it later.
Pushing a camera through fittings takes practice. Long-sweep fittings and wyes are easy; short-radius elbows, sanitary tees entered from the wrong direction and P-traps are hard. Pushing too hard can jam the head or damage the cable. A slight twist of the cable can help the head turn the corner. Grace never pushed a camera through a line with a cutter or debris stuck in it, and never ran it through a line that was actively draining hot water, which can damage the electronics.
Reading the picture
Interpreting what the camera shows is a skill learned by watching many inspections. A pipe in good condition has a smooth, round interior with tight joints and water running along the bottom. Common defects include the following.
| What you see | What it usually means |
|---|---|
| Roots growing through a joint or crack | A cracked pipe or loose joint letting roots in; common in clay and older cast iron |
| Water standing over a length of pipe | A sag or belly where the pipe has settled |
| A step up or down at a joint | An offset joint from settlement or poor installation |
| Cracks, fractures or missing pieces | Broken pipe from settlement, roots, frost or heavy loads |
| Pipe looking oval or flattened | Deformation, common in thin-wall plastic under load |
| Rough, flaking or tuberculated walls | Corrosion and scale in cast iron |
| Holes in the bottom of a cast iron pipe | Channel corrosion, where the invert has rusted through |
| A pipe of different material partway along | A previous repair or the transition to the city connection |
| Grease on walls or a cloudy, slow flow | A grease problem upstream |
| Soil or gravel visible | A collapse or a separated joint |
Grace taught Maya to describe defects with three pieces of information: what it is, where it is (distance and position around the pipe, such as the clock position), and how bad it is. A small root intrusion at a joint is not the same as a pipe wall that has fallen in. Municipal and industry inspectors use formal coding systems for this, such as the pipeline assessment certification program used across North America, with standard defect codes and grades. Service plumbers do not usually code formally, but borrowing the idea of naming, locating and grading each defect makes reports clear and useful.
Locating: finding the camera and the pipe
The sonde in the camera head transmits a radio signal, commonly at 512 Hz, though other frequencies are used. A handheld receiver, called a locator, picks up the signal through soil, concrete and walls. Directly above the sonde, the signal pattern has a strong peak, with smaller peaks called ghost signals in front of and behind it. The locator shows the signal strength, points toward the sonde and, once you are directly above it, estimates its depth. Typical service locators can find a sonde to a depth of 15 to 20 feet.
To locate, Grace pushed the camera to the point of interest and stopped. She walked the locator along the expected path of the pipe until the signal peaked, then turned the locator and moved side to side to center over the sonde. She checked that she was over the main peak, not a ghost, by moving along the line and watching the signal rise and fall. Then she read the depth, marked the spot with paint or a flag, and wrote the distance and depth on the inspection report.
A second method locates the pipe itself rather than the camera. A line transmitter clamps onto or connects directly to a metal pipe or a tracer wire and sends a signal along it. The receiver follows the signal along the pipe's path. This works for metal water services, gas lines with tracer wire and some sewer pipes with tracer wire, but not for plastic or clay pipe without a wire. For those, the camera's sonde or a separate sonde on a push rod is used.
Locating depth matters. A plumber planning a spot repair needs to know whether the defect is 3 ft or 10 ft deep, which affects the cost, the shoring needed for the excavation and whether the work requires a permit or a dig notice. Before any digging, the location of other buried utilities must be marked through the state one-call service. In Ohio, that is OHIO811, and excavators must call 811 before digging.
Worked problem
Distance and depth from a camera inspection
The camera reaches a cracked joint with roots at 20 ft from the basement cleanout. The cleanout is 1 ft inside the front wall, and the pipe leaves the house straight out toward the street. The locator reads a depth of 5.5 ft at the defect. The basement floor is 6 ft below grade. Where is the defect, and how deep will the dig be?
Show solution
- \[d_{\text{outside}} = 20 - 1 = 19\ \text{ft along the pipe from the outside face of the wall}\]
- The locator measures depth from the surface where the reading is taken, the lawn above the defect: 5.5 ft to the sonde, which sits near the center of the pipe.
- The excavation must reach the bottom of the pipe and give room to work: about 5.5 ft plus half the pipe diameter and a bedding allowance, roughly 6.2 ft.
Answer: The defect is about 19 ft out from the wall and roughly 6.2 ft deep at the bottom of the pipe. An excavation that deep needs sloping or shoring under OSHA's excavation rules.
# Check slope between two camera locate points (illustrative readings)
# depth is to the sonde (pipe center) measured from the surface; surface elevations from a level
points = [
    # distance from cleanout (ft), surface elevation (ft), locator depth (ft)
    (6.5, 100.00, 3.6),
    (20.0, 99.70, 5.5),
    (33.0, 99.00, 4.95),
    (46.0, 98.70, 5.25),
]
for (d1, s1, z1), (d2, s2, z2) in zip(points, points[1:]):
    invert1, invert2 = s1 - z1, s2 - z2          # pipe center elevations
    slope = (invert1 - invert2) / (d2 - d1) * 100
    flag = "OK (falls toward street)" if slope >= 1.0 else ("flat or sagging" if slope > -0.1 else "back-graded")
print(f"{d1:4.1f} ft to {d2:4.1f} ft: slope {slope:5.2f}% {flag}")6.5 ft to 20.0 ft: slope 16.30% OK (falls toward street) 20.0 ft to 33.0 ft: slope 1.15% OK (falls toward street) 33.0 ft to 46.0 ft: slope 4.62% OK (falls toward street)
The program combines locator depths with surface elevations from a builder's level to estimate the slope of each segment. Locator depths have an error of a few percent, so this is a rough check, but it confirms what the camera showed: the segment between the second and third points holds water because it is nearly flat. Surface elevations must be measured, not assumed; a lawn that slopes toward the house can make a properly sloped pipe look back-graded if the surface is assumed level.
Inside buildings
Cameras are also valuable inside buildings. A camera pushed through a cleanout can show whether a kitchen line has a belly under a slab, whether a stack has corroded through, or whether a new renovation broke a drain. In condominiums and apartment buildings, cameras help sort out where a recurring blockage starts, which matters when the responsibility is split between the unit owner and the corporation or landlord. In commercial kitchens, regular camera inspections can show grease buildup before it causes a backup.
Grace also used cameras to check work. After a section of drain was replaced or lined, a camera inspection confirmed that the joints were tight, the slope was even and nothing had been left in the pipe. Many municipalities and insurers ask for post-repair video, and some new construction contracts require a camera inspection of the building sewer before the job is accepted.
Reporting to the customer
A camera inspection is only as useful as the report that comes out of it. Grace gave customers a short written summary with photos of each defect, its distance from the entry point and its location on a sketch of the property, the depth, her assessment of severity, and the repair options. She saved the video and sent the customer a link. She avoided technical jargon and explained what each defect meant in practical terms: this will keep blocking, this will get worse, this is fine for now.
Honesty matters here more than anywhere. Camera inspections have a reputation, in some places, for being used to sell unnecessary sewer replacements. Grace showed the customer the actual video, explained which defects needed action and which did not, and gave options ranging from regular maintenance cleaning to spot repair to full replacement or lining. When a defect was in the part of the lateral owned by the municipality, she said so and told the customer how to report it.
Common mistakes
MistakePushing the camera into a blocked line.
InsteadClear and flush the line first; the camera cannot see through sewage and can be damaged.
MistakeLocating a ghost signal instead of the main peak.
InsteadMove along the line and confirm the strongest peak before marking the spot.
MistakeRecording defects without distances or positions.
InsteadNote what, where (distance and clock position) and how bad for every defect.
MistakeAssuming the surface is level when estimating pipe slope.
InsteadMeasure surface elevations with a level before calculating slope from locator depths.
MistakeRecommending replacement without showing the customer the video.
InsteadShow the footage, explain each defect and give a range of options.
Summary and key terms
- Camera systems have a head, push cable, distance counter and recording monitor; size the camera to the pipe.
- Clear the line, zero the counter, push slowly, stop at fittings and defects and record everything.
- Common defects include roots, sags, offsets, cracks, deformation, corrosion and collapse.
- A sonde in the camera head lets a locator find its position and depth from the surface; line transmitters trace metal pipes and tracer wires.
- Locate other utilities through the one-call service before digging.
- Report defects clearly and honestly, with photos, distances, depths and options.
- Sonde
- A small transmitter, often in a camera head, that a locator can find from the surface.
- Locator
- A handheld receiver that detects a sonde or a signal on a pipe and estimates its position and depth.
- Push cable
- The semi-rigid cable that pushes a camera head through a pipe and carries its signal.
- Ghost signal
- A weaker signal peak in front of or behind a sonde that can be mistaken for its location.
- Offset joint
- A joint where one pipe section is displaced up, down or sideways from the next.
Practice problems
Work each problem on paper first, then reveal the answer to check.
Why should a line be cleared before a camera inspection?
Show answer
The camera cannot see through sewage and can be damaged by a blockage.
What three facts should be recorded for each defect?
Show answer
What it is, where it is (distance and clock position) and how severe it is.
How do you make sure you are over the main sonde peak?
Show answer
Move along the line and confirm the signal rises to its strongest point, not a smaller ghost peak.
A defect is at 28 ft on the counter and the cleanout is 1.5 ft inside the wall. How far outside the wall is it?
Show answer
26.5 ft along the pipe.
Why are locator depths combined with surface elevations?
Show answer
To estimate pipe elevations and slope; the surface is rarely level.
Lesson quiz · 5 questions
Score 60% or more to complete this lesson.
Create a free account to save your progress, take quizzes and earn a certificate.