
JS-220 · Lesson 7 of 12 · 30 min
Forms in React
▶ Video coming soon A video version of this lesson is on the way.
On Tuesday, February 1, Mira rebuilds the sign-up form. In her first year she wrote it in plain JavaScript with Lucy's rules: a name, an email address, an optional ten-digit phone number for text reminders, at least one area of interest, food-safety training for anyone choosing the kitchen, and confirmation that the volunteer is 16 or older. The rules stay the same. What changes is how the form keeps its values, when it shows errors and how it sends the sign-up to Theo's server. "Forms are where React has changed most since you started," Gareth says. "React 19 gave forms their own way of sending data. We will use it, but you should understand the older style too, because most of the code you will meet is written that way."
This lesson covers controlled and uncontrolled inputs, the two ways React components work with form fields. It shows how to handle many fields with one function, how to validate values and show errors accessibly, and how React 19's form actions, with the useActionState, useFormStatus and useOptimistic hooks, send data and show progress. It also covers handling validation errors from the server and giving every field a unique id with useId.
Controlled inputs
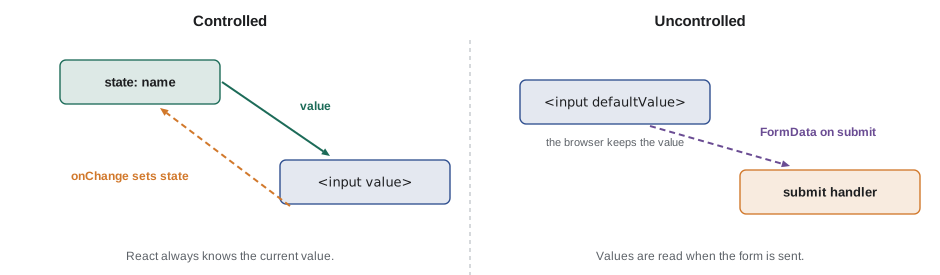
In plain JavaScript the browser keeps a form field's value, and code reads it when it needs it. In a controlled input, React state holds the value instead. The input's value prop is set from state, and its onChange handler sets the state on every change. The state is then the single source of truth for the field: the component always knows its current value, can check it as the volunteer types, and can change it, for example to clear the field or format a phone number.
import { useState } from 'react';

export function NameField() {
  const [name, setName] = useState('');
  return (
    <div className="field">
      <label htmlFor="name">Full name</label>
      <input id="name" value={name} onChange={(e) => setName(e.target.value)} autoComplete="name" />
      <p className="hint">Hello{name.trim() ? `, ${name.trim()}` : ''}!</p>
    </div>
  );
}
What this code does
The input's value comes from the name state, and every key press calls onChange, which stores the new text with setName. React then renders again, so the greeting below the field updates as the volunteer types. If onChange were missing, the input would be stuck showing the state's value, and React would warn that a value was given without a handler.
Different fields keep their value in different props. Text inputs, textareas and selects use value. Checkboxes and radio buttons use checked. A number input is a common trap: its value is always a string, even with type="number", so it must be converted with Number before arithmetic.
Many fields, one handler
A form with eight fields does not need eight pieces of state and eight handlers. Keep the values in one object and write one handler that uses each input's name attribute to decide which property to change. Checkbox groups, such as the areas of interest, need a little more: the value is an array, and a change adds or removes the checkbox's value.
// The values object a sign-up form keeps in state.
let values = { name: '', email: '', phone: '', areas: [], foodSafety: false, age16: false };

// One handler for every field, as the onChange of each input would call it.
function handleChange({ name, type, value, checked }) {
  if (type === 'checkbox' && name === 'areas') {
    const areas = checked ? [...values.areas, value] : values.areas.filter((a) => a !== value);
    values = { ...values, areas };
  } else if (type === 'checkbox') {
    values = { ...values, [name]: checked };
  } else {
    values = { ...values, [name]: value };
  }
}

// Events as the browser would report them, using the input's name, type, value and checked.
handleChange({ name: 'name', type: 'text', value: 'Ana Ferreira' });
handleChange({ name: 'email', type: 'email', value: 'ana@example.com' });
handleChange({ name: 'areas', type: 'checkbox', value: 'kitchen', checked: true });
handleChange({ name: 'areas', type: 'checkbox', value: 'garden', checked: true });
handleChange({ name: 'areas', type: 'checkbox', value: 'kitchen', checked: false });
handleChange({ name: 'age16', type: 'checkbox', checked: true });
console.log(values);{ name: "Ana Ferreira", email: "ana@example.com", phone: "", areas: [ "garden" ], foodSafety: false, age16: true }What this code does
handleChange receives the properties React's event would give through e.target: the input's name, type, value and checked. Text fields set the property named by the input's name with a computed key, single checkboxes store checked, and the areas checkboxes add or remove their value from an array. Every change creates a new values object, so the state is never changed in place.
In the component, each input gets name, value or checked, and onChange={(e) => handleChange(e.target)}. With TypeScript, the values object has a type, and a misspelled name attribute is the one thing the compiler cannot catch, so the names are kept in one constant list.
Uncontrolled inputs and FormData
In an uncontrolled input, the browser keeps the value, as in plain HTML. The input may get a starting value with defaultValue or defaultChecked, and the component reads the values when the form is submitted, usually all at once with FormData, which collects every named field of a form. Uncontrolled inputs mean less code and no render on every key press. They are a good choice when nothing on the page needs to react to the value until the form is sent, which is true of most of the sign-up form.
// FormData works the same way in the browser and in this runner.
const data = new FormData();
data.append('name', '  Raj Patel ');
data.append('email', 'raj@example.com');
data.append('phone', '613 555 0142');
data.append('areas', 'warehouse');
data.append('areas', 'kitchen');
data.append('foodSafety', 'on');   // a checked checkbox sends its value, 'on' by default
// age16 is missing: an unchecked checkbox sends nothing at all.

function readSignUp(formData) {
  return {
    name: String(formData.get('name') ?? '').trim(),
    email: String(formData.get('email') ?? '').trim(),
    phone: String(formData.get('phone') ?? '').replace(/\D/g, ''),
    areas: formData.getAll('areas'),
    foodSafety: formData.has('foodSafety'),
    age16: formData.has('age16'),
  };
}

console.log(readSignUp(data));
console.log('Object.fromEntries keeps only one area:', Object.fromEntries(data).areas);{ name: "Raj Patel", email: "raj@example.com", phone: "6135550142", areas: [ "warehouse", "kitchen" ], foodSafety: true, age16: false }
Object.fromEntries keeps only one area: kitchenWhat this code does
The FormData object here is filled by hand, but it holds exactly what the browser would collect from the sign-up form. get returns one value, getAll returns every value for a name, which the areas checkboxes need, and has tells whether a checkbox was checked, since an unchecked box is simply absent. The last line shows why Object.fromEntries is not enough for a form with checkbox groups: it keeps only the last value of each name.
The choice between the two styles is made per field, not per form. Mira's sign-up form is mostly uncontrolled. Only the areas checkboxes are controlled, because the food-safety question must appear as soon as the kitchen is ticked.
Validating
Validation is a pure function: values in, errors out. Keeping it separate from the component means it can be tested on its own, reused when the server reports problems and run whenever the component needs it. Mira's validate function returns an object with one message for each field that has a problem, and an empty object when everything is fine.
const AREAS = ['warehouse', 'kitchen', 'lunch-counter', 'garden'];

function validate(v) {
  const errors = {};
  if (v.name.trim().length < 2) errors.name = 'Enter your full name.';
  if (!/^[^\s@]+@[^\s@]+\.[^\s@]+$/.test(v.email.trim())) errors.email = 'Enter an email address, like name@example.com.';
  const digits = v.phone.replace(/\D/g, '');
  if (digits && digits.length !== 10) errors.phone = 'Enter a ten-digit phone number, or leave this empty.';
  if (v.areas.length === 0) errors.areas = 'Choose at least one area.';
  else if (v.areas.some((a) => !AREAS.includes(a))) errors.areas = 'Choose areas from the list.';
  if (v.areas.includes('kitchen') && !v.foodSafety) errors.foodSafety = 'Kitchen volunteers need food-safety training. Tick the box if you have it.';
  if (!v.age16) errors.age16 = 'Confirm that you are 16 or older.';
  return errors;
}

const good = { name: 'Ana Ferreira', email: 'ana@example.com', phone: '(608) 555-0199', areas: ['garden'], foodSafety: false, age16: true };
const bad = { name: 'A', email: 'ana@', phone: '555-0199', areas: ['kitchen'], foodSafety: false, age16: false };
console.log('good:', validate(good));
console.log('bad:');
for (const [field, message] of Object.entries(validate(bad))) console.log(` ${field}: ${message}`);good: {}
bad:
name: Enter your full name.
email: Enter an email address, like name@example.com.
phone: Enter a ten-digit phone number, or leave this empty.
foodSafety: Kitchen volunteers need food-safety training. Tick the box if you have it.
age16: Confirm that you are 16 or older.What this code does
validate checks each of Lucy's rules and adds a message under the field's name when a rule fails, so the result says both which fields are wrong and what to tell the volunteer. The phone number is checked only if digits were entered, because it is optional, and the food-safety rule applies only when the kitchen is chosen. The good values produce an empty object, which is how the form knows it may be sent.
Each message says what to do, not only what is wrong: "Enter an email address, like name@example.com" rather than "Invalid email". That is one of the accessibility guidelines for forms, and it helps everyone.
When to show errors
Showing every error the moment the form appears is unfriendly: the volunteer has not done anything wrong yet. Showing them only after submitting is better but can be frustrating on a long form. A common compromise, and the one Sana chose, is to show a field's error once the volunteer has left that field, or after the first attempt to submit, and from then on to update it as they type, so that it disappears as soon as it is fixed. This needs two more pieces of state: which fields have been touched, and whether the form has been submitted.
Errors must be accessible as well as visible. Each field with an error gets aria-invalid="true", and its message is linked with aria-describedby, so a screen reader reads the message with the field. After a failed submit, Sana's design shows an error summary at the top of the form, a list of the problems with links to each field, and moves keyboard focus to it. The submit button stays enabled: a disabled button gives no clue about what is missing, and many screen reader users never find out why nothing happens.
import { useId } from 'react';

export function Field({ label, name, error, hint, ...inputProps }) {
  const id = useId();
  const hintId = hint ? `${id}-hint` : undefined;
  const errorId = error ? `${id}-error` : undefined;
  return (
    <div className={error ? 'field has-error' : 'field'}>
      <label htmlFor={id}>{label}</label>
      {hint && <p id={hintId} className="hint">{hint}</p>}
      {error && <p id={errorId} className="error">{error}</p>}
      <input
        id={id}
        name={name}
        aria-invalid={error ? true : undefined}
        aria-describedby={[hintId, errorId].filter(Boolean).join(' ') || undefined}
        {...inputProps}
      />
    </div>
  );
}
What this code does
useId gives each Field a unique id that is the same on every render, so two Field components on one page never clash. The hint and the error get ids based on it, and aria-describedby lists whichever of them exist, so a screen reader reads both with the input. aria-invalid is set only when there is an error, and the error appears above the input, where it is seen before the field.
useId exists because hand-written ids break when a component is used twice on one page, and random ids break server rendering, where the server and the browser must produce the same ids. The ids it produces contain characters such as colons, which are valid in id attributes.
Form actions in React 19
Older React code handles submission with onSubmit: call e.preventDefault(), read the values, set a loading flag, send the request, then set the result or an error. React 19 adds a shorter, more structured way. The form's action prop can be a function. When the form is submitted, React calls it with the form's FormData, runs it as a transition so that the page stays responsive, and when it finishes resets the form's uncontrolled fields.
useActionState wraps such a function and gives the component the result of the last submission. It takes the action and an initial state, and returns three things: the current state, a new action to pass to the form, and a boolean that is true while the action is running. The action receives the previous state and the FormData, and whatever it returns becomes the new state. This is a natural place to validate, send the request and return either errors or a success message.
import { useActionState } from 'react';
import { readSignUp, validate } from '../signup-rules.js';
import { postSignUp } from '../api.js';

async function signUpAction(previous, formData) {
  const values = readSignUp(formData);
  const errors = validate(values);
  if (Object.keys(errors).length > 0) return { status: 'invalid', values, errors };
  const result = await postSignUp(values);
  if (!result.ok) return { status: 'invalid', values, errors: result.fieldErrors };
  return { status: 'done', name: values.name };
}

export function SignUpForm({ shiftId }) {
  const [state, formAction, isPending] = useActionState(signUpAction, { status: 'new', errors: {} });

  if (state.status === 'done') return <p role="status">Thanks, {state.name}. You are signed up.</p>;
  return (
    <form action={formAction} noValidate>
      <input type="hidden" name="shiftId" value={shiftId} />
      <Field label="Full name" name="name" autoComplete="name" defaultValue={state.values?.name} error={state.errors.name} />
      <Field label="Email" name="email" type="email" autoComplete="email" defaultValue={state.values?.email} error={state.errors.email} />
      {/* phone, areas, food safety and age fields as above */}
      <button type="submit" disabled={isPending}>{isPending ? 'Signing up…' : 'Sign up'}</button>
    </form>
  );
}
What this code does
signUpAction is an ordinary async function that receives the previous state and the submitted FormData, and returns the next state: either the values with their errors, or done. useActionState runs it when the form is submitted and gives the component the latest state and isPending. Because the fields are uncontrolled and the form resets after the action, the values are passed back as defaultValue so that the volunteer does not lose what they typed when there are errors.
The button is disabled only while the request is running, to stop a double submission, and its label says what is happening. noValidate turns off the browser's own error bubbles, because the form shows its own accessible messages; the type and required attributes still help browsers fill in the fields.
A button deep inside a form can find out whether its form is being submitted with useFormStatus, from react-dom. It must be called in a component rendered inside the form, not in the component that renders the form. This lets Brightwater use one SubmitButton component in every form without passing isPending down.
import { useFormStatus } from 'react-dom';

export function SubmitButton({ children, pendingText }) {
  const { pending } = useFormStatus();
  return (
    <button type="submit" disabled={pending} aria-disabled={pending}>
      {pending ? pendingText : children}
    </button>
  );
}
What this code does
useFormStatus reports the status of the form that contains this component, so SubmitButton knows when that form's action is running without receiving a prop. While it is pending, the button is disabled and shows its pending text. The component can be placed in any form in the portal.
Optimistic updates
A sign-up takes a second or so to reach Theo's server and come back. useOptimistic lets the page show the expected result immediately, such as one fewer space and a "You are signed up" badge, while the request is still running. It takes the real state and an update function, and returns an optimistic version of the state and a function to apply an optimistic change during an action. When the action finishes, React switches back to the real state: the new data from the server if it worked, or the old data if it failed, in which case the form shows the error. Lesson 9 does the same with the data-fetching library.
Errors from the server
The browser's checks are a convenience for the volunteer, not a protection. Anyone can send a request to Theo's API without using the form, so his server checks every rule again and rejects bad data with a 422 response in the problem details format agreed in Mira's first year: a JSON body with a title, a status, a detail and an errors list naming each field. Some rules can only be checked on the server, such as a volunteer who is already booked on another shift at the same time. The form must show those errors in the same way as its own.
// A 422 response body from POST /api/v1/shifts/s-101/signups.
const problem = {
  type: 'https://riverside-food-hub.example/problems/validation',
  title: 'Some details need attention',
  status: 422,
  detail: 'The sign-up was not saved.',
  errors: [
    { field: 'email', message: 'This email address is already registered to another volunteer.' },
    { field: 'shiftId', message: 'You are already booked on a shift at this time.' },
    { field: 'age16', message: 'Confirm that you are 16 or older.' },
  ],
};

const FORM_FIELDS = ['name', 'email', 'phone', 'areas', 'foodSafety', 'age16'];

function toFieldErrors(problem) {
  const fieldErrors = {};
  const general = [];
  for (const { field, message } of problem.errors ?? []) {
    if (FORM_FIELDS.includes(field) && !fieldErrors[field]) fieldErrors[field] = message;
    else general.push(message);
  }
  if (general.length === 0 && Object.keys(fieldErrors).length === 0) general.push(problem.detail ?? problem.title);
  return { fieldErrors, general };
}

console.log(toFieldErrors(problem));
console.log(toFieldErrors({ title: 'Service unavailable', status: 503, detail: 'Please try again in a few minutes.' }));{ fieldErrors: { email: "This email address is already registered to another volunteer.", age16: "Confirm that you are 16 or older." }, general: [ "You are already booked on a shift at this time." ] }
{ fieldErrors: {}, general: [ "Please try again in a few minutes." ] }What this code does
toFieldErrors turns a problem details body into the same shape validate returns, so the form can show server errors next to the right fields. Errors for fields the form does not have, such as shiftId, go into a general list shown in the error summary. A response with no errors list, such as a 503 from a busy server, still gives the volunteer its detail message instead of failing silently.
Form libraries
Large forms are often built with a library. React Hook Form manages values, touched fields and errors with mostly uncontrolled inputs, and Zod or similar schema libraries describe the rules once, in a form that both the browser and a Node.js server can use. The portal has three small forms, so Brightwater writes them by hand with the patterns in this lesson. The same validate function will be reused on the server when the Node.js block arrives.
Common mistakes
MistakeA number input's value is a number.
InsteadIt is always a string. Convert it with Number and check for NaN.
MistakeA controlled input only needs a value prop.
InsteadIt also needs onChange; without it the field cannot be edited and React warns.
MistakeDisable the submit button until the form is valid.
InsteadKeep it enabled and explain the problems on submit; a disabled button gives no clue about what is missing.
MistakeChecking the form in the browser is enough.
InsteadAnyone can call the API directly. The server must check every rule again, and the form must show its errors.
MistakeuseFormStatus can be called in the component that renders the form.
InsteadIt reports the status of the form it is inside, so it must be in a component rendered within the form, such as a submit button.
Summary and key terms
- A controlled input takes its value from state and reports every change with onChange; it lets the component react to the value as it is typed.
- An uncontrolled input keeps its own value, optionally starting from defaultValue, and is read on submit with FormData, using get, getAll for checkbox groups and has for single checkboxes.
- One handler can manage many fields using each input's name.
- Validation is a pure function that returns a message for each field with a problem; messages should say what to do.
- Show errors after a field is touched or the form is submitted, mark fields with aria-invalid and aria-describedby, show an error summary and keep the submit button enabled. useId gives stable unique ids.
- In React 19 a form's action can be a function; useActionState gives the last result, a form action and a pending flag, useFormStatus gives a button its form's status, and useOptimistic shows the expected result while an action runs.
- The server checks every rule again and returns problem details, which the form maps to its fields.
- controlled input
- A form field whose value comes from React state and whose changes are reported with onChange.
- uncontrolled input
- A form field that keeps its own value in the browser, read when needed, usually on submit.
- FormData
- A browser object that collects the named fields of a form, read with get, getAll and has.
- touched field
- A field the user has visited and left, used to decide when to show its error.
- error summary
- A list of a form's problems at its top, with links to the fields, shown after a failed submit.
- useId
- The hook that gives a component a unique id that stays the same between renders.
- form action
- A function passed to a form's action prop, called by React with the form's FormData on submit.
- useActionState
- The hook that runs a form action and returns its latest result, the action for the form and a pending flag.
Practice problems
Work each problem on paper first, then reveal the answer to check.
What two props make a text input controlled?
Show answer
value from state and onChange that sets the state.
How do you read all the checked areas from a form's FormData?
Show answer
formData.getAll('areas').
Why should validate return an object of messages rather than true or false?
Show answer
So the form knows which fields are wrong and what to tell the volunteer.
What three things does useActionState return?
Show answer
The current state, an action to pass to the form and a pending flag.
The server rejects a sign-up because the volunteer is already booked at that time. Where should the message appear?
Show answer
In the error summary, as a general error, because no single field caused it.
Try it yourself
Validate the hamper drive helper form
Lucy needs a short form for the December hamper drive. Complete validateHelper(v) so that it returns an object of messages using exactly these texts:
name: Enter your name. when the trimmed name is empty. contact: Give an email address or a phone number. when both are empty after trimming. shifts: Choose between 1 and 4 shifts. unless v.shifts (a string from a number input) is a whole number from 1 to 4. vehicle: Tell us what you will drive. when v.driving is true and the trimmed v.vehicle is empty.
function validateHelper(v) {
  return {};
}

const show = (e) => console.log(Object.keys(e).length ? JSON.stringify(e) : 'valid');
show(validateHelper({ name: 'Kim', email: 'kim@example.com', phone: '', shifts: '2', driving: false, vehicle: '' }));
show(validateHelper({ name: '  ', email: ' ', phone: '', shifts: '0', driving: true, vehicle: '' }));
show(validateHelper({ name: 'Lee', email: '', phone: '6085550199', shifts: '2.5', driving: true, vehicle: 'van' }));
show(validateHelper({ name: 'Sam', email: '', phone: '', shifts: 'four', driving: false, vehicle: '' }));
Try it yourself
Decide which errors to show
Complete visibleErrors(errors, touched, submitted). It returns only the errors the form should show now: all of them once the form has been submitted, otherwise only those for fields whose name is in the touched array.
Then complete summary(errors), which returns the lines of the error summary: There are N problems with your sign-up: (or There is 1 problem with your sign-up:) followed by one line - message per error, or an empty array when there are none.
function visibleErrors(errors, touched, submitted) {
  return errors;
}

function summary(errors) {
  return [];
}

const errors = { name: 'Enter your full name.', email: 'Enter an email address.', age16: 'Confirm that you are 16 or older.' };
console.log(JSON.stringify(visibleErrors(errors, [], false)));
console.log(JSON.stringify(visibleErrors(errors, ['email', 'phone'], false)));
console.log(JSON.stringify(visibleErrors(errors, ['email'], true)));
console.log(summary(visibleErrors(errors, ['email'], false)).join('\n'));
console.log(summary(errors).join('\n'));
console.log(summary({}).length);
Lesson quiz · 5 questions
Score 60% or more to complete this lesson.
Create a free account to save your progress, take quizzes and earn a certificate.