
INS-340 · Lesson 9 of 12 · 22 min
Sewing, fastening and labeling covers
▶ Video coming soon A video version of this lesson is on the way.
At Pellam's shop in June 2026, Ferris Quade let Tessa run a seam on a scrap cover. The machine was a heavy industrial walking-foot machine, with a needle as thick as a nail and a spool of PTFE-coated glass fiber thread. Her first seam wandered off the line and bunched at the corner; her third was straight. "That's the easy part," Ferris said. "The hard part is deciding where every strap, hook and hem goes so that a maintenance man in gloves can get it off and back on in five minutes, and so the cover still has its tag on in ten years."
Most insulators will never sew a production cover, but every insulator who installs, repairs, specifies or inspects covers needs to understand how they are put together. A cover that fails usually fails at a seam, a fastener or a missing tag, not in the fabric. This lesson covers how covers are constructed, the threads and seams used, the ways of holding the mat in place, the fastening systems and their limits, and how covers are labeled.
How a cover is made
A fabricator works from the measurement sheets and sketches, as lesson 7 described, in a series of steps:
- Patterning. Each piece is drawn full size on pattern paper or in software, with seam allowances and flaps added, and the pattern is kept on file under the cover number for reorders.
- Cutting. Fabrics are cut with shears, rotary cutters, hot knives or computer-controlled cutters; mats are cut on a table with a downdraft or extraction to control fibers, as at Coldstream's own shop.
- Assembly. The inner jacket, mat and outer jacket are laid up and the edges closed with sewn seams, usually with a binding or folded hem to stop the glass fabric fraying.
- Quilting. The mat is held in place by stitch lines or quilting pins so it does not slump to the bottom of the cover.
- Hardware and tags. Straps, rings, hooks, grommets, drawstrings and the identification tag are fitted.
- Checking. The finished cover is checked against the sketch and dimensions, folded and packed with its tag visible.
Thread and seams
The thread is often the first part of a cover to fail, because it is thin and is exposed at every seam. Its temperature rating must match the hottest face it is used on.
| Thread (typical) | Typical limit | Notes |
|---|---|---|
| PTFE-coated glass fiber | 500 °F on the coating; glass core higher | The usual choice for industrial covers; resists chemicals and UV |
| Plain glass fiber | about 1,000 °F | Hot-face seams; abrades more easily |
| Stainless steel | above 1,000 °F | Very hot service and seams on wire mesh; hard on machines |
| Aramid (such as Kevlar) | about 400 °F continuous | Very strong; used on cooler outer seams and straps |
| High-silica or quartz | about 1,800 °F | Very hot inner seams |
Seams are usually lock-stitched, with a stitch density of about four to six stitches per inch, and often double-stitched with two parallel rows for strength. Edges are finished with a binding, a folded strip of fabric sewn over the raw edge, or with a rolled hem. On outdoor covers, seams on the top surface are kept to a minimum and arranged so that water runs off them, and the closing flap overlaps downward, like shingles, so rain does not run into the seam.
Holding the mat in place
Without support, an insulation mat slides inside its jackets, especially on vertical surfaces and on covers that are taken off and put back often. Over time the top of the cover goes thin and hot while the bottom bulges. Two methods prevent this:
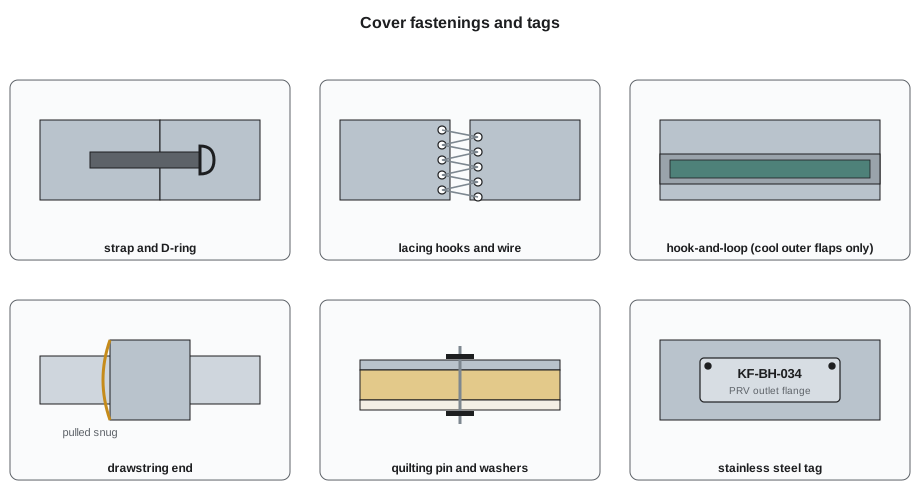
- Quilting pins. Stainless steel pins pushed through the cover from one face to the other, with a washer on each side, on a regular grid. They are quick to fit and hold thick mats well.
- Stitched quilting. Lines of stitching through all the layers, like a quilt. Neater, but each stitch line is a slight thermal short and a path for heat to the outer jacket.
Spacing depends on the mat and the shape, but a grid of about 6 in is common on industrial covers, with the outer pins about half a spacing from the edges.
Worked problem
How many quilting pins in the flange cover?
The outer piece of the flange cover in lesson 7 is about 52 ¼ × 17 in. Ferris quilts it on a 6 in grid, starting half a spacing, 3 in, in from each edge. How many pins are needed?
Show solution
- Along the length of 52 ¼ in: the first pin at 3 in and the last within 3 in of the far edge, so the pins span at most 52.3 − 6 = 46.3 in. Spaces = 46.3 ÷ 6 = 7.7, rounded up to 8, so 9 pins along.
- Across 17 in: span 17 − 6 = 11 in; spaces = 11 ÷ 6 = 1.8, rounded up to 2, so 3 pins across.
- Total = 9 × 3 = 27 pins, each with two washers.
Answer: 27 quilting pins and 54 washers. Rounding the number of spaces up keeps the actual spacing at or below 6 in.
Fastening systems
The fastening system decides how easy a cover is to take off and put back, and how well it stays closed. The choice depends on how often the cover is opened, the temperature at the fastener and the environment.
- Straps and D-rings or buckles. Fabric straps sewn to the flap, passing through stainless steel D-rings or slide buckles on the other side and pulled tight. Quick, easy with gloves and adjustable. The most common fastening on industrial covers.
- Lacing hooks and wire. Stainless steel hooks (sometimes called lacing anchors) fitted along both edges of a seam, laced together with stainless steel wire twisted tight. Very secure and heat-proof, good for covers opened once a year or less, but slower and needs a tool.
- Hook-and-loop strips. Fast and convenient, but most products are nylon or polyester, with typical limits around 175 to 250 °F, and they lose grip with dirt, oil and wear. Used only on cool outer flaps and indoor covers, never on hot faces, and avoided in food areas where they trap dirt.
- Drawstrings. Cords of PTFE-coated glass or stainless steel in the end hems of a cover, pulled tight around the adjacent insulation or pipe and tied or clamped.
- Snaps, springs and clips. Stainless snaps, spring hooks and clips for particular designs.
- Grommets. Stainless steel eyelets for lacing, drain holes and hanging covers while stored.
Worked problem
Straps and lacing for the flange cover
The closing seam of the flange cover runs the 17 in length of the cover. Kellerton's specification asks for straps no more than about 8 in apart, starting about 2 in from each end, or, for covers opened less than once a year, lacing hooks about 3 in apart. How many straps or hooks are needed? Using a rule of thumb of twice the seam length plus 1 ft for the twists, how long should the lacing wire be?
Show solution
- Straps: the straps span 17 − 2 × 2 = 13 in; 13 ÷ 8 = 1.6 spaces, rounded up to 2, so 3 straps at 6 ½ in.
- Lacing hooks: 17 ÷ 3 = 5.7 spaces, rounded up to 6 spaces, so 7 hooks on each edge, 14 in total.
- Wire = 2 × 17 + 12 = 46 in, cut to 4 ft.
Answer: Three straps with drawstrings at each end, because the PRV outlet flange will be opened at least once a year. Had it been a rarely opened joint, 14 lacing hooks and 4 ft of wire would have done the same job.
Whatever the system, the fasteners should be on the side or underside where they are easy to reach, not against a wall or above a hot pipe, and the cover should close without the installer having to stretch it. A strap that must be pulled with pliers to reach its buckle is a strap that will be left undone.
Identification and labeling
A removable cover is only reusable if it goes back on the right item. In a boiler house with a dozen similar valves, unmarked covers end up on the wrong valves, folded in a corner or thrown away. Every cover carries a tag, usually stainless steel, stamped or embossed and riveted or sewn to the outer jacket, and some fabricators also stencil the number on the fabric.
A typical tag shows:
- The cover number, matching the tag on the item, the measurement sheet and the drawing or list.
- The item and location, such as "PRV outlet flange, boiler house".
- The service and temperature, such as "Steam 150 psig, 366 °F".
- The fabricator and date, for reorders and warranty.
Many plants also fix a matching tag to the item itself, near the cover, so that a cover found loose can be matched to its place. Kellerton puts a small stainless tag on the pipe beside each covered item with the same number. Some facilities add a QR code or barcode linked to their maintenance software, so that a technician can call up the cover's drawing and order a replacement from the floor.
The fabricator also supplies a cover list: each cover number, its item, its location and its tag text. When Pellam delivers the PRV station covers on November 30, the list will go into Kellerton's maintenance records, and Marcel will check each tag against his measurement sheets before installing.
Coldstream's own shop
Coldstream does not run a production cover shop, but Tomasz keeps a heavy-duty sewing machine, a stock of the common fabrics and threads, quilting pins, hooks, D-rings and tag blanks for repairs. Typical shop jobs are re-sewing a torn seam, replacing a strap or hook, adding a tag to an unmarked cover found on a job, and making simple covers such as an insulated wrap for a small valve. Anything larger, or anything for high temperature, goes to Pellam. Tomasz's rule is that a repaired cover gets the same thread and hardware as the original, never a quick fix with ordinary thread, and its tag is checked before it leaves.
Special features
Beyond the basic envelope, fasteners and tag, covers often carry special features that the measurer asks for and the fabricator builds in:
- Inspection flaps. A smaller flap, closed with its own straps, that opens over a nameplate, a test point or a leak-prone joint, so the whole cover does not have to come off.
- Drain grommets. Stainless eyelets at the low point of outdoor or wet-area covers, so water that gets in can get out.
- Lifting handles. Sewn fabric handles on large, heavy covers, such as exchanger heads and turbine casings, so they can be lifted without tearing the jacket.
- Stem boots. Close-fitting sleeves around valve stems and instrument connections that let the item move or be operated while keeping the cover closed.
- Reinforcing patches. Extra layers of fabric at strap anchors, lacing hooks and handles, where the load is concentrated.
- Two-part covers. Large items are often covered in two or more pieces that overlap, so each piece is light enough for one person to handle.
The two exchanger covers for Kellerton, KF-HX-01 and 02, are being made with lifting handles and two-part construction, because each would weigh too much for one person in a single piece, and the bonnet cover has the framed nameplate opening Wendell asked for.
Common mistakes
MistakeSewing a hot cover with ordinary polyester thread.
InsteadUse thread rated for the temperature at the seam: PTFE-coated glass, glass, stainless or silica as required.
MistakeLeaving the mat unquilted on a vertical or frequently handled cover.
InsteadQuilt with pins or stitching on a regular grid so the mat cannot slump.
MistakeUsing hook-and-loop on a hot face or in a washdown area.
InsteadKeep hook-and-loop to cool, indoor outer flaps; use straps or lacing elsewhere.
MistakePutting fasteners where they cannot be reached.
InsteadPlace straps and hooks on the accessible side and size the cover so it closes without stretching.
MistakeDelivering or installing covers without tags.
InsteadTag every cover and every item with the same number, and keep a cover list.
Summary and key terms
- Fabricators pattern, cut, assemble, quilt, fit hardware and tags, and check covers against the measurement sheets.
- Thread must be rated for the seam temperature; seams are lock-stitched, often doubled, with bound edges, and arranged to shed water outdoors.
- Quilting pins or stitch lines on a grid, often about 6 in, stop the mat slumping.
- Straps and rings suit frequent access; lacing hooks and wire suit rare access; hook-and-loop only on cool indoor flaps; drawstrings close the ends.
- Every cover and item carries a matching tag with number, location, service and fabricator, and the cover list goes into the plant's records.
- Lock stitch
- A stitch formed by two threads interlocking in the fabric, used for strong seams.
- Binding
- A strip of fabric folded over a raw edge and sewn to stop fraying.
- Quilting pin
- A stainless steel pin with washers passed through a cover to hold its mat in place.
- Lacing hook
- A stainless steel hook fitted to a cover edge, used with lacing wire to close a seam.
- D-ring
- A metal ring, shaped like the letter D, through which a strap is pulled to fasten a cover.
- Hook-and-loop
- A fastening of two fabric strips, one with tiny hooks and one with loops, that grip when pressed together.
- Cover list
- The record of each cover's number, item, location and tag text.
Practice problems
Work each problem on paper first, then reveal the answer to check.
Why must thread be chosen for the seam temperature?
Show answer
Thread is the thinnest part of the cover and fails first if it is under-rated.
How many pins on a 6 in grid for a piece 24 × 18 in, starting half a spacing in?
Show answer
4 along × 3 across = 12.
Which fastening suits a cover opened once every few years on a very hot item?
Show answer
Stainless lacing hooks and wire.
What information goes on a cover tag?
Show answer
Cover number, item and location, service and temperature, fabricator and date.
Why does the closing flap of an outdoor cover overlap downward?
Show answer
So rain runs off it instead of into the seam.
Lesson quiz · 5 questions
Score 60% or more to complete this lesson.
Create a free account to save your progress, take quizzes and earn a certificate.