
INS-220 · Lesson 8 of 12 · 23 min
Cones, reducers and transitions
▶ Video coming soon A video version of this lesson is on the way.
On a Thursday evening in October, Tomasz drew a large circle on a sheet of aluminum with a string and a marker tied to a nail, drew a smaller circle from the same nail, and cut out a curved band between two lines from the center. He rolled it up and dropped it over an insulated NPS 6 by 3 reducer on the bench. It fitted like a lampshade. "Every reducer on every pipe you will ever jacket," he said, "is a piece of a big circle. The only question is how big." Devon spent the rest of the night working out how big.
Wherever a pipe changes size, the jacket must change size too. Concentric reducers need a cone; eccentric reducers need an offset cone; equipment nozzles, end caps and transitions between round and square need their own shapes. This lesson covers the radial line development of a cone, the method used for every concentric reducer jacket, the ways eccentric reducers are jacketed, how cones are lapped and fastened, and where transitions and conical end caps appear.
The jacket on a concentric reducer
A concentric reducer keeps the pipe centerline straight while the diameter gets smaller. Its insulation, built up as INS-210 showed, forms a cone between the larger straight insulation on one side and the smaller on the other. The jacket over it is a frustum: a cone with its top cut off. When a frustum is unrolled flat, it becomes a band of a circle, a curved strip between two arcs with the same center. This is the radial line development from SMW-120.
Three measurements describe the cone: the large end outside diameter D, the small end outside diameter d, and the length of the cone along the pipe, H. From them, the slant height s is the length of the cone's sloping side. The large end radius of the pattern, R, is the distance from the cone's imaginary point to its large end, measured along the slant. The small end radius is R − s. The angle of the pattern, A, is the fraction of a full circle the band covers.
Check the result: the large arc of the pattern, 2πR × A ÷ 360, must equal the girth of the large end, πD, and the small arc must equal πd. If they do not, there is an arithmetic error.
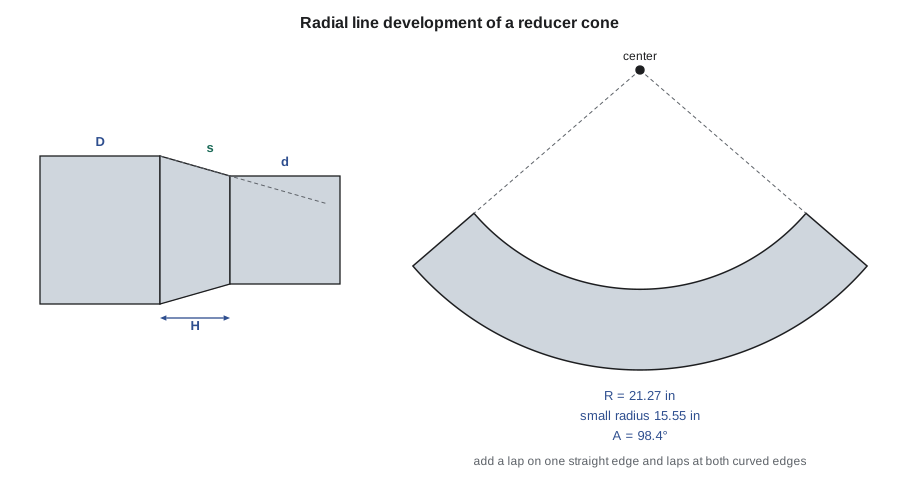
Worked problem
A cone for a Kellerton NPS 6 × 3 reducer
On the Kellerton rack, an NPS 6 × 3 concentric reducer is insulated with 2 1/2 in mineral wool. The large end insulation is 11.625 in across and the small end 8.5 in, and the insulated cone is 5.5 in long. Find the slant height, the pattern radii and the pattern angle, and check the arcs.
Show solution
- (D − d) ÷ 2 = (11.625 − 8.5) ÷ 2 = 1.5625 in.
- s = √(5.5² + 1.5625²) = √(30.25 + 2.44) = √32.69 = 5.72 in.
- R = 5.8125 × 5.72 ÷ 1.5625 = 21.27 in. Small radius = 21.27 − 5.72 = 15.55 in.
- A = 360 × 5.8125 ÷ 21.27 = 98.4°.
- Check: large arc = 2π × 21.27 × 98.4 ÷ 360 = 36.52 in, and π × 11.625 = 36.52 in. Small arc = 2π × 15.55 × 98.4 ÷ 360 = 26.70 in, and π × 8.5 = 26.70 in.
Answer: Strike arcs of 21 1/4 in and 15 9/16 in from one center and cut a band through about 98 1/2°, then add laps.
Laying out and cutting the cone
Lay the sheet flat on the bench. Mark the center point near one edge, with room for the large radius. With a trammel, a beam compass or a string and marker, strike the large arc and the small arc from the center. From the center, draw one straight line across both arcs. Set out the pattern angle with a protractor, or step off the large arc length with a flexible rule along the curve, and draw the second straight line. Add the laps: a longitudinal lap, about 2 in, along one straight edge; and laps along the curved edges as needed to lap the straight jacket at each end, usually a crimped edge at one end and a plain lap at the other. Cut with snips that follow the curve.
If the band is too large for one sheet, as it often is on big reducers and on cones for equipment, cut it in two or more pieces, each a fraction of the angle, with a lap on each joining edge. Two halves of 49° each would make up the Kellerton cone if a full piece did not fit. Each joint between pieces is a longitudinal lap and follows the same seam rules as straight jacket.
For many cones of the same size, make a template of the band in thin sheet or heavy card and use it to mark each one. Tomasz's shop keeps a rack of templates for the reducer sizes Kellerton uses most.
Fitting and lapping cones
A cone is lapped to the straight jacket at both ends, and the shingle rule decides which way. On a vertical line, the upper jacket laps over whatever is below: if the large end of the reducer is at the top, the large straight jacket laps over the cone's large end, and the cone's small end laps over the small straight jacket below. On a horizontal line, the cone's seams go below the centerline with their edges pointing down, and the end laps face away from the weather. A crimped edge on one end of the cone lets it slide inside the straight jacket on that side for a neat lap.
Roll the cut band into shape by hand or on the slip roll set for a cone, place it over the insulated reducer, close the longitudinal lap at the seam position and fasten it. Band both ends over their laps with the straight jacket. On small cones, a band will slide down the slope; place it right at the lap, where the straight jacket stops it, or use screws or rivets at the laps on hot service.
Eccentric reducers
An eccentric reducer has one side straight, flat across its length, and the other side sloping. INS-210 explained why: on pump suctions the flat side is up so no air collects, and on steam and condensate lines the flat side is often down so condensate drains. The jacket over it is an oblique cone, a cone whose point is not on the pipe centerline. Its pattern cannot be struck from one center with a compass.
There are three common ways to jacket eccentric reducers. The first is triangulation, also from SMW-120: divide both ends into equal parts, measure the true lengths of the lines joining matching points, and build the pattern triangle by triangle. It gives an exact fit and is how the shop makes eccentric pieces from field measurements. The second, used in the field on small sizes, is to treat the reducer as a short series of gores or wedges: a straight piece on the flat side and a tapered gore on the sloping side, lapped together. The third is a pre-formed cover where the maker has one for the size. Whichever you use, the flat side of the jacket must sit flat along the line of the straight jackets on each side, so the laps match and water does not collect.
Conical end caps and nozzle cones
Cones appear in other places too. Where insulation stops at a flange, a valve or an equipment nozzle, some specifications call for a conical end cap instead of a flat one: a short cone that steps down from the jacket diameter to the pipe or the nozzle, which sheds water better than a flat ring. On vertical lines outdoors, a cone at the top of a jacket run sheds water off the end like a small roof. Rain hats around penetrations, from lesson 4, are small cones too. All are laid out by the same radial line method, with the small diameter equal to the pipe or the penetration plus a clearance, and are sealed where they meet the pipe.
Transitions between shapes
Some fittings change shape as well as size: round to rectangular on duct and equipment connections, or round to oval on some equipment nozzles. Their jackets are laid out by triangulation, as SMW-120 taught for sheet metal fittings. Insulators see these mostly on equipment, ductwork and breeching. INS-310 covers equipment insulation and its finishing; this course stops at the round cones and reducers met on piping.
| Fitting | Jacket shape | Layout method | Lapping note |
|---|---|---|---|
| Concentric reducer | Right cone (frustum) | Radial line, from one center | Upper or upstream piece laps over |
| Eccentric reducer | Oblique cone | Triangulation, or field gores | Flat side in line with the straight jackets |
| Conical end cap | Short right cone | Radial line | Sheds water outward; sealed to the pipe |
| Rain hat at a penetration | Small right cone | Radial line | Laps over the jacket below |
| Round to rectangular | Transition | Triangulation | See INS-310 for equipment |
A conical end cap
Worked problem
An end cone at a flange cutback
On the Kellerton steam line, Tomasz wanted a conical end cap where the NPS 6 insulation stops 5 1/2 in short of each flange. The jacket is 11.625 in across; the cone closes down to a 7 in opening around the 6.625 in pipe, leaving clearance for movement and sealant; and it is 2 3/8 in long along the pipe. Find the slant height, the pattern radii and the angle.
Show solution
- (D − d) ÷ 2 = (11.625 − 7) ÷ 2 = 2.3125 in.
- s = √(2.375² + 2.3125²) = √(5.641 + 5.348) = √10.989 = 3.315 in.
- R = 5.8125 × 3.315 ÷ 2.3125 = 8.332 in. Small radius = 8.332 − 3.315 = 5.017 in.
- A = 360 × 5.8125 ÷ 8.332 = 251.1°.
- Check: large arc = 2π × 8.332 × 251.1 ÷ 360 = 36.52 in against π × 11.625 = 36.52 in; small arc = 2π × 5.017 × 251.1 ÷ 360 = 21.99 in against π × 7 = 21.99 in.
Answer: A band about 3 5/16 in wide between radii of 8 5/16 in and 5 in, through about 251°, plus laps.
A steep, short cone like this one has a large pattern angle, more than half a circle, because its sides are nearly flat. A long, gentle reducer cone has a small angle. The steeper the cone, the larger the angle, and when the two ends are almost the same size the radii become very large and the pattern is nearly a straight strip.
The cone's small edge does not touch the hot pipe. It stops at the clearance, and the gap is closed with a high-temperature flexible sealant or a separate collar that lets the pipe move. On the flange side, the flange cover from INS-210 laps over the cone.
Templates and checking fit
Before cutting a cone from good material, many jacketers cut a trial piece from scrap or card, roll it and try it on the fitting. A cone that does not close, or closes with too much lap, shows an error in a diameter or the length. When the trial fits, it becomes the template. Write the line, size and dimensions on the template so it can be used again. On cold-service reducers, the cone is held with bands and sealant only; on hot service, rivets or screws at the longitudinal lap are common.
Reducers in PVC
On indoor PVC work, reducers are covered with pre-formed PVC reducer covers where the sizes match, or with a cone cut from PVC sheet by the same radial line method. PVC cones are sealed at their longitudinal lap and at both ends with solvent-weld adhesive, which makes them easier to seal than metal cones on cold service. Like other PVC fittings, a PVC reducer cover must suit the insulation diameters at both ends; a cover made for one combination of pipe sizes and insulation thicknesses will not fit another, so check both ends before ordering.
Rolling and closing a cone
A cone does not roll like a cylinder. Its large edge must curve to a larger radius than its small edge, so it cannot be put straight through a slip roll set for a cylinder. Small cones can be formed by hand around the insulated fitting, a little at a time, working from the small end. In the shop, cones are rolled on a slip roll with the rolls set at an angle, or formed over a cone stake. Close the longitudinal lap from the small end toward the large end, so any error shows at the large end, where it is easiest to trim. If a cone will not close without forcing, stop and recheck the diameters and length; forcing it puts a twist in the cone that leaves its end laps open on one side.
Common mistakes
MistakeGuessing the cone pattern and trimming until it fits.
InsteadCalculate s, R and A, and check the arcs against the girths.
MistakeUsing pipe diameters instead of insulation diameters.
InsteadUse the outside diameters of the insulation at each end.
MistakeForgetting the laps on the curved edges.
InsteadAdd laps at both ends and a longitudinal lap on one straight edge.
MistakeLapping the cone the same way regardless of direction.
InsteadFollow the shingle rule for the line's real position.
MistakeJacketing an eccentric reducer as if it were concentric.
InsteadUse triangulation or gores so the flat side stays flat.
Summary and key terms
- A concentric reducer jacket is a frustum; its flat pattern is a band between two arcs from one center.
- s = √(H² + ((D − d)/2)²); R = (D/2) × s ÷ ((D − d)/2); small radius = R − s; A = 360 × (D/2) ÷ R.
- Check that the large and small arcs equal πD and πd.
- Add a longitudinal lap and end laps; split large bands into pieces; use templates for repeated sizes.
- Eccentric reducers are oblique cones laid out by triangulation or field gores, with the flat side in line.
- Conical end caps, top cones and rain hats are laid out the same way; transitions are triangulated.
- Frustum
- A cone with its top cut off, the shape of a reducer jacket.
- Slant height
- The length of a cone measured along its sloping side.
- Radial line development
- A pattern method for cones using lines from a common center.
- Pattern angle
- The angle of the band of a circle that forms a cone pattern.
- Oblique cone
- A cone whose point is not on the line through the centers of its ends.
- Triangulation
- A pattern method that builds a shape from true-length triangles.
- Trammel
- A beam with two points used to strike large arcs.
- Conical end cap
- A short cone that closes a jacket end and sheds water.
Practice problems
Work each problem on paper first, then reveal the answer to check.
What shape does a concentric reducer jacket unroll into?
Show answer
A band of a circle between two arcs from the same center.
D = 12 in, d = 8 in, H = 4.8 in. What is the slant height?
Show answer
√(4.8² + 2²) = √27.04 = 5.2 in.
For the same cone, what is the large pattern radius?
Show answer
6 × 5.2 ÷ 2 = 15.6 in.
And the pattern angle?
Show answer
360 × 6 ÷ 15.6 ≈ 138.5°.
How is an eccentric reducer jacket laid out exactly?
Show answer
By triangulation.
Lesson quiz · 5 questions
Score 60% or more to complete this lesson.
Create a free account to save your progress, take quizzes and earn a certificate.