
INS-220 · Lesson 6 of 12 · 21 min
Elbow jacketing: gores and pre-formed covers
▶ Video coming soon A video version of this lesson is on the way.
At the fifth jacketing night, Tomasz set two jacketed NPS 6 elbows side by side on the bench. One wore a pressed two-piece aluminum cover, smooth and shiny, with a single seam around its middle. The other was made of five gores, each beaded and lapped over the next, like the tail of a lobster. "The pressed one took two minutes," Tomasz said. "The gore one took forty. Which one would you put on the Kellerton rack?" Devon pointed to the pressed one. Tomasz turned both elbows over. The pressed cover was a few millimeters too small for the insulation under it, and its edge had been forced over with a gap at the throat. The gore elbow fitted everywhere. "The one that fits," Tomasz said.
Elbows are where straight jacket meets a change of direction, and where many jackets fail. This lesson covers the two ways elbows are jacketed: with pre-formed elbow covers, and with gores, the segments of a lobster-back elbow laid out from a pattern and fitted one by one. It shows how to lay out a gore pattern by ordinates, how gores are lapped so they shed water, and how elbow jackets are joined to the straight runs on each side.
Pre-formed elbow covers
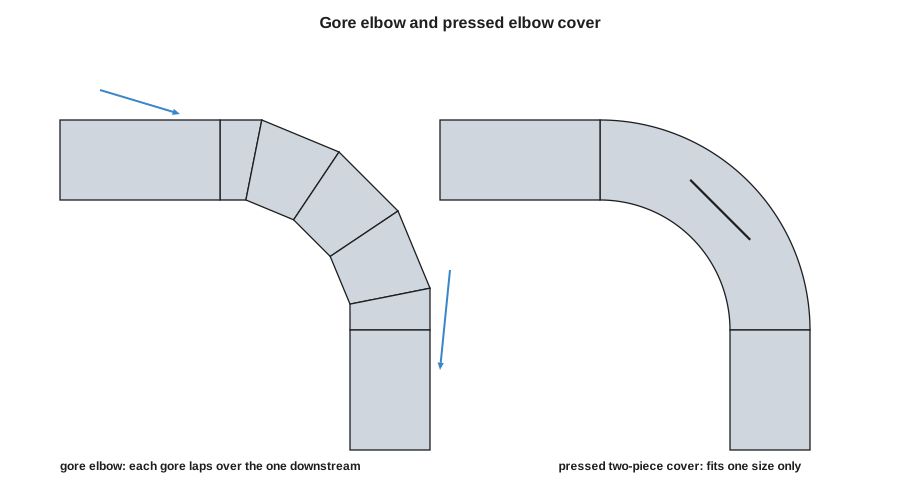
Pre-formed covers for elbows come in metal and PVC. Metal covers are usually pressed from aluminum or stainless steel in two halves that meet at seams along the heel and throat or around the middle, or in segmented forms that look like gores but come joined. PVC covers, as INS-210 showed, are molded in two halves or one piece with an insulation insert. All of them are made for a given insulation outside diameter and a given elbow radius: long radius or short radius, 90° or 45°.
Pre-formed covers are fast and neat when they fit. They fit when the insulation under them matches the size they were ordered for, the elbow is a standard radius, and the insulation on the elbow has been built to a smooth, even shape. They do not fit when the insulation is oversize, when two layers of insulation make an odd diameter, when the elbow is a special radius or an odd angle, or when the fitting insulation is lumpy. Forcing a cover that is too small leaves gaps at the throat and heel; a cover that is too big rattles and lets water in at its ends. Before ordering covers, check the actual insulation outside diameter on the elbows, and check that elbow radii match the covers.
To install a pre-formed metal cover, fit both halves over the insulated elbow and check that the ends lap over or under the straight jacket on each side by the required lap, following the shingle rule. Close the seams with the fasteners the maker or the specification calls for: screws, rivets, a band at each end, or a snap seam, and seal the seams on outdoor or washdown work. On horizontal-to-horizontal elbows outdoors, place the cover's seams on the sides, not on top.
Gore elbows
A gore elbow is built from segments called gores. Each middle gore is a short cylinder cut at both ends at an angle, so it is wedge-shaped: longer at the heel, the outside of the bend, than at the throat, the inside of the bend. The two end gores are half as wide, cut square on the end that meets the straight run and angled on the end that meets the next gore. Together, the gores turn the jacket through the elbow angle. The same idea was used in INS-210 for segmented insulation on large elbows.
The number of gores depends on the pipe size, the insulation thickness and the look the specification wants. More gores make a smoother elbow that follows the insulation closely; fewer gores are quicker but leave gaps at the heel on large elbows. Common practice is three pieces (one middle gore and two end gores) on small pipe, five pieces on medium sizes and seven or more on large pipe. For a 90° elbow with N pieces, the number of angle steps between the two ends is N − 1, so each middle gore turns the jacket through 90 ÷ (N − 1) degrees, and each end gore through half that.
In the ordinate formula, R is the centerline radius of the elbow, r is the outside radius of the insulation (half its outside diameter), and φ is the angle around the jacket measured from the heel. At the heel, φ is 0° and the ordinate is longest; at the throat, φ is 180° and the ordinate is shortest; at the sides, φ is 90° and the ordinate equals the gore's length along the centerline. An end gore uses half the ordinate, plus a straight extension to lap onto the straight jacket.
Laying out a gore pattern
Gore patterns are laid out flat on the sheet by ordinates, as in SMW-120's parallel line development. Draw a straight base line equal to the girth of the insulation, and add the longitudinal lap at one end. Divide the girth into 12 or 16 equal parts and draw a perpendicular line at each division. Number them around the jacket, starting at the heel. On each line, measure the ordinate for its angle, half above the base line and half below it for a middle gore, so the pattern is symmetrical. Join the ends of the ordinates with a smooth curve on each side. The result is a shape like a long, curved bow tie: widest at the heel lines and narrowest at the throat line.
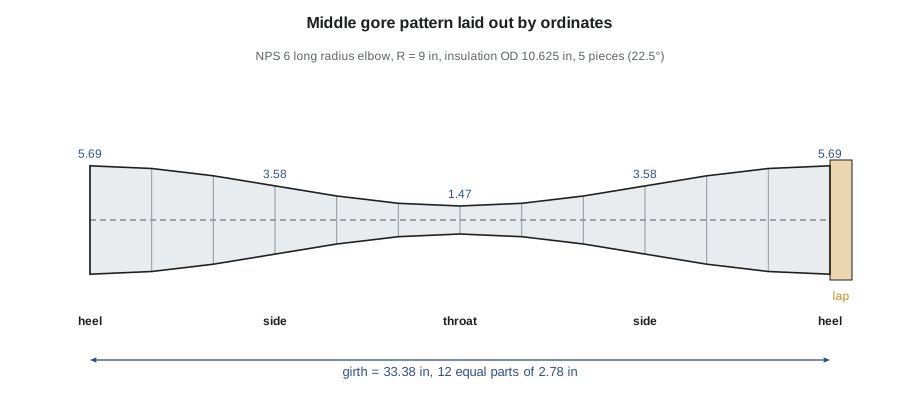
Add a lap allowance to one curved edge of each gore so it laps the next one, usually about 1 in, or form a bead or crimp on that edge instead. Mark the heel on every gore and number the gores in order, so they go on the elbow in the right sequence.
Worked problem
Gore ordinates for an NPS 6 elbow
A long radius NPS 6 elbow has a centerline radius of 9 in. It is insulated with 2 in mineral wool to an outside diameter of 10.625 in. Tomasz wants a 5-piece gore jacket. Find the gore angle, the girth and division spacing for 12 divisions, and the middle gore ordinates at the heel, the sides and the throat.
Show solution
- Pieces N = 5, so θ = 90 ÷ (5 − 1) = 22.5° for each middle gore, and 11.25° for each end gore.
- r = 10.625 ÷ 2 = 5.3125 in. Girth = π × 10.625 = 33.38 in; spacing for 12 divisions = 33.38 ÷ 12 = 2.78 in.
- tan(11.25°) = 0.1989.
- Heel (φ = 0°): 2 × (9 + 5.3125) × 0.1989 = 5.69 in.
- Sides (φ = 90°): 2 × 9 × 0.1989 = 3.58 in.
- Throat (φ = 180°): 2 × (9 − 5.3125) × 0.1989 = 1.47 in.
- In between: 30° gives 5.41 in, 60° gives 4.64 in, 120° gives 2.52 in and 150° gives 1.75 in. End gores use half of each: 2.85 in at the heel down to 0.73 in at the throat.
Answer: Middle gores: 5.69 in at the heel, 3.58 in at the sides, 1.47 in at the throat, on a girth of 33.38 in divided at 2.78 in.
Check the numbers before you cut. The ordinate at the sides should equal the centerline length of the gore, and the three middle gores and two end gores should add up, at the sides, to about the length of the elbow's centerline arc. Here, 3 × 90.9 + 2 × 45.5 = 363.7 mm against a centerline arc of π ÷ 2 × 228.6 = 359.1 mm: slightly more, because the straight gores cut across the curve. That small excess is normal and is taken up in the laps.
Lapping the gores
Gores must follow the shingle rule just like straight pieces. Think about which way water runs over the elbow in its real position. On an elbow that turns from a horizontal line down into a vertical drop, water runs from the horizontal leg over the elbow and down the vertical leg, so each gore on the upstream side laps over the gore downstream of it, and the last gore laps over the vertical jacket. On an elbow that turns from a vertical riser into a horizontal line, the vertical jacket below laps under the first gore, and so on up and around. On a level elbow on a rack, where water does not run from one leg to the other, lap the gores away from the weather.
Assemble the gores on the elbow one at a time, starting from the downstream end, with each gore's heel mark on the heel of the elbow. Hold each gore closed with a temporary band while you fit the next. Close each gore's longitudinal lap at the seam position chosen for the elbow, usually at the throat or on the lower side, and keep the seams of all the gores in line. Fasten each gore to the next with a screw or rivet at the heel and at each side, or band them where the gores are large enough to take a band, following the specification. Outdoors, seal the gore laps with sealant inside the laps.
Joining the elbow to the straight runs
The elbow jacket and the straight jacket on each side must lap by the full circumferential lap, in the right direction. If the elbow is jacketed before the straight runs, the straight runs downstream of the elbow lap under it and those upstream lap over it. If the straight runs are already done, the elbow ends must be fitted to lap correctly with them, which may mean slipping the elbow end under the upstream jacket. Plan this before you start: on a long run with several elbows, the order of work follows the water.
Band the elbow at both ends over the laps with the straight jacket. On large elbows, band each gore as well. Where the elbow and straight jacket are both outdoors, seal the laps. On cold service, do not drive screws or rivets through to the vapor retarder: use bands and adhesive or sealant only, or the fastening the specification allows that cannot reach the retarder.
Elbows at odd angles
Not every elbow is 90°. A 45° elbow needs half the gores of a 90° elbow with the same gore angle: a 45° elbow with a 22.5° gore angle has one middle gore and two end gores. Field-made offsets and odd-angle bends need the gore angle worked out from the real angle, which should be measured as INS-210 described. For an odd angle A with N pieces, θ = A ÷ (N − 1). Pre-formed covers are made for standard angles only; for odd angles, gores are the normal answer.
Shop gores and field gores
Gores can be made in the shop or in the field. In the shop, a jacketer lays out one pattern, checks it on a mock-up or a sample elbow, then cuts all the gores of that size on the shear and the snips, beads or crimps their edges on the beader, and rolls them to the radius on the slip roll. Each gore is marked with its size, its position in the elbow and its heel, and the set is bundled by elbow. Shop gores are fast to install and very even. Field gores are cut on site with hand snips from a pattern traced onto the sheet; they are slower but can be made to fit an elbow whose insulation is not the size expected. On Kellerton work, Tomasz's shop makes the gores for every standard elbow from the field sketches, and the crew carries a few blank sheets and a pattern for each size to make field gores where a shop set does not fit.
Elbows on cold service
On cold lines, elbows are where vapor retarders most often fail, because the insulation on the elbow is made of several pieces with many joints. INS-210 covered sealing the insulation and vapor retarder on cold fittings. The jacket over a cold elbow protects that work: it must not pierce it, so gores are held with bands and sealant or adhesive, not screws or rivets, and PVC elbow covers are sealed with adhesive. Where a specification calls for metal gores on a cold line, the gores may be fitted with their laps sealed and held by bands at each gore, with a band or clip at the heel where gores are too narrow to band. Check how the specification wants them held before you start.
Checking a finished elbow
Look at a finished elbow from the direction water will come. Every gore should lap over the next one downstream, with no gaps at the heel or throat. The gore seams should be in line with each other and with the seams of the straight runs. The elbow ends should lap the straight jacket by the full lap in the right direction. On outdoor work, sealant should show as a thin line at the lap edges. Press lightly on the heel: a gore elbow that moves or rattles is too large or not fastened.
Common mistakes
MistakeOrdering pre-formed covers from the drawing sizes.
InsteadCheck the real insulation diameter and elbow radius on site first.
MistakeForcing an undersize pressed cover over the insulation.
InsteadUse the right size cover or make a gore elbow.
MistakeLapping gores without thinking about which way water runs.
InsteadLap each gore over the gore downstream of it in the elbow's real position.
MistakeForgetting to mark heels and numbers on the gores.
InsteadMark every gore before it leaves the bench.
MistakeRiveting gores on a cold line through to the vapor retarder.
InsteadUse bands and sealant or another fastening that cannot reach the retarder.
Summary and key terms
- Pre-formed elbow covers are fast but must match the real insulation diameter, the elbow radius and the angle.
- A gore elbow is built of wedge-shaped middle gores and half-width end gores; each middle gore turns 90 ÷ (N − 1) degrees.
- Gore ordinates are 2 (R + r cos φ) tan(θ/2), longest at the heel and shortest at the throat; end gores use half.
- Lay out the pattern from the girth divided into equal parts, add a lap or bead on one edge, and mark heel and order.
- Lap gores in the direction water runs in the elbow's real position, and join them to the straight runs by the full lap.
- Odd-angle elbows use θ = A ÷ (N − 1).
- Gore
- One wedge-shaped segment of a segmented elbow jacket.
- Heel
- The outside of a bend, where the elbow is longest.
- Throat
- The inside of a bend, where the elbow is shortest.
- Lobster-back elbow
- An elbow jacket made of overlapping gores.
- Ordinate
- A measured length on a division line used to lay out a pattern.
- Centerline radius
- The radius of an elbow measured to the center of the pipe.
- Pressed elbow cover
- A factory-made metal elbow jacket in two halves.
- Gore angle
- The angle through which one middle gore turns the jacket.
Practice problems
Work each problem on paper first, then reveal the answer to check.
A 90° elbow is made of 7 pieces. What is the middle gore angle?
Show answer
90 ÷ 6 = 15°.
Where is the gore ordinate longest?
Show answer
At the heel.
R = 6 in, r = 3.75 in, θ = 30°. What is the heel ordinate of a middle gore?
Show answer
2 × 9.75 × tan 15° = 2 × 9.75 × 0.268 ≈ 5.22 in.
On an elbow turning from horizontal down to vertical, which gore laps over which?
Show answer
Each upstream gore laps over the gore downstream of it, and the last over the vertical jacket.
What gore angle does a 45° elbow with 3 pieces have?
Show answer
45 ÷ 2 = 22.5°.
Lesson quiz · 5 questions
Score 60% or more to complete this lesson.
Create a free account to save your progress, take quizzes and earn a certificate.