
INS-220 · Lesson 5 of 12 · 23 min
Straight pipe jacketing
▶ Video coming soon A video version of this lesson is on the way.
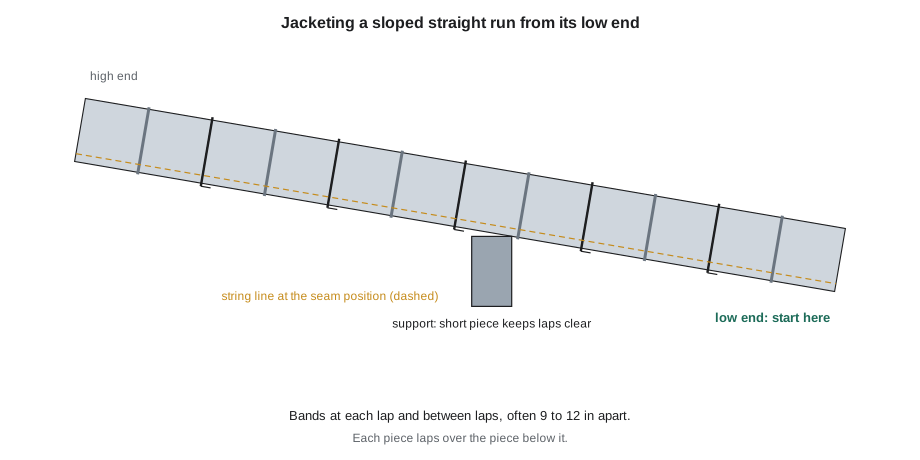
On Thursday, October 22, with the Mountview penthouse insulation nearly done, Bernie let Tessa and Devon jacket the 24 m rooftop run of heating hot water line that Tessa had measured. Tomasz had cut the pieces in the shop the night before and sent them up with a box of bands and seals. Devon wanted to start at the end nearest the roof hatch. Tessa put a level on the line first. It fell about 3/8 in in 10 ft toward the air-handling unit. "Then we start at the unit," she said, "and work back uphill to the hatch." Bernie, watching from the doorway, said nothing, which from Bernie was a compliment.
Straight pipe is where most jacket goes, and where the habits that make a good jacketer are learned. This lesson brings together the earlier lessons into a working method for jacketing a straight run: checking the insulation, choosing the starting point, placing and lining up pieces, banding, jacketing vertical runs, allowing for expansion, and jacketing with factory-formed metal jacket and with PVC.
Before the first piece
Check the insulation before covering it. It must be the specified material and thickness, dry, tight at its joints and without gaps, and secured with its own bands or wire as the specification calls for. On cold service, the vapor retarder must be complete, sealed and inspected; once the jacket is on, nobody will see it again. Shields and inserts must be in place at supports. Fittings should be insulated, or at least the straight run should stop where the fitting insulation will begin, so that jacket laps can be planned around them.
Then plan the run. Check its slope with a level at several points, decide on the starting end, decide which side the longitudinal seams will go on, and note where the fittings, supports, branches and flanges are. Lay out the pieces so that circumferential laps do not fall on top of a support, a hanger or a branch, where they are hard to band and seal; a short piece cut to length moves the laps clear. Where the run ends at a fitting, plan for the elbow or tee jacket to lap correctly over or under the straight run, following the shingle rule.
Placing and lining up pieces
Start at the downstream end: the low end of a sloped line, the bottom of a vertical line, or, on a level line, the end that puts the circumferential laps facing away from the weather. Wrap the first piece around the insulation with its moisture barrier inward, so that its longitudinal lap falls at the planned seam position with its outer edge pointing down. Pull it snug by hand so it hugs the insulation without crushing it. Put on a temporary band or a strap to hold it while you check that the seam is on its line and the piece is square to the pipe.
Slide the next piece on so that it laps over the first by the specified circumferential lap, with its seam in line with the first piece's seam. Snap a chalk line or stretch a string along the run at the seam position, or measure the seam distance from the top center at each piece as in lesson 4, so the seams make a straight line along the whole run. On beaded jacket, push each piece until its bead seats over the edge of the piece below. Band each circumferential lap as you go, then band the middle of each piece.
Bands and their spacing
Bands hold pipe jacket closed and press the laps tight. They are thin straps of stainless steel or aluminum, closed with a crimped seal or a wing seal, or bought as pre-formed bands with their own closures. Typical bands for pipe jacket are about 1/2 in or 3/4 in wide and about 0.020 in thick. Stainless bands are stronger and are standard on aluminum and stainless jacket in plants; aluminum bands are used on some commercial work. A common rule is a band over every circumferential lap and bands in between at a spacing set by the specification, often about 9 to 12 in; on a piece about 36 in long, that usually means one band at each lap and one in the middle. Lesson 10 covers bands, screws and rivets in detail.
Bands should be tight enough to hold the laps closed without cutting into the jacket or crushing soft insulation. Place each lap band so it sits over the lap, not just beside it. Put the seal or buckle of each band on the side of the pipe away from view and away from the weather, near the longitudinal seam, and keep all the seals in a line. Cut off band tails cleanly and fold them so no sharp ends stick out.
Worked problem
Bands for the Mountview roof run
The roof run is 29 pieces of jacket with a girth of 26.81 in. Tomasz's cut list calls for a band at each of the 28 laps between pieces, one at each end of the run and one at the middle of each piece. Each band is cut to the girth plus 3 in for the seal and tensioner. Bands come in coils of 100 ft. How many bands, seals and coils are needed?
Show solution
- Bands = 28 laps + 2 ends + 29 middles = 59 bands, and 59 seals.
- Band length = 26.81 + 3 = 29.81 in, call it 30 in.
- Total length = 59 × 30 = 1,770 in, about 147.5 ft.
- Coils = 147.5 ÷ 100 = 1.5, so 2 coils, leaving about 52 ft for the elbows at each end and spares.
Answer: 59 bands and 59 seals, cut from 2 coils.
Vertical runs
On a vertical line, gravity is the extra problem. Jacket pieces are smooth and, once the line heats and cools a few times, they tend to slide down. Pieces that slide open their laps at the top and pile up at the bottom. To stop this, vertical jackets are held up. On the insulation side, long vertical runs have support rings or insulation supports welded or clamped to the pipe at intervals, often every few meters, which carry the insulation weight. On the jacket side, jacket support clips, sometimes called S-clips, are hooked over the edge of the lower piece and under the edge of the upper piece at each circumferential lap, two or three clips per lap, so that each piece hangs from the one above instead of sliding. Some specifications call for screws or rivets at the laps of vertical runs instead; check the specification and do not use screws on cold service.
Start at the bottom. Close the bottom of a vertical run with an end cap or by lapping it into the elbow or the fitting jacket below. Work up, lapping each upper piece outside the piece below. At the top, close the jacket with a rain collar or cap that sheds water outward, or lap it under the elbow jacket above so that the elbow sheds onto it.
Expansion and slip joints
Lesson 2 showed that jackets grow and shrink with temperature. On a short indoor run this movement is small and is taken up in the laps, which slide slightly under their bands. On long runs, outdoor runs, and hot lines whose pipe itself grows a lot, the movement needs a planned place to go. Specifications handle this in a few ways. Some call for laps to be banded snug but not sealed, so each lap can slide. Others call for expansion or slip joints in the jacket at intervals or at the pipe's own expansion joints and loops: a lap made wider than normal, for example 4 in instead of 2 in, with its band snug enough to close it but loose enough to let it slide, and no screws or rivets through it.
Worked problem
Planning slip joints on a long outdoor run
Kellerton's plant standard calls for jacket slip joints at about 30 ft spacing on outdoor hot lines. The 120 ft straight section of the yard rack steam line between its two expansion loops will see a jacket temperature swing of about 100 °F between a winter night and a summer afternoon. Using 12.8 millionths per degree Fahrenheit for aluminum, how much does the whole jacket move, and how much must each slip joint take?
Show solution
- Whole run: 12.8 × 10⁻⁶ × 1,440 × 100 = 1.84 in.
- Slip joints at 30 ft spacing divide the run into 120 ÷ 30 = 4 sections, with 3 slip joints between them.
- Each 30 ft section moves 12.8 × 10⁻⁶ × 360 × 100 = 0.46 in.
- Each slip joint, taking the movement from the section beside it, must allow about 1/2 in, well within a 4 in slip lap.
Answer: The whole jacket moves about 1 7/8 in; each slip joint takes about 1/2 in.
Slip joints do not reduce the movement; they give it a place to go. Without them, the jacket would push at its fasteners, at its end caps and at the elbows, and on a hot day a fully sealed and riveted run can buckle at its weakest lap.
Factory-formed jacket
Much pipe jacket comes pre-cut and pre-rolled for a given insulation outside diameter, with a factory-formed longitudinal lap such as a Z-lock or a pre-curled overlap. Factory jacket is faster to install and gives very even seams. It is ordered by the insulation outside diameter, so it is only as good as the match between that diameter and the real insulation: on oversize or double-layer insulation it may not close, and on undersize insulation it is loose. Wrap it, snap or press the seam closed along its length, keep the seam at the planned position, and band it as for field-cut jacket. Some factory jacket has its own built-in bands or closure strips; follow the maker's instructions.
PVC jacket on straight pipe
PVC jacket on straight runs is cut from rolls or bought pre-curled to size. The method is like metal jacket, with a few differences. PVC laps are usually smaller, often about 1 1/2 in, because they are sealed with adhesive rather than banded. The jacket must be clean and dry and at the temperature the adhesive maker allows. Apply the solvent-weld adhesive in a thin, even bead along the lap, press the lap closed and hold it until it grips. Circumferential laps are sealed the same way, or with a PVC butt strip over a butt joint where the specification allows. Some specifications call for stainless tacks at intervals on the longitudinal lap while the adhesive sets; never use tacks or staples that pass through a cold-service vapor retarder. Bands are used over PVC only where the specification asks for them, for example on vertical runs or high-traffic areas.
Because PVC moves more than metal, long runs of PVC need expansion joints too. Many makers call for an unsealed slip joint or a flexible joint at intervals, and for the PVC to be installed at moderate room temperature so that it is neither stretched nor slack in service. PVC that is installed cold and then warms up in a hot mechanical room will grow and bow between its joints.
Jacketing at supports, hangers and ends
Supports, hangers and the ends of runs are where straight jacketing takes the most time. As lesson 4 explained, keep the jacket whole on top at shields and supports, make cuts underneath and seal them, and put sealed collars around hanger rods that pass through the top. Where a run ends at a flange cutback, finish it with an end cap set back so the flange cover can lap over it. Where it ends at a wall or a floor, finish it with an end cap or a sleeve that the wall or floor detail can seal to; on fire-rated walls, the firestop system decides how the insulation and jacket pass through, which INS-330 covers.
Finishing a run neatly
A finished run should look like one piece of work. Seams are in one straight line on the planned side; bands are evenly spaced with their seals in line; lap edges are straight and tight; there are no dents, fingerprints, marker lines or sealant smears on the exposed face; and every end, support and penetration is closed. Wipe off marker lines and sealant with the cleaner the maker allows before it sets. Pick up every offcut and band tail. Then walk the run once from end to end, looking at it the way the owner will, from the floor or the roof hatch, before you call it done.
Common mistakes
MistakeStarting a sloped run at whichever end is nearest.
InsteadStart at the low end so each piece laps over the one below.
MistakeLetting laps land on top of a hanger or support.
InsteadCut a short piece to move the lap clear.
MistakeLeaving vertical jacket with nothing to hold it up.
InsteadUse support rings for the insulation and jacket clips or the specified fasteners at each lap.
MistakeRiveting and sealing every lap on a long outdoor hot line.
InsteadLeave slip joints where the specification calls for them so the jacket can move.
MistakeTacking PVC through a cold-service vapor retarder.
InsteadUse adhesive only; never puncture the vapor retarder.
Summary and key terms
- Check that insulation is complete, dry and inspected before jacketing it; plan slope, start point, seam side and lap positions.
- Start at the downstream end, keep seams in line on the planned side, and lap each piece over the one before.
- Band every circumferential lap and between laps at the specified spacing; line up seals and finish tails cleanly.
- Hold up vertical jacket with insulation supports and jacket clips or the specified fasteners; start at the bottom.
- Plan for movement with slip joints on long, outdoor and hot runs.
- Factory jacket depends on the insulation being the size it was ordered for; PVC is sealed with adhesive and needs its own expansion joints.
- Slip joint
- A wider jacket lap left free to slide so the jacket can expand and contract.
- Jacket support clip
- A clip, sometimes called an S-clip, that hangs each piece of vertical jacket from the one above.
- Support ring
- A ring fixed to a vertical pipe or vessel that carries the weight of the insulation.
- Band seal
- A crimped or wing seal that closes a band.
- Factory jacket
- Pipe jacket cut and rolled to size at the factory with a formed longitudinal lap.
- String line
- A string stretched along a run to keep jacket seams in a straight line.
- Butt strip
- A strip of jacket that covers a butt joint between two pieces.
- Pre-curled PVC
- PVC jacket formed into a roll that springs closed around the insulation.
Practice problems
Work each problem on paper first, then reveal the answer to check.
On a vertical run, where do you start jacketing?
Show answer
At the bottom.
Name two ways vertical jacket is held up.
Show answer
Jacket support clips at the laps, and support rings or insulation supports on the pipe (or specified fasteners at the laps).
A 66 ft run has 24 pieces. With a band at each of 23 laps, 2 ends and 24 middles, how many bands?
Show answer
49.
A 60 ft aluminum jacket section sees a 90 °F swing. How much does it move?
Show answer
12.8 × 10⁻⁶ × 720 × 90 ≈ 0.83 in.
Why should PVC not be tacked on cold service?
Show answer
Tacks puncture the vapor retarder.
Lesson quiz · 5 questions
Score 60% or more to complete this lesson.
Create a free account to save your progress, take quizzes and earn a certificate.