
GAS-330 · Lesson 10 of 12 · 23 min
Pressure testing larger systems
▶ Video coming soon A video version of this lesson is on the way.
On Thursday, October 15, Maureen and Ayesha went to Glenview Elementary to test the new gas line for the replacement boiler that Bayline would commission in November. The line ran 150 ft of 1-1/2 in. steel from the meter, partly along the outside of the gym wall and across a low roof, and partly through the boiler room. The school board's specification called for a test at 50 psig for 60 minutes, more than the code's minimum for this pressure and length, and the board's inspector, as well as the City of Columbus mechanical inspector, would want to see the record. The caretaker, Doug Pereira, had the boiler room unlocked by eight. By half past ten, Ayesha was staring at a gauge that had risen 1 psi in the first twenty minutes and was now falling. "It's leaking," she said. "Or it's the sun," Maureen said. "Which?"
This lesson explains how larger and elevated-pressure gas systems are pressure tested: what the test proves, what it is done with, how test pressures and times are set, how temperature affects a test, how to test safely, how to find leaks, and what must be recorded. It finishes the welded header at Crown Linen from lesson 8 and the Glenview line.
What a pressure test proves
A pressure test fills new or altered piping with air or an inert gas at a pressure above its operating pressure and holds it for a set time with the source isolated. If the pressure holds, apart from changes explained by temperature, the piping and every joint in it are tight. The test is made on the whole new system, or each part of it as it is completed, before any part is concealed, insulated, coated, buried or put into service, so that any leak can be found and repaired. It is a separate step from the leak test at operating pressure done after appliances and the meter are connected and gas is introduced, which checks the connections that the pressure test could not include.
Test medium
Pressure tests are made with air, nitrogen or carbon dioxide, or another inert gas the code allows. Fuel gas is never used, because a leak during a test would release fuel gas. Oxygen is never used: oil, pipe sealant or cutting fluid inside new piping can burn violently in oxygen under pressure. Nitrogen is preferred on larger and elevated-pressure jobs because it is dry and inert and, if the system will be purged with it later, is already in the pipe. A nitrogen cylinder is always used with a regulator set below the test pressure and a relief device on the test rig, so that the system cannot be overpressured by the cylinder's full pressure, which can be more than 2,000 psig.
Test pressure and duration
The IFGC requires a test pressure of at least 1.5 times the maximum working pressure, and never less than 3 psig, for a minimum time that the code sets, longer for larger systems; NFPA 54 ties the minimum duration to the volume of the piping, with a short minimum for small systems. Local rules and the inspector may require more. A specification may require a higher pressure or a longer time than the code, as Glenview's did, and then the specification governs, provided that nothing in the system is exposed to more than it is rated for.
Anything that cannot take the test pressure is isolated: the meter, regulators, appliance valves, gauges and other components not rated for it. Isolation is by removal and capping, or by closed valves rated for the test pressure, with the downstream side open to atmosphere so that a passing valve shows up rather than damaging the component. Line regulators, OPDs and appliances are connected after the test, and their joints are checked in the leak test at operating pressure.
| Item | Typical requirement |
|---|---|
| Medium | Air, nitrogen or carbon dioxide; never fuel gas or oxygen |
| Pressure | At least 1.5 × working pressure, minimum 3 psig or the specification if higher |
| Duration | Not less than the code minimum, longer for larger volumes or the specification if longer |
| Gauge | A range suited to the test pressure, with graduations fine enough to show a small drop |
| Isolated | Meter, regulators, appliance valves and anything not rated for the test pressure |
| When | Before concealment, insulation, coating, backfill or service |
Gauges
The gauge is the test's only witness, so it must be suitable. A gauge whose range is far above the test pressure cannot show a small drop; one whose range is barely above the test pressure is near its limit and may be damaged. The codes and good practice call for a gauge whose range suits the test pressure and whose graduations are fine enough to see a small loss; for a 50 psig test, a 0 to 100 psig gauge with 1 psi divisions is typical. On larger and specified tests, a calibrated digital gauge or a chart recorder or data logger is used, so that the whole test, not just its start and end, is on record, and the gauge's calibration date goes on the test record.
Temperature and the test
A pressure test traps a fixed amount of gas in the pipe. If the pipe and its contents warm up, the pressure rises; if they cool, it falls, exactly as lesson 6 described for gas in a meter. The change is proportional to the absolute temperature, so a few degrees can move a test gauge noticeably, especially at higher test pressures and on piping exposed to sun, wind or outdoor air. Indoors, in a stable room, temperature changes during a test are small. Outdoors, or on a roof in changing weather, they can be larger than the drop a small leak would cause.
Worked problem
How much can temperature move the gauge?
Glenview's line is at 50 psig when the gas in it is at 64 °F. A cloud covers the sun and the gas cools to 54 °F. Atmospheric pressure is 14.4 psia. What does the gauge read?
Show solution
- Absolute pressure and temperature at the start:
- \[50 + 14.4 = 64.4 \text{ psia}, \quad 64 + 459.67 = 523.67 \text{ °R}\]
- After cooling:
- \[64.4 \times \frac{513.67}{523.67} = 63.2 \text{ psia}\]
- Gauge reading:
- \[63.2 - 14.4 = 48.8 \text{ psig}\]
Answer: A 10 °F cooling drops the gauge by about 1.2 psi with no leak at all. A test that ignores temperature can fail a tight system or, if the pipe warms during the test, pass a leaking one.
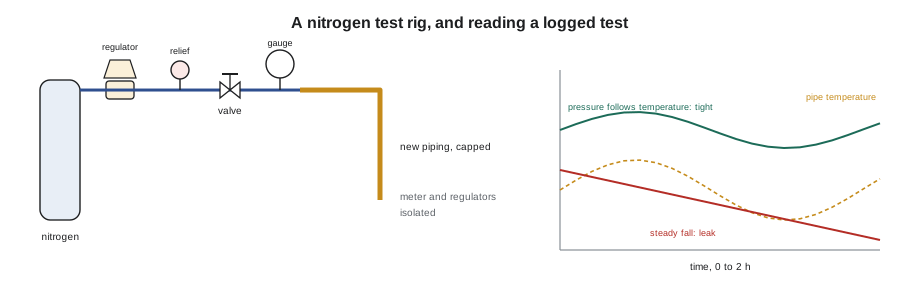
Technicians deal with temperature in several ways: let the system stabilize for a while after filling, before starting the timed test; test early in the day or under cover when exposed piping is involved; record the temperature at the start and end, measured on the pipe; and, on long tests or large systems, use a chart recorder that shows whether the pressure follows the temperature or keeps falling steadily. A falling pressure that recovers when the sun returns is temperature; a steady fall regardless of weather is a leak.
Testing safely
A pneumatic test stores a great deal of energy in compressed gas, far more than a water test at the same pressure, because gas is compressible. A failure of a joint, a cap or a fitting during the test can throw parts with great force. Safe practice on larger tests includes:
- Raising the pressure in stages, holding at an intermediate pressure and checking for leaks before going to the full test pressure.
- Keeping people out of the area around the piping while it is at test pressure, with barriers or signs where needed, and never standing in line with caps and blind flanges.
- Using a regulator and a relief device on the test rig set so that the system cannot exceed its test pressure.
- Never tightening, hammering on or repairing a joint while the system is under pressure. If a leak is found, the system is depressurized, the joint repaired, and the test started again from the beginning.
- Releasing the test pressure slowly, to the outdoors, at the end.
Finding leaks
When a test fails, the leak has to be found. On new piping every joint is checked with a leak detection solution made for gas work, brushed or sprayed on and watched for at least a minute for bubbles; small leaks produce slow, small bubbles that are easy to miss. Electronic ultrasonic detectors can hear the hiss of gas escaping from a joint that is hard to reach. On a large system, sections can be isolated by valves or caps and tested separately to narrow the search. A flame is never used to look for a leak.
Records and tags
Every pressure test is recorded: the address and the part of the system tested, the date, the test medium, the test pressure and duration, the pipe sizes and lengths, the start and end pressures and temperatures, the gauge used, the name and license or registration of the person who did it, and the contractor's name. Columbus inspectors witness or review the test and record it on the permit, and Bayline also tags the piping with the test details. The test record goes to the inspector and stays in the job file.
Crown Linen: Sunday morning
At Crown Linen, the new 3 in. header from lesson 8 was tested at seven on Sunday morning, October 4, with the dryer and boiler branches capped and the inlet spool still out. Grant filled it with nitrogen in two stages, holding at 15 psig while Ayesha brushed every weld and flange, then brought it to the specification's 50 psig. In the closed, unheated laundry, the pipe temperature held at 57 °F and the gauge held steady for the full 60 minutes. Grant recorded the test, tagged the header and released the nitrogen slowly to the outdoors through a hose, leaving enough in the pipe for the purge in lesson 11.
Glenview: sun or leak?
At Glenview, Maureen told Ayesha to read the temperature on the outside section of pipe with the surface thermometer: it had been 64 °F in the sun at the start and was now 54 °F under the cloud. The gauge had fallen from 50 to 48.8 psig, almost exactly what the temperature change predicted. "That's not a leak," Maureen said, "but it's not a test either. We can't prove anything with numbers moving that much." They let the line settle, brushed all the joints with solution, which showed nothing, and waited until mid-afternoon, when the sky had cleared to a steady overcast. Then they restarted the timed test with a data logger on the gauge port and the pipe thermometer taped to the roof section. Over the 60 minutes the temperature moved by less than 2 °F and the pressure by less than the logger's resolution. The test passed, and both the logger trace and the start and end temperatures went on the record.
Worked problem
Was the change in the first test all temperature?
In the first test, the gauge fell from 50.0 psig to 48.8 psig while the pipe cooled from 64 °F to 54 °F. The calculation above predicts 48.8 psig. What difference remains?
Show solution
- \[48.8 - 48.8 = 0 \text{ psi}\]
Answer: The change is fully explained by temperature, within the gauge's reading accuracy. But a test that passes only after a calculation is weak evidence; the clean retest is what went on the record.
Testing additions to existing systems
When new piping is added to a system already in service, the new section is pressure tested on its own, isolated from the live system by a closed valve and a cap or blind, so that the test pressure never reaches the existing piping and gas never reaches the test. The final connection between new and old, the tie-in, cannot be included in that test, so it is checked by the leak test at operating pressure once gas is admitted: solution on every joint made at the tie-in, and a gauge watched for the code's minimum time with the downstream appliance valves closed. On elevated-pressure systems, a tie-in usually means shutting down part of the existing system, so it is planned with the owner for a time when the appliances affected can be off, and the purge of the new section follows lesson 11.
Common mistakes
MistakeTesting with fuel gas or oxygen.
InsteadUse air, nitrogen or carbon dioxide.
MistakeLeaving the meter, regulators and appliance valves connected during the test.
InsteadIsolate anything not rated for the test pressure.
MistakeStarting the timed test immediately after filling.
InsteadLet the system stabilize, and record the pipe temperature at start and end.
MistakeTightening a leaking joint while the system is under test pressure.
InsteadDepressurize, repair, and restart the test.
MistakeUsing a gauge whose range is far above the test pressure.
InsteadUse a gauge whose range and graduations can show a small drop.
MistakeCovering or burying piping before it is tested.
InsteadTest before concealment, insulation, coating or backfill.
Summary and key terms
- A pressure test holds new or altered piping at a pressure above its operating pressure, with the source isolated, to prove it tight before it is concealed or put into service; a separate leak test at operating pressure checks the connections made afterward.
- The medium is air, nitrogen or carbon dioxide, never fuel gas or oxygen, and nitrogen cylinders are used through a regulator with a relief device.
- Test pressure and duration come from the IFGC (at least 1.5 times working pressure, minimum 3 psig) and the codes' minimum durations, or from the specification if it requires more; components not rated for the test are isolated.
- Gauges must suit the test pressure, and chart recorders or loggers are used on larger tests.
- Temperature changes move the pressure in proportion to absolute temperature, so tests are stabilized, timed in steady conditions and recorded with pipe temperatures.
- Pneumatic tests are raised in stages with people kept clear, leaks are found with solution or ultrasonic detectors and never repaired under pressure, and every test is recorded and tagged.
- Pressure test
- A test holding piping above operating pressure with an inert medium to prove it tight.
- Leak test at operating pressure
- A check of connections made after the pressure test, with gas at operating pressure.
- Test medium
- The air or inert gas used to pressurize piping for a test.
- Chart recorder
- An instrument that records pressure continuously over a test.
- Leak detection solution
- A non-corrosive liquid that forms bubbles at a leaking joint.
- Stabilization
- Waiting after filling until the gas and pipe temperatures settle before timing a test.
Practice problems
Work each problem on paper first, then reveal the answer to check.
Why is oxygen never used for a pressure test?
Show answer
Oil, sealant or cutting fluid in the pipe can burn violently in pressurized oxygen.
Name three components isolated during a pressure test.
Show answer
The meter, line regulators and appliance valves, and anything else not rated for the test pressure.
A test line at 30 psig cools from 70 °F to 60 °F, with an atmosphere of 14.4 psia. What does the gauge read?
Show answer
44.4 × 519.67 ÷ 529.67 = 43.6 psia, or 29.2 psig.
What must be done if a joint leaks during a test?
Show answer
Depressurize, repair the joint, and start the test again.
Why did Maureen restart the Glenview test?
Show answer
Temperature changes from sun and cloud moved the gauge as much as a leak would, so the first test proved nothing.
Lesson quiz · 5 questions
Score 60% or more to complete this lesson.
Create a free account to save your progress, take quizzes and earn a certificate.