
DCT-130 · Lesson 6 of 12 · 20 min
Installing servers, switches and storage
With the cabinet in place, the rails understood and the equipment staged, the actual installation can begin. Installing a server into a rack is a short job when it is prepared well and a long one when it is not. It is also where a technician's work becomes visible to the customer, who will judge Stonebridge's service by whether their server is in the right place, powered from the right sides, cabled as asked and running when they log in. Jamal's first independent installation is a remote hands ticket for the Bayview Credit Union: two 1U servers and a 1U switch into cabinet A-31-03, which has just been moved into their new cage.
Read the ticket, then the elevation
A remote hands installation ticket at Stonebridge tells the technician what to install, where and how. Jamal reads it twice before going near the equipment. A good installation ticket gives:
- the customer, cage and cabinet;
- each device by model and serial number, matching the receiving record;
- the U position of each device;
- power: which strip outlets to use on the A and B strips;
- network: which ports on the device connect to which ports on the switch or patch panel, and with which cables;
- whether to power the device on, and what to check when it is on;
- who to call with questions, and the customer's change window if there is one.
He compares the ticket with the cabinet's elevation in DCIM, the drawing that shows what is in each unit. The elevation shows U20 to U22 as free for the new equipment and U23 as a blanking panel. If the ticket and the elevation disagree, or the space is not actually free when he opens the cabinet, he stops and asks the customer. He never moves another device to make room unless the ticket says so.
Front and back: airflow direction
Almost all data center equipment breathes from front to back: it draws cool air in through its front panel and blows warm air out of its rear. The cabinet is placed with its front to the cold aisle, and equipment must be installed facing the same way. Switches are the exception that needs attention. Many network switches have their ports on one end and their fans blowing from one end to the other, and they are sold in two versions: port-side intake and port-side exhaust. In a server cabinet where the switch ports face the rear, where the server cables are, the switch must exhaust out of its port side so that it still breathes cold air from the front of the cabinet. A switch installed with the wrong airflow direction draws hot exhaust air into itself and can overheat.
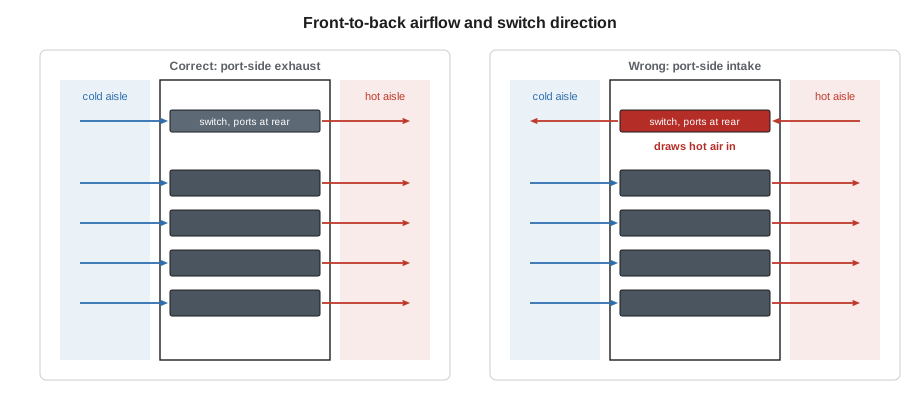
Jamal checks the switch's model number and finds the letters that mean port-side exhaust in the manufacturer's naming. He also looks at the fan modules, which are color-coded by airflow direction on that make. The customer ordered correctly, but Roz tells him that at least once a year she finds a switch on site with the wrong fans.
The installation
The sequence Jamal follows for each device:
- Open the cabinet, confirm cage, cabinet and the U positions free. Take a photograph of the cabinet before starting.
- Remove blanking panels from the units to be used and keep them for later.
- Install rails or brackets at the correct units, as Lesson 5 describes.
- Mount the device, with a second person for heavy or high installations, and secure it.
- Check the label on the device front and rear matches the ticket, or apply labels if staging did not.
- Connect power: one cord to the planned outlet on the A strip, one to the planned outlet on the B strip. Lesson 8 covers this in detail.
- Connect network cables to the ports on the ticket, routed through the cable managers, with labels at both ends.
- Dress the cables neatly, clear of the exhaust and the service path of sliding servers.
- Refit blanking panels in any empty units, close and lock the cabinet.
- Power on if the ticket says so, and check the indicators.
- Photograph the finished work, front and rear, and update the ticket and DCIM.
Servers
Most servers in Hall A are 1U and 2U general-purpose machines with two power supplies, a few network ports and a management port. The management port, often called the out-of-band or baseboard management port, connects to a separate management network so that the customer can control the server remotely even when it is not running. Customers usually want it connected first, because it lets them finish the setup without anyone in the hall. Servers often have front bezels, which lock, and a service tag or asset tag on a pull-out tab at the front.
When powering on, Jamal watches the indicators: power supply lights on both supplies, the system health light, the network link lights on each connected port. A health light that shows amber or flashing usually means a fault the server has detected, such as a missing memory module or a disk not seated. He reports exactly what he sees, in the colors and patterns the manufacturer's guide uses, instead of guessing at the cause.
Switches
Top-of-rack switches sit at or near the top of each cabinet and connect the servers below them to the customer's network. They are usually 1U, with many ports at one end. Installation points specific to switches:
- Airflow direction, as above.
- Mounting: deep switches need rear support brackets, not just front ears.
- Power: switches with two power supplies are fed from A and B like servers. Some small switches have a single supply and need a transfer switch, as Lesson 8 explains.
- Optics: many switch ports take pluggable transceivers, small modules that convert to optical fiber or high-speed copper. Transceivers are static-sensitive and their optical faces must be kept capped and clean. DCT-210 and DCT-320 cover them.
- Console port: a serial port for initial setup, which the customer may want connected to a console server.
Storage
Storage arrays and disk shelves are heavy, often 2U to 4U, and deep. A fully populated 4U shelf can carry sixty or more drives. They are often installed empty and the drives fitted afterwards, which makes the lift lighter and safer, but the drives must then go back into exactly the slots they came from, or into the slots the customer specifies, because the order of drives in an array can matter to the data on them. Drives are carried in anti-static packaging and handled by their carriers, never by their circuit boards. Storage often has more cabling than servers, with redundant connections to controllers or to storage switches, and it is usually the equipment customers are most nervous about, because it holds their data.
What not to touch
A technician working in a customer's cabinet works on the devices on the ticket and nothing else. Roz's list of things not to do is short: do not unplug, move or reset any device that is not on the ticket; do not change any setting on the device, even one that looks wrong, unless the ticket says so; do not log in to anything, unless the customer provides access and asks; do not remove other people's labels; and do not leave the cabinet unlocked, even for a minute. If something else in the cabinet looks wrong, such as a server with a fault light or a cable hanging loose, it goes on the ticket as an observation for the customer to decide on.
# Remote hands installation: build the completion note from the checks done
ticket = "RH-49302"
checks = [
    ("Cabinet A-31-03 and units U20-U22 confirmed free", True),
    ("Switch airflow: port-side exhaust model, fans checked", True),
    ("srv-bcu-21 at U20, srv-bcu-22 at U21, sw-bcu-03 at U22", True),
    ("Power: each device one cord on strip A, one on strip B", True),
    ("Network: 6 cables to the ticket's port map, labels on both ends", True),
    ("Management ports connected to the out-of-band switch", True),
    ("Blanking panels refitted in U23-U24", True),
    ("Powered on: srv-bcu-22 health light amber", False),
]
print(f"Completion note for {ticket}")
for text, ok in checks:
    print(("  done  " if ok else "  NOTE  ") + text)
if not all(ok for _, ok in checks):
print("Status: installed; one item for the customer to review (see NOTE). Photos attached.")Completion note for RH-49302 done Cabinet A-31-03 and units U20-U22 confirmed free done Switch airflow: port-side exhaust model, fans checked done srv-bcu-21 at U20, srv-bcu-22 at U21, sw-bcu-03 at U22 done Power: each device one cord on strip A, one on strip B done Network: 6 cables to the ticket's port map, labels on both ends done Management ports connected to the out-of-band switch done Blanking panels refitted in U23-U24 NOTE Powered on: srv-bcu-22 health light amber Status: installed; one item for the customer to review (see NOTE). Photos attached.
The note in the code is what the customer sees. It lists what was done, in the customer's terms, and flags the one thing that did not go as expected. The amber light on the second server turned out to be a memory module that had worked loose in shipping; the customer asked Stonebridge to reseat it under a follow-up ticket, and the light went green.
Photographs
Stonebridge requires photographs before and after every installation, front and rear. Photographs settle questions that would otherwise take days: whether a cable was already loose before the visit, which outlet a cord went into, whether a blanking panel was there. They are attached to the ticket, so the customer can see them. Photographs are taken only of the customer's own cabinet, never of other customers' equipment or of security features, and they stay in the ticket system.
Worked problem
A ticket that does not match the cabinet
A Hall A ticket asks Jamal to install a 2U server at U14 in cabinet A-17-04. When he opens the cabinet, U14 is free but U15 holds a 1U appliance that is not in DCIM.
Show solution
- Do not move the appliance, and do not install the server in a different place on his own judgment.
- Photograph the cabinet and the appliance's label.
- Update the ticket: "U15 occupied by an unlisted 1U appliance, serial on photo. 2U server cannot go at U14. Please advise: new position or remove appliance?"
- Wait for the customer's answer before continuing, and report the DCIM mismatch to the shift lead.
Answer: The customer's own engineer had installed the appliance during a visit and not recorded it. They give Jamal a new position at U30 and update DCIM. The delay is twenty minutes; installing in the wrong place, or moving the appliance, could have caused an outage.
When the customer is on the phone
Many installations happen with the customer's engineer on a call, watching from their own systems as each device comes up. That changes the rhythm of the work: the technician narrates what they are doing, waits for confirmation at agreed points and answers questions about lights and labels. Roz's advice is to say what you see rather than what you think it means: "the second power supply light is off" rather than "the power supply is dead", because the customer may know something you do not, such as that the supply is switched off on purpose. It is also to repeat back any instruction that changes the plan, such as a different port or a different U position, and to note it on the ticket before doing it. A verbal change that is not written down is a mistake waiting for the next person.
Customers sometimes ask for things that are outside the ticket during a call, such as reseating a module in a different server or moving a cable while the technician is there. The answer is not a flat refusal. The technician adds the request to the ticket, or asks the customer to add it, and the shift lead confirms it can be done under the customer's authorization. It usually takes a minute, and it protects both the customer and the technician if something goes wrong.
Common mistakes
MistakeInstalling a switch with the wrong airflow direction.
InsteadCheck the model's airflow letters and the fan colors before mounting.
MistakeMaking room by moving a device that is not on the ticket.
InsteadStop and ask the customer.
MistakeGuessing at the meaning of a fault light.
InsteadReport exactly what the light shows, using the maker's terms.
MistakePutting drives back in any free slots.
InsteadReturn drives to their original or specified slots.
MistakeSkipping the before-and-after photographs.
InsteadPhotograph front and rear, before and after, every time.
Summary and key terms
- Read the ticket and compare it with the elevation before starting; stop if they disagree.
- Equipment breathes front to back; check switch airflow direction.
- Follow a fixed sequence: rails, mount, label, power A and B, network, dress, blank, lock, test, record.
- Watch and report indicator lights exactly as the maker describes them.
- Handle storage drives by their carriers and return them to the right slots.
- Work only on the devices on the ticket, and photograph before and after.
- Elevation
- A drawing of a cabinet showing what occupies each rack unit.
- Out-of-band port
- A server's separate management network port, used to control it remotely.
- Port-side exhaust
- A switch airflow arrangement in which air leaves through the end with the ports.
- Transceiver
- A pluggable module in a switch port that converts to optical fiber or copper.
- Remote hands
- A service in which site technicians do physical work for a customer on request.
- Drive carrier
- The tray that holds a disk or solid-state drive in a server or storage shelf.
Practice problems
Work each problem on paper first, then reveal the answer to check.
Why must a rear-facing top-of-rack switch exhaust from its port side?
Show answer
So that it still draws cold air from the front of the cabinet and exhausts into the hot aisle.
A new server shows an amber health light after power-on. What does the technician do?
Show answer
Report exactly what the light shows, using the maker's terms, and let the customer decide.
Why are storage shelves often installed empty?
Show answer
It makes the lift lighter and safer; drives are refitted afterwards in their slots.
What should be photographed on an installation?
Show answer
The customer's cabinet, front and rear, before and after the work.
Lesson quiz · 5 questions
Score 60% or more to complete this lesson.
Create a free account to save your progress, take quizzes and earn a certificate.