
CRE-250 · Lesson 6 of 12 · 27 min
Audio for live streams
Viewers will watch a stream with a soft or low-resolution image, but they leave quickly if the streamer is hard to hear, the game drowns out the voice, the microphone picks up keyboard clatter and fans, or the audio echoes and distorts. Live audio is harder than recorded audio because there is no chance to fix it afterward: levels, noise and balance must be right in real time, across hours, with sources that change constantly. This lesson builds on the microphone and recording knowledge of CRE-130 and CRE-240 and focuses on the live context: microphone choice and placement for streaming, gain staging, filters in streaming software, mixing voice, game, music and alerts, monitoring, avoiding echo and feedback with guests, music licensing on streams, and troubleshooting.
Microphones for streaming
Streaming microphones must reject the noise of the streaming environment: keyboards, mice, computer fans, controllers, rooms with hard surfaces, and sometimes family or housemates. Common choices include:
- Dynamic microphones, such as broadcast-style models, used close to the mouth on an arm, which reject room noise and keyboard sound well. They need adequate gain, sometimes an inline preamp booster or a good interface.
- Condenser microphones, more sensitive and detailed, which work well in quiet, treated rooms but pick up more keyboard and room noise.
- USB microphones, simple to set up, available in dynamic and condenser designs, some with hybrid USB and XLR outputs.
- Headset microphones, practical for competitive gaming and keeping a consistent distance, though less flattering in sound and appearance.
- Lavalier and wireless microphones for IRL streams, active movement and on-camera presentations.
For most desk streamers in untreated rooms, a dynamic microphone on a boom arm, positioned a hand's width from the mouth, gives the clearest results.
Placement and consistency
Live streamers move, lean, turn to second monitors and react, so microphone placement must tolerate movement. A boom arm keeps the microphone close without blocking the face, positioned slightly off-axis to reduce plosives; a pop filter or foam windscreen helps. Point the microphone's rejection zone, the rear for cardioid models, toward the keyboard and other noise sources. Decide where the microphone appears on camera: visible microphones are accepted and can look professional, while hiding them often means moving them farther from the mouth, worsening sound. Mark the arm position so it returns to the same place each stream.
Gain staging
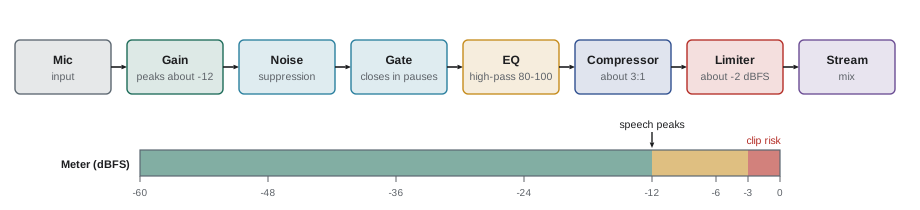
Gain staging sets levels at each stage of the audio chain so that the signal is strong without clipping. Set the microphone or interface gain so that normal speech peaks around −18 to −12 dBFS and loud laughs or shouts stay below about −3 dBFS. In the streaming software, leave headroom and use limiting rather than pushing levels close to 0 dBFS. Because live speech varies from whispers to yells, a compressor and limiter in the chain (below) keep levels consistent. Check levels with the software's meters during a test, and recheck after changing equipment or rooms.
Filters in streaming software
Streaming software applies audio filters to each source in real time. A typical microphone chain is:
- Noise suppression: reduces steady background noise such as fans and hum; AI-based options, including the RNNoise filter in OBS and GPU-based tools such as NVIDIA Broadcast, remove more noise, sometimes at the cost of naturalness.
- Noise gate or expander: lowers the microphone when the streamer is not speaking, cutting keyboard sound and room noise between phrases. Set the threshold carefully so it does not cut off quiet words.
- Equalization: a high-pass filter around 80 to 100 Hz removes rumble; small boosts or cuts shape the voice.
- Compression: evens out loud and quiet speech, for example a ratio around 3:1 to 4:1 with a threshold a little below normal speech level.
- Limiter: a final safety net, set around −1 to −3 dBFS, preventing clipping when the streamer shouts.
Order matters: noise suppression and gating before compression prevents the compressor from raising background noise.
Worked problem
Setting a compressor for a loud reaction streamer
A streamer's normal speech peaks around −15 dBFS, but excited shouts reach −2 dBFS and sometimes clip. Viewers complain the shouts are painfully loud. How could compression and limiting help?
Show solution
- Set a compressor threshold around −18 dBFS so it starts working on normal speech peaks.
- Use a ratio of about 4:1: a shout that would exceed the threshold by 16 dB is reduced to 4 dB over, a 12 dB reduction.
- Add a few decibels of make-up gain if normal speech becomes too quiet.
- Add a limiter at about −2 dBFS to catch anything the compressor misses.
Answer: A compressor around −18 dBFS at 4:1 with a limiter at −2 dBFS tames shouts by roughly 12 dB while keeping speech clear.
Mixing voice, game, music and alerts
A stream mix balances several sources. The voice should always be clearly intelligible above everything else, typically 10 to 15 dB louder than game audio and music during speech. Game audio gives atmosphere and context, but loud explosions and music can mask the voice; reducing game volume and using ducking, which automatically lowers game and music when the microphone is active, helps. Background music should be quiet. Alerts should be noticeable but not startling, set lower than many streamers expect. Different games and content need different balances, so many streamers save audio profiles per scene. Listen to the stream through a phone speaker and headphones, as viewers will, to check the balance.
| Source | Typical level relative to voice | Tips |
|---|---|---|
| Voice | Reference (peaks about −12 dBFS) | Compress and limit |
| Game audio | 10–15 dB lower during speech | Duck under voice; per-game profiles |
| Music | 15–25 dB lower | Licensed tracks only; separate track for VODs |
| Alerts and sounds | Similar to or below voice | Short, not startling; filter TTS |
| Guests | Matched to host | Compress each guest separately |
Monitoring
Streamers must hear what they are doing without creating problems. Closed-back headphones let the streamer hear the game, guests and alerts without the sound leaking into the microphone. Monitoring the actual stream output, through the streaming software's monitor function or a separate device watching the stream, catches problems such as a muted source, a wrong device or music that viewers cannot hear. Latency in monitoring one's own voice can be distracting; many interfaces offer direct, zero-latency monitoring. A moderator who tells the streamer quickly when audio fails is invaluable, since streamers often cannot hear their own stream problems.
Echo and feedback with guests
Echo occurs when a remote guest's voice plays from speakers, is picked up by a microphone and sent back. The solution is for everyone to use headphones, and for the streaming software or call tool to send each guest a mix that excludes their own voice, called a mix-minus. Browser studios and call tools usually handle this automatically. When capturing a separate call application into streaming software, route audio carefully so that the guest hears the host but not themselves, and test with each guest before going live.
Music licensing on streams
Music used on streams is subject to copyright, and platforms enforce it with automated detection and takedown notices. Playing commercial songs on stream, even in the background, can lead to muted VODs, strikes or channel suspensions. Safe options include music libraries licensed for streaming, platform-provided music features where available, royalty-free and creator-friendly music with clear licenses, music you have created or commissioned, and game soundtracks permitted by the publisher, which vary by game.
In the United States, copyright in musical works and recordings is protected under federal copyright law, and organizations such as ASCAP, BMI and SoundExchange license public performance of music for many uses. The Digital Millennium Copyright Act notice-and-takedown process is widely used against streams and VODs. A license obtained by a platform does not necessarily cover a streamer's use, and fair use is unlikely to excuse playing whole songs as background entertainment. Check each platform's music policy and the terms of any library you use.
Recording music on a separate audio track from the stream, or using software that sends music to the live stream but not to the VOD, reduces risk for archived content, but it does not make unlicensed live use lawful. Lesson 12 discusses copyright more broadly.
Troubleshooting live audio
Common live audio problems and fixes include: no microphone audio (wrong device selected, muted source or disconnected cable); robotic or crackling sound (sample rate mismatch between devices and software, usually fixed by setting everything to 48 kHz, or USB bandwidth issues); echo (speakers instead of headphones, or duplicate audio sources capturing the same sound); desynchronization between audio and video (add a sync offset to the microphone or camera source); game audio missing or doubled (desktop audio and application capture both active); and sudden volume jumps (alerts or new games at different levels, fixed with per-source limiters). Keep a short audio checklist and test after every software update, since updates sometimes change device settings.
Loudness for live streams
Viewers move between streams, videos and adverts, and a stream that is much quieter or louder than others is uncomfortable. Recorded platforms normalize loudness, but live streams generally do not, so the streamer must manage levels. Measure loudness in LUFS (loudness units relative to full scale) with a loudness meter plugin; many streamers aim for about -16 to -14 LUFS integrated for voice-led streams, with true peaks below about -1 dBTP, which matches the targets many platforms use for recorded content. Keep game and music beds clearly below the voice, often 10 to 20 dB lower during talking.
Worked problem
Setting music under the voice
A streamer voice averages about -18 dBFS on the mixer meter, and background music averages -12 dBFS. Viewers say the music drowns out the voice. How much should the music be reduced if it should sit about 12 dB under the voice?
Show solution
- Target music level: -18 - 12 = -30 dBFS.
- Current music level: -12 dBFS.
- Reduction needed: -12 - (-30) = 18 dB.
- Apply an 18 dB cut on the music source, or use ducking that lowers the music when the microphone is active.
Answer: Reduce the music by about 18 dB, to around -30 dBFS, or duck it automatically when speaking.
Ducking and sidechain compression
Ducking automatically lowers one source when another is active, most often music or game audio when the streamer speaks. Streaming software and audio routing tools offer ducking through sidechain compression: the compressor on the music listens to the microphone and reduces the music level when the microphone signal passes a threshold. Settings to adjust include the amount of reduction, the attack (how quickly the music drops) and the release (how quickly it returns). Too fast a release makes the music pump up and down between words; a release of several hundred milliseconds usually sounds natural.
Audio routing and separate tracks
Separating audio sources lets streamers control what viewers hear and what is saved. Many streamers route game audio, music, voice chat and alerts to separate channels in software, so each can be controlled. Streaming software can record several audio tracks at once, for example a mixed track for the stream and separate tracks for voice and game, which helps when editing VODs into videos later. A common arrangement is to exclude unlicensed or license-restricted music from the VOD track using features such as a separate VOD audio track, though this depends on platform support.
| Source | Live mix | VOD track | Local recording |
|---|---|---|---|
| Microphone | Yes | Yes | Separate track |
| Game audio | Yes | Yes | Separate track |
| Licensed music | Yes | Only if license allows | Separate track |
| Alerts | Yes | Optional | Optional |
| Voice chat | Yes, with consent | Yes, with consent | Separate track |
Room treatment on a budget
Rooms with hard walls, bare floors and windows reflect sound and make voices sound distant and echoey. Soft furnishings help: rugs, curtains, a sofa, a bookshelf behind the camera and absorbent panels at the first reflection points around the desk. Closer microphone placement reduces the room sound more cheaply than any treatment.
Before every stream, a quick sound check saves embarrassment: speak at performance level and watch the meter, play a few seconds of game audio and music, trigger a test alert, and listen to a short local recording through headphones to confirm that nothing is missing, doubled or distorted.
Common mistakes
MistakeUsing a sensitive condenser next to a loud keyboard.
InsteadUse a close dynamic microphone and point its rejection at noise.
MistakeGame audio louder than the voice.
InsteadKeep game 10–15 dB lower and use ducking.
MistakeNo limiter on a loud streamer.
InsteadCompress and limit to prevent clipping.
MistakeGuests on speakers.
InsteadRequire headphones and use mix-minus.
MistakePlaying commercial music on stream.
InsteadUse licensed or creator-safe music.
Summary and key terms
- Live audio must be right in real time for hours.
- Close dynamic microphones on arms suit most desk streamers.
- Gain stage for speech peaks around −18 to −12 dBFS with headroom.
- Filter chain: noise suppression, gate, high-pass, compressor, limiter.
- Voice stays 10–15 dB above game audio and music; use ducking.
- Monitor with closed headphones and check the real stream output.
- Avoid echo with headphones and mix-minus; use licensed music only.
- Dynamic microphone
- Robust microphone that rejects distant noise.
- Boom arm
- Adjustable arm holding a microphone close.
- Gain staging
- Setting levels at each stage of the chain.
- Noise gate
- Filter that mutes signal below a threshold.
- Noise suppression
- Filter that removes steady background noise.
- Compressor
- Processor that reduces level differences.
- Limiter
- Processor that prevents peaks above a ceiling.
- Ducking
- Automatically lowering one source when another is active.
- Mix-minus
- A mix sent to a guest without their own voice.
- Sample rate
- Audio samples per second, such as 48 kHz.
Practice problems
Work each problem on paper first, then reveal the answer to check.
Why choose a dynamic microphone for a noisy desk?
Show answer
It rejects distant noise when used close.
Where should a cardioid microphone's rear point?
Show answer
Toward the keyboard and noise sources.
Target speech peak level?
Show answer
About −18 to −12 dBFS.
Order of a typical filter chain?
Show answer
Noise suppression, gate, high-pass, compressor, limiter.
Reduction at 4:1 for a signal 12 dB over threshold?
Show answer
9 dB (it ends up 3 dB over).
How much quieter than voice should game audio be?
Show answer
About 10–15 dB during speech.
What is ducking?
Show answer
Automatically lowering game and music when speaking.
What prevents echo with remote guests?
Show answer
Headphones and mix-minus.
Common cause of crackling audio?
Show answer
Sample rate mismatch; set 48 kHz everywhere.
Does keeping music off the VOD make live use lawful?
Show answer
No.
Lesson quiz · 5 questions
Score 60% or more to complete this lesson.
Create a free account to save your progress, take quizzes and earn a certificate.