
BLR-310 · Lesson 4 of 12 · 20 min
Truncated and eccentric cones
The Pinecrest Paper dust collector hopper is the biggest piece of plate work in the shop this winter. It is a truncated cone of 3/8 in plate, 96 in across at the top where it bolts to the collector and 24 in across at the bottom where the rotary valve goes, 60 in high. On the next bench, the Riverbend fan inlet needs an eccentric reducer, a cone from a 48 in duct down to an 32 in duct, flat along the bottom so that ash does not collect in it. The first is a radial-line job; the second is the first triangulation job of the winter. This lesson covers both: the truncated right cone, which is a full cone with its top cut off, and the eccentric cone, which is not a right cone at all and needs a different method.
The truncated right cone
A truncated cone, or frustum, is a right cone with its top removed by a plane parallel to the base. Its pattern is part of a ring: the space between two arcs swung from the same center, the apex of the full cone, and bounded by two straight lines along elements. The trick is that the apex is not on the part. It is the point where the elements would meet if the cone were extended, and the first step of the development is to find it.
From the large radius Rb, the small radius Rs and the height h between them, the height of the full cone to its imaginary apex comes from similar triangles: H equals h times Rb divided by Rb minus Rs. The large pattern radius is the slant height of the full cone, the square root of Rb squared plus H squared. The small pattern radius is the slant height to the small end, which is the large pattern radius times Rs divided by Rb. The sector angle is the same as for the full cone, 360 degrees times Rb divided by the large pattern radius.
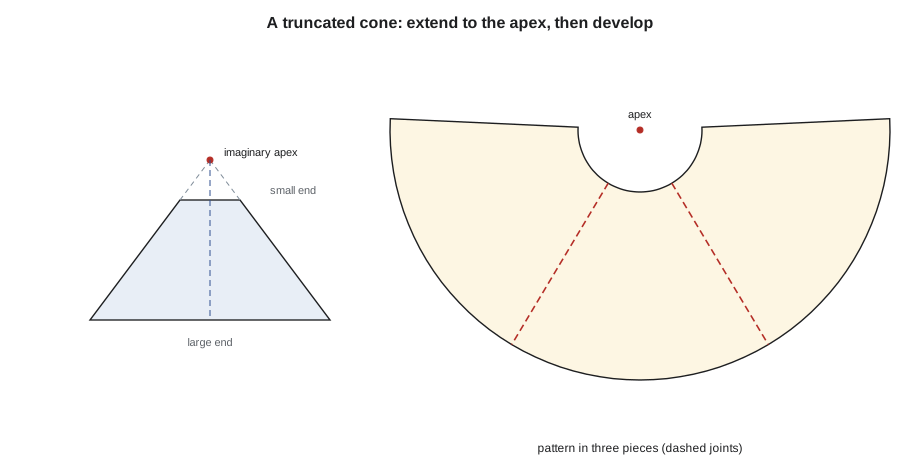
The hopper pattern
Kiera works out the hopper on the mean diameters, 96 3/8 in and 24 3/8 in. To keep the numbers simple for the first pass, Joanne has her run the shop code on the round mean figures of 96 in and 24 in, then repeat it with the exact mean values for the cutting list.
# Truncated and eccentric cones (US units)
import math
from math import gcd
MODE = "in"

def frac(x, den=16):
    sign = "-" if x < 0 else ""
    n = round(abs(x) * den); whole, rem = divmod(n, den)
    if rem == 0:
        return f"{sign}{whole} in"
    g = gcd(rem, den)
    return f"{sign}{whole} {rem // g}/{den // g} in" if whole else f"{sign}{rem // g}/{den // g} in"

def show(x):
    x = 0.0 if abs(x) < 1e-6 else x
    return f"{x:,.0f} mm" if MODE == "mm" else frac(x)
# 1. concentric truncated cone: hopper
Db, Ds, h = 96, 24, 60   # mean large and small diameters, height between them
Rb, Rs = Db / 2, Ds / 2
Hfull = h * Rb / (Rb - Rs)     # height to the imaginary apex
Lb = math.hypot(Rb, Hfull)     # large pattern radius
Ls = Lb * Rs / Rb              # small pattern radius
ang = 360 * Rb / Lb
print("apex height", show(Hfull), " pattern radii", show(Lb), "and", show(Ls))
print(f"sector angle {ang:.1f} deg; in 3 pieces of {ang / 3:.1f} deg")
print("slant length of the frustum", show(Lb - Ls))

# 2. eccentric reducer, flat on the bottom: triangulate between 12 points on each end
DB2, DS2, Lg = 48.25, 32.25, 36  # large and small mean diameters, length along the axis
n = 12
def pt(R, k, x):               # point k on an end circle; both circles touch the bottom line
    a = 2 * math.pi * k / n
    return (x, R * math.sin(a), R - R * math.cos(a))   # (axial, sideways, height above bottom)
print("solid (k to k) and dashed (k to k+1) true lengths, half the reducer:")
for k in range(n // 2 + 1):
    a, b = pt(DB2 / 2, k, 0), pt(DS2 / 2, k, Lg)
    solid = math.dist(a, b)
    line = f"  {k:2} solid {show(solid):>10}"
    if k < n // 2:
        dashed = math.dist(a, pt(DS2 / 2, k + 1, Lg))
        line += f"   dashed {k}-{k + 1}' {show(dashed):>10}"
print(line)apex height 80 in pattern radii 93 5/16 in and 23 5/16 in sector angle 185.2 deg; in 3 pieces of 61.7 deg slant length of the frustum 70 in solid (k to k) and dashed (k to k+1) true lengths, half the reducer: 0 solid 36 in dashed 0-1' 36 15/16 in 1 solid 36 1/4 in dashed 1-2' 36 3/8 in 2 solid 36 7/8 in dashed 2-3' 36 9/16 in 3 solid 37 3/4 in dashed 3-4' 37 7/16 in 4 solid 38 9/16 in dashed 4-5' 38 11/16 in 5 solid 39 3/16 in dashed 5-6' 40 1/16 in 6 solid 39 3/8 in
The apex is 80 in above the large end, well above the part. The large pattern radius is more than 93 in, too long for any trammel in the shop, and the sector is more than half a circle, so the pattern is far too big to cut from one plate. The answer is to cut it in three equal pieces of about 62 degrees each, with three seams spaced around the hopper. Each piece fits on a standard plate.
Laying out an arc with a radius of 93 in without a trammel that long is a common problem with truncated cones. Joanne's method is to lay the pattern out by coordinates: calculate points on both arcs at equal angles, measure them off from a base line with a tape and a square, and bend a batten through them. The other method is to make one piece accurately on thin sheet metal, check it, and use it as a template for all three. For this job she does both: Kiera lays out one piece by coordinates and the other two are traced from it. In lesson 11, the same points go to the CNC table as a file.
Flat cones and the chord method
When a cone is very flat, like a tank roof, the apex can be tens of meters away and even coordinates become awkward. The pattern is then developed from the chord and the rise of its arcs: the chord across each end of a piece and the height of the arc above that chord, its sagitta, which Kiera met last winter for shell templates. The sagitta for an arc of radius L across a chord c is L minus the square root of L squared minus a quarter of c squared. With the chord and sagitta known for both the large and small arcs, the piece can be laid out from its straight edges without ever finding the apex.
The eccentric cone
An eccentric cone joins two circles whose centers do not lie on the same vertical line. The Riverbend reducer has its two ends tangent along the bottom, so the bottom of the duct stays straight and ash slides through. Because the elements do not all meet at one point and are not all the same length, there is no single apex to swing arcs from, and the radial-line method fails. The reducer is developed by triangulation.
Each end circle is divided into the same number of equal parts, twelve in this case, numbered from the bottom. Solid lines join each point on the large end to the matching point on the small end: 0 to 0, 1 to 1, and so on. Dashed lines join each point on the large end to the next point on the small end: 0 to 1, 1 to 2, and so on. Together, the solid and dashed lines divide the surface into narrow triangles. The true length of every line is found from its three distances: the length of the reducer along its axis, the sideways offset between its ends and the difference in their heights above the bottom line.
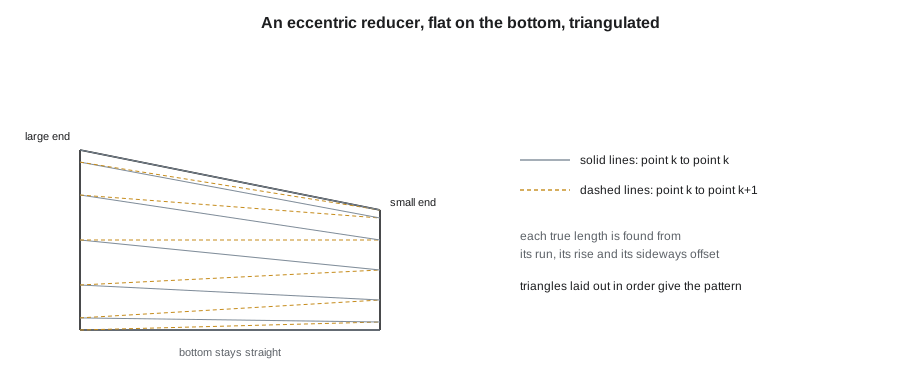
The pattern is built by laying out the triangles in order. Kiera starts with line 0, the bottom line, which on a flat-bottomed reducer is its true length along the bottom. From its ends, she swings the next pair of distances: from the large-end point 0, the dashed true length 0 to 1'; from the small-end point 0, the chord between small-end points. Where the arcs cross is point 1' on the small end. From that point and large-end point 0, she swings the solid true length 1 and the large-end chord to find large-end point 1. She continues, triangle by triangle, to line 6 at the top, then joins the points on each end with smooth curves. Because the reducer is symmetrical about its bottom line, half the pattern is laid out and the other half is a mirror image.
| Line | Joins | Found from |
|---|---|---|
| Solid k | Large-end point k to small-end point k | Axial length, sideways offset, height difference |
| Dashed k to k+1' | Large-end point k to small-end point k+1 | Same three distances |
| Large-end chord | Two neighboring large-end points | Large mean diameter and the number of divisions |
| Small-end chord | Two neighboring small-end points | Small mean diameter and the number of divisions |
Reading the reducer's true lengths
The second half of the code output gives the solid and dashed true lengths for half the reducer. Line 0, along the bottom, is exactly the reducer's length, because both ends touch the bottom line. Line 6, at the top, is the longest, because it rises the full difference between the two diameters. Kiera notices that the dashed lines are close to the solid lines near the bottom and grow apart toward the top; the triangles there are the most stretched, and errors there show most in the finished part.
Triangulation has one weakness: small errors build up as the triangles are laid out one after another. Joanne's defense is to check the pattern at the end. The curve on the large end must measure half the large mean circumference, and the curve on the small end half the small mean circumference. If either is off by more than a few millimeters, the triangles have drifted and the pattern is laid out again.
Worked problem
Checking the finished half pattern
Kiera measures her half pattern with a flexible rule. The large-end curve measures 75 3/4 in and the small-end curve 50 11/16 in. Are they right?
Show solution
- Half the large mean circumference = π × 48.25 ÷ 2 = 75 13/16 in (rounded to the nearest 1/16 in).
- Half the small mean circumference = π × 32.25 ÷ 2 = 50 11/16 in.
Answer: The large curve is 1/16 in short and the small curve is exact, both within Joanne's limit, so the pattern is accepted.
Eccentric reducers can also be made as truncated oblique cones and developed from the apex of the oblique cone, with elements of different lengths swung from that apex. The method is quicker than full triangulation when the reducer's sides, extended, meet at a point that is easy to reach on the layout floor. Joanne shows Kiera both and lets her use whichever she prefers; the triangulation method is the one that works on every shape.
Matching marks and seam positions
Before any piece of a split cone leaves the layout table, Kiera marks it. Each piece gets its job and part number, the hopper's 0 degree reference, the element lines for rolling, and matching marks at both ends of each seam edge, so that piece 1's right edge goes to piece 2's left edge and not to piece 3's. The marks are center punched at the large and small ends, where they will still show after rolling, and written in paint marker beside them. On the eccentric reducer, she also marks the bottom line, because the reducer must be installed with its straight side down; a reducer turned over in the field would trap ash instead of shedding it.
The three seams of the hopper are placed so that none falls under the round side inlet or at the collector's support lugs, and they are staggered from the top course's long seam. Joanne's habit is to put one seam on the side that will face the platform, where it can be inspected easily in service.
Common mistakes
MistakeSwinging a truncated cone pattern from the small end as if it were the apex.
InsteadFind the imaginary apex from similar triangles; both arcs are swung from it.
MistakeUsing the radial-line method on an eccentric cone.
InsteadAn eccentric cone has no single apex with equal elements; triangulate it.
MistakeLaying out triangles without checking the result.
InsteadCheck that each end curve equals half its mean circumference.
MistakeCutting a large pattern in pieces with seams across it.
InsteadSplit along elements, so each piece is an equal part ring.
MistakeDrawing straight lines between the points on the end curves.
InsteadJoin them with smooth curves through the points.
Summary and key terms
- A truncated cone's pattern is a part ring swung from the imaginary apex of the full cone.
- The apex height is h × Rb ÷ (Rb − Rs); the pattern radii are the slant heights to each end.
- Large patterns are split into equal pieces and laid out by coordinates, by a master template, or by chord and sagitta.
- An eccentric cone has no single apex and is developed by triangulation.
- Solid lines join matching points and dashed lines join each point to the next; each true length comes from three distances.
- Triangulated patterns are checked by measuring the end curves against the mean circumferences.
- Frustum
- A cone with its top cut off by a plane parallel to the base.
- Imaginary apex
- The point where a truncated cone's elements would meet if extended.
- Eccentric cone
- A cone joining two circles whose centers are offset.
- Triangulation
- Developing a surface by dividing it into triangles and laying out their true lengths in order.
- Sagitta
- The height of an arc above its chord.
- Oblique cone
- A cone whose apex is not directly above the center of its base.
Practice problems
Work each problem on paper first, then reveal the answer to check.
A truncated cone has radii of 40 in and 20 in and a height of 32 in. How high is its imaginary apex above the large end?
Show answer
H = 32 × 40 ÷ 20 = 64 in.
What is its large pattern radius?
Show answer
√(40² + 64²) = 75 1/2 in.
Why is the bottom line of the Riverbend reducer exactly the reducer's length?
Show answer
Both end circles touch the bottom line, so line 0 has no rise or sideways offset.
How does Joanne check a triangulated pattern?
Show answer
By measuring each end curve and comparing it with half the mean circumference of that end.
Lesson quiz · 5 questions
Score 60% or more to complete this lesson.
Create a free account to save your progress, take quizzes and earn a certificate.