
BLR-310 · Lesson 2 of 12 · 20 min
Parallel-line development: cylinders and elbows
The first job on Kiera's bench is the simplest kind of pattern, and the one that every other method builds on. The pulp mill crew needs a set of NPS 6 pipe spools with two-piece 90 degree turns made from straight pipe, and the Riverbend fan inlet duct needs a four-piece elbow rolled from plate. Both are cylinders cut by a sloping plane, and both are developed by the parallel-line method. "Get this one right and the tee and the lateral are just more of the same," Joanne says. This lesson covers the parallel-line method on a cylinder, the 45 degree cut that makes a two-piece turn, the segmented elbow with its full gores and half gores, and how the patterns are laid out, wrapped and cut.
The idea of parallel-line development
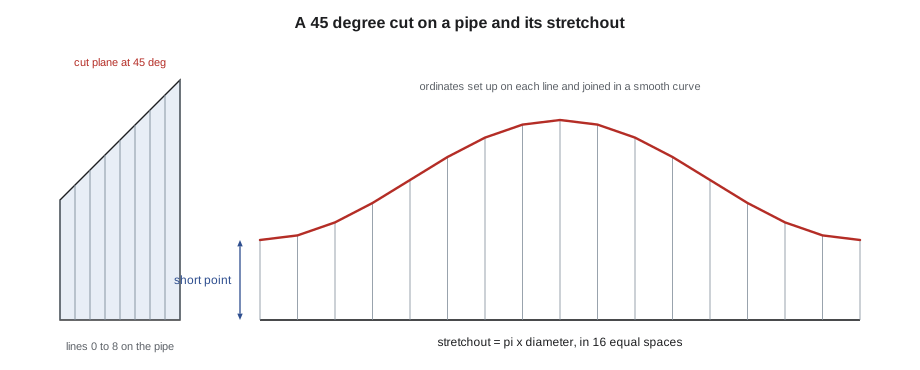
A cylinder is made of straight lines all parallel to its axis. If a plane cuts the cylinder at a slope, each of those lines is cut at a different length. Parallel-line development finds those lengths and sets them up side by side. The steps are always the same. Draw the part in a view where the cut appears as a line and the cylinder's lines appear at their true length; for a pipe cut, that is the side elevation. Divide the cylinder's circumference into equal parts, usually 12 or 16, and draw a line on the cylinder through each division. Lay out a stretchout line equal to the circumference and divide it into the same number of equal spaces. At each space, set up the length of the matching line from the elevation. Join the tops of the lines with a smooth curve. The curve is the cut line, and the area between it and the stretchout line is the pattern.
The number of divisions is a judgment. More divisions give a smoother curve but take longer to lay out. Joanne uses 12 for small pipe, 16 for most work and 24 or more for large ducts where the spacing on the stretchout would otherwise be more than about 6 in. The divisions must start at a point that matters, usually the shortest or longest line, so that the seam and the key points of the cut fall on division lines.
The 45 degree cut on a pipe
A two-piece 90 degree turn, sometimes called a miter turn in the shop, is made by cutting two pieces of pipe at 45 degrees to their axes and welding the cut faces together. It turns the flow more abruptly than a long radius elbow and has a higher pressure drop, so it is used on low-pressure lines, vents, drains and ducting where a forged elbow is not required and the owner's specification allows it. The pulp mill spools are on a low-pressure condensate return, and the drawing calls for fabricated turns.
In the elevation, the cut plane appears as a line at 45 degrees across the pipe. The line on the pipe at the inside of the turn, the throat, is shortest, and the line at the outside, the heel, is longest. For any line at angle θ around the pipe measured from the throat, the height of the cut above the throat point is the radius times the tangent of the cut angle times one minus the cosine of θ. At the throat the height is zero; at the heel, half way around, it is the full diameter times the tangent of the cut angle, which for a 45 degree cut is the diameter.
Here R is the radius the pattern is developed on and α is the angle of the cut from square. Because the pulp mill turns are marked on finished pipe with a wrap-around template, the template is developed on the pipe's outside diameter, as lesson 1 explained. For a duct rolled from flat plate, the same formula is used with the mean radius.
Laying out and using the wrap-around template
Kiera draws the template on thin sheet metal. The stretchout for NPS 6 pipe, with its outside diameter of 6 5/8 in, is about 20 13/16 in long; she divides it into 16 spaces, sets up the ordinates and joins them with a flexible batten, a thin strip of wood or plastic held to the points with weights. She then wraps the template around the pipe with the stretchout line square to the axis, checks that the two ends of the template meet exactly, and scribes along the curve. A template that does not meet at the ends was laid out on the wrong diameter.
The cut is made with a torch held so that the bevel is square to the pipe's surface at the throat and leans at the heel; or the pipe is cut square to the template line and the weld bevel is ground after. On thicker pipe, the inside and outside surfaces of the cut do not quite match, so the fitter checks the fit with the two pieces held together and grinds the throat if needed. A small root opening is left along the joint for the weld, and the two pieces are tacked at the throat, the heel and both sides before the angle is checked with a square or a protractor.
One template marks both pieces of a two-piece turn, because both are cut at the same angle. Turning one piece end for end after the cut puts the two cut faces together with their heels and throats matched. Making both pieces from one length of pipe, with a single cut, wastes no pipe at all.
The segmented elbow
Large ducts and pipes that need a smoother turn than a two-piece miter are made as segmented elbows: a series of short sections, called gores, each turning part of the angle. A gore is a short cylinder cut at both ends by planes that meet on the line through the center of the bend. The middle gores are full gores, each turning the same angle. The two end pieces are half gores, square at the end that joins the straight duct and cut at the other. A 90 degree elbow with four pieces has two half gores and two full gores; each full gore turns 30 degrees, each half gore turns 15 degrees, and every cut is at 15 degrees from square.
The rule is that the number of full-gore turns is the number of pieces less one, and each cut is at half a full gore's angle. Five pieces give four turns of 22.5 degrees and cuts at 11.25 degrees. More pieces give a smoother flow and a lower pressure drop at the cost of more cutting and welding.
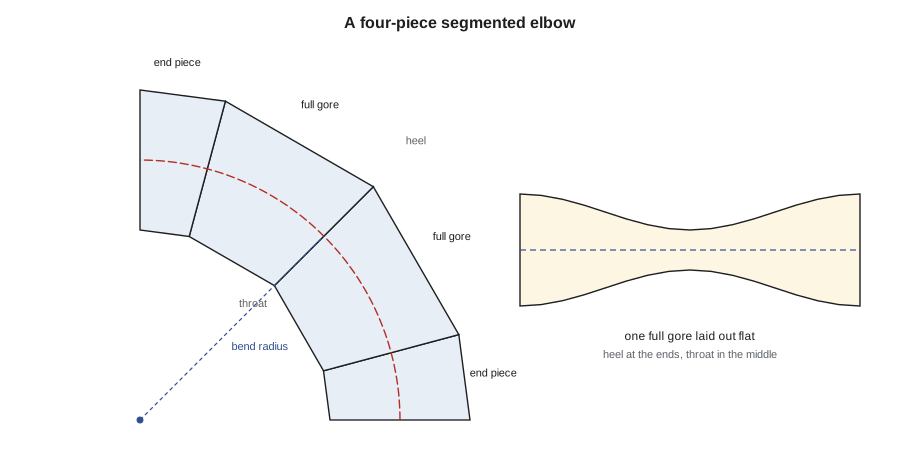
The bend radius of an elbow is the radius of its centerline. For ducts, a bend radius of one and a half times the diameter is common, the same ratio as a long radius pipe elbow. The throat of each gore is the length on the inside of the bend, the heel the length on the outside. For a full gore with bend radius R and duct radius r, each half of the gore spans the angle of one cut, so the heel length is twice the quantity R plus r, times the tangent of the cut angle, and the throat length is twice R minus r times the same tangent.
| Pieces in a 90 degree elbow | Full gores | Turn per full gore | Cut angle from square |
|---|---|---|---|
| 2 (miter turn) | 0 | - | 45 degrees |
| 3 | 1 | 45 degrees | 22.5 degrees |
| 4 | 2 | 30 degrees | 15 degrees |
| 5 | 3 | 22.5 degrees | 11.25 degrees |
| 6 | 4 | 18 degrees | 9 degrees |
Developing the gores
Each gore is developed by the parallel-line method. The duct's mean circumference is the stretchout, divided into equal spaces. At each line, the distance from the gore's middle plane to the cut plane is the bend radius plus the line's offset from the duct center, times the tangent of the cut angle. For the full gore, the pattern is that length on both sides of a center line; for a half gore, it is the length on one side and a straight edge on the other. The pattern of a full gore looks like a band that is widest where the heel lines fall and narrowest where the throat lines fall. Joanne lays out a full gore and a half gore on one template and traces them alternately along a plate, heel to throat, so that the cut between two gores serves both and almost no plate is wasted.
For a rolled duct, each gore is cut flat, rolled to the mean diameter, and its seam welded. The seams are staggered around the elbow so they do not line up, and they are kept away from the heel and throat, where the cut ends are hardest to fit. The gores are then fitted one by one on a layout table, with the heel and throat lines matched and the bend radius checked against a plywood template of the centerline arc.
Kiera's numbers
Kiera runs the shop code for both jobs: the ordinates for the NPS 6 template, and the throat, heel and centerline lengths for the Riverbend elbow. The duct is rolled from 1/4 in plate with an inside diameter of 36 in, so the mean diameter is 36 1/4 in, and the bend radius is one and a half times the inside diameter.
# Parallel-line development: a mitered cut and a segmented elbow (US units)
import math
from math import gcd
MODE = "in"

def frac(x, den=16):
    sign = "-" if x < 0 else ""
    n = round(abs(x) * den); whole, rem = divmod(n, den)
    if rem == 0:
        return f"{sign}{whole} in"
    g = gcd(rem, den)
    return f"{sign}{whole} {rem // g}/{den // g} in" if whole else f"{sign}{rem // g}/{den // g} in"

def show(x):
    x = 0.0 if abs(x) < 1e-6 else x
    return f"{x:,.0f} mm" if MODE == "mm" else frac(x)
# 1. two-piece 90 degree miter on a pipe: cut plane at 45 degrees
D = 6.625                       # pipe outside diameter (pattern wrapped on the outside)
R = D / 2
cut = math.radians(45)
n = 16                         # divisions around the pipe
print("stretchout", show(math.pi * D) + ";", n, "equal spaces of", show(math.pi * D / n))
for k in range(n // 2 + 1):
    th = 2 * math.pi * k / n
    h = R * math.tan(cut) * (1 - math.cos(th))   # height above the short point
    print(f"  line {k:2}  ordinate {show(h)}")

# 2. four-piece 90 degree duct elbow: two half gores and two full gores
Dm, CLR, pieces = 36.25, 54, 4   # mean duct diameter, centerline radius
full = 90 / (pieces - 1)           # each full gore turns this many degrees
half = math.radians(full / 2)      # each cut is at half that angle
r = Dm / 2
print(f"full gore turns {full:.0f} deg; each cut is {full / 2:.0f} deg from square")
for name, f in (("full gore", 2), ("end piece", 1)):
    throat = f * (CLR - r) * math.tan(half)
    heel = f * (CLR + r) * math.tan(half)
print(f"{name:10} throat {show(throat)} heel {show(heel)} centerline {show(f * CLR * math.tan(half))}")stretchout 20 13/16 in; 16 equal spaces of 1 5/16 in line 0 ordinate 0 in line 1 ordinate 1/4 in line 2 ordinate 1 in line 3 ordinate 2 1/16 in line 4 ordinate 3 5/16 in line 5 ordinate 4 9/16 in line 6 ordinate 5 5/8 in line 7 ordinate 6 3/8 in line 8 ordinate 6 5/8 in full gore turns 30 deg; each cut is 15 deg from square full gore throat 19 1/4 in heel 38 5/8 in centerline 28 15/16 in end piece throat 9 5/8 in heel 19 5/16 in centerline 14 1/2 in
The NPS 6 ordinates rise from zero at the throat to the full outside diameter at the heel, as they should for a 45 degree cut. The elbow figures give her the key check dimensions for the fit-up: every full gore must measure the same at its heel and throat, and each half gore must measure exactly half. If one gore is long at the heel, the elbow will overturn; if every gore is a little long, the elbow will turn more than 90 degrees and miss its flange.
Worked problem
Checking a five-piece elbow
A five-piece 90 degree elbow is planned for the same duct. What is the cut angle, and how does the full gore's centerline length compare with the four-piece elbow's?
Show solution
- Five pieces give four turns: 90 ÷ 4 = 22.5 degrees per full gore, so each cut is 11.25 degrees from square.
- Centerline length of a full gore = 2 × bend radius × tan 11.25° ≈ 0.398 × bend radius.
- For the four-piece elbow it was 2 × bend radius × tan 15° ≈ 0.536 × bend radius.
Answer: Each cut is 11.25 degrees, and each full gore is about three-quarters as long along its centerline as a four-piece elbow's gore.
Common mistakes
MistakeStarting the divisions at an arbitrary point.
InsteadStart at the throat or heel so the key points fall on division lines.
MistakeUsing the inside or outside diameter for a rolled duct.
InsteadUse the mean diameter for rolled plate; use the outside diameter only for a template wrapped on finished pipe.
MistakeJoining the ordinate points with straight lines.
InsteadJoin them with a smooth curve, using a flexible batten.
MistakeMaking all four pieces of a four-piece elbow the same.
InsteadThe end pieces are half gores, square at one end.
MistakeLining up the longitudinal seams of the gores.
InsteadStagger the seams and keep them away from the heel and throat.
Summary and key terms
- Parallel-line development divides a cylinder by lines parallel to its axis and sets their lengths up along the stretchout.
- The height of a sloping cut above the throat is R tan α (1 − cos θ).
- A two-piece turn uses two pieces cut at 45 degrees; one template marks both.
- A segmented elbow of n pieces has n − 2 full gores and two half gores; each cut is 90 ÷ (2(n − 1)) degrees from square.
- Gores are nested heel to throat on the plate to save material.
- Heel, throat and centerline lengths are the check dimensions for fitting an elbow.
- Parallel-line development
- Developing a surface made of parallel lines by setting their lengths up along a stretchout.
- Ordinate
- A measured length set up at a division on the stretchout line.
- Throat
- The inside of a bend; the shortest line of a cut pipe or gore.
- Heel
- The outside of a bend; the longest line of a cut pipe or gore.
- Gore
- One segment of a segmented elbow, cut at both ends.
- Bend radius
- The radius of the centerline of an elbow.
Practice problems
Work each problem on paper first, then reveal the answer to check.
How many full gores are in a six-piece 90 degree elbow, and at what angle is each cut?
Show answer
Four full gores and two half gores; each cut is 9 degrees from square.
Why is a wrap-around template for a pipe developed on the outside diameter?
Show answer
Because it lies on the outside surface of the finished pipe.
What is the ordinate at the heel of a 45 degree cut on a pipe with an outside diameter of 8 5/8 in?
Show answer
The full diameter, 8 5/8 in, because tan 45° = 1 and 1 − cos 180° = 2.
Why are gores nested heel to throat on the plate?
Show answer
So one cut serves two gores and almost no plate is wasted.
Lesson quiz · 5 questions
Score 60% or more to complete this lesson.
Create a free account to save your progress, take quizzes and earn a certificate.