
BLR-310 · Lesson 3 of 12 · 20 min
Radial-line development: right cones
The new silencer on Riverbend Unit 2's vent needs a weather hood: a cone of 1/4 in plate, 48 in across at its base and 24 in high, that sits on short legs above the vent opening and keeps rain out without blocking the steam. It is a small part, but Joanne picks it to teach the radial-line method because a full cone shows every feature of the method in one piece. "Once you can lay out a cone without looking anything up, you'll find cones everywhere," she says. "Hoppers, reducers, transitions between shells, roofs, hoods, funnels. Half of what we build has a cone in it somewhere." This lesson covers the geometry of a right cone, the radial-line development, how a cone pattern is laid out and divided to fit the plate, and how cones are formed and checked.
The geometry of a right cone
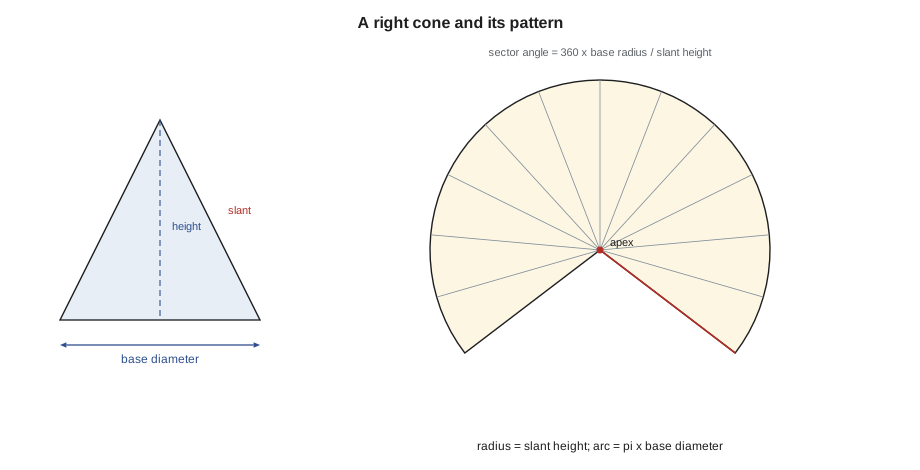
A right cone has a circular base and an apex directly above the center of the base. Every straight line from the apex to the base, called an element, has the same length, the slant height. That is what makes the radial-line method work: if all the elements are the same length and they all meet at the apex, the flat pattern must be part of a circle whose radius is the slant height and whose center is the apex.
Three dimensions describe a right cone: the base radius R, the vertical height H, and the slant height L. They form a right triangle, so the slant height is the square root of R squared plus H squared. The half apex angle, the angle between the axis and an element, is the angle whose tangent is R divided by H. Drawings for vessels and hoppers usually give the diameters and the half apex angle; drawings for hoods and roofs usually give the diameter and the height. Either way, the first job is to find the slant height.
The second equation gives the included angle θ of the pattern sector. The arc of the sector must equal the base circumference, two times pi times R. A full circle of radius L has a circumference of two times pi times L, so the sector is the fraction R divided by L of a full circle, and its angle is 360 degrees times R over L. A tall, narrow cone has a small sector; a flat cone has a sector close to a full circle.
Developing the pattern
Joanne teaches the drafting method first, even though the arithmetic is quicker, because the drawing shows what the numbers mean. Draw the cone's elevation to scale. Draw the half plan, a half circle of the base, below it, and divide it into equal parts, usually six for a half or twelve for the whole. Project the divisions up to the base line of the elevation and draw elements from those points to the apex. On a right cone, the outline elements of the elevation already show their true length, the slant height; the others appear foreshortened, but they are all the same true length.
To develop the pattern, swing an arc with the apex as center and the slant height as radius. Step off along the arc the same number of spaces as the base was divided into, each equal to the chord between divisions on the base circle. Draw lines from the apex to the first and last points. The sector between them is the pattern. With twelve divisions, the chords are a little shorter than the arc spacings they stand for, so the pattern made this way comes out slightly short; for accurate work, the sector angle is calculated and set off with a protractor or by the chord across the opening, and the divisions are used only to mark the element lines for rolling.
In the shop, Kiera lays out the hood directly on the plate. She marks the apex near one edge, swings the outer arc with a trammel set to the slant height, sets off the sector angle by measuring the chord between its ends, and marks the twelve element lines. The element lines are not cutting lines; they are rolling lines that the operator uses to keep the cone straight in the rolls.
Kiera's numbers for the weather hood
The hood's dimensions are given to the mean surface. Kiera runs the code to get the slant height, the sector angle, the arc length, the chord across the opening and the element spacing, and to see what the pattern would look like in two halves.
# Radial-line development of a right cone (US units)
import math
from math import gcd
MODE = "in"

def frac(x, den=16):
    sign = "-" if x < 0 else ""
    n = round(abs(x) * den); whole, rem = divmod(n, den)
    if rem == 0:
        return f"{sign}{whole} in"
    g = gcd(rem, den)
    return f"{sign}{whole} {rem // g}/{den // g} in" if whole else f"{sign}{rem // g}/{den // g} in"

def show(x):
    x = 0.0 if abs(x) < 1e-6 else x
    return f"{x:,.0f} mm" if MODE == "mm" else frac(x)
D, H = 48, 24                # mean base diameter and vertical height of the cone
R = D / 2
L = math.hypot(R, H)           # slant height: radius of the pattern
angle = 360 * R / L            # included angle of the pattern sector, degrees
arc = math.pi * D              # the pattern's outer arc equals the base circumference
chord = 2 * L * math.sin(math.radians(min(angle, 360 - angle) / 2))
print("slant height (pattern radius)", show(L))
print(f"sector angle {angle:.1f} deg; arc length {show(arc)}")
print("chord across the opening", show(chord))
print(f"half apex angle {math.degrees(math.atan(R / H)):.1f} deg")
n = 12                         # elements: equal spaces on the base circle and on the pattern arc
print("element spacing on the arc", show(arc / n), "=", f"{angle / n:.2f} deg each")
# in two halves to fit the plate: each half is a sector of half the angle
print(f"each half pattern: {angle / 2:.1f} deg, chord {show(2 * L * math.sin(math.radians(angle / 4)))}")slant height (pattern radius) 33 15/16 in sector angle 254.6 deg; arc length 150 13/16 in chord across the opening 54 in half apex angle 45.0 deg element spacing on the arc 12 9/16 in = 21.21 deg each each half pattern: 127.3 deg, chord 60 13/16 in
The half apex angle is 45 degrees, because the height equals the base radius. The sector is about 255 degrees, so the pattern is more than half a circle and needs a plate about 68 in square to cut in one piece. The shop has plenty of plate that size in 1/4 in, so she cuts it in one piece with a single seam. If the plate were smaller, she would cut the pattern in two halves, each a sector of half the angle, and weld two seams.
Worked problem
A shallower hood
The engineer asks what the pattern would be if the hood were only 12 in high on the same base. Find the slant height and the sector angle.
Show solution
- L = √(24² + 12²) = 26 13/16 in.
- θ = 360 × 24 ÷ 26.83 = about 322 degrees.
Answer: The pattern radius is 26 13/16 in and the sector is about 322 degrees, close to a full circle: a flatter cone has a fuller sector.
Seams, splitting the pattern and grain
Where to put the seam is decided before the pattern is laid out. On a hood, it goes on the side away from the prevailing wind and away from the legs. On a hopper or a vessel cone, the seam position is set by the drawing, usually staggered from the seams of the shell it joins, as in lesson 7 of Layout and Fitting I. A cone that is too large for one plate is split into two, three or more equal sectors, each with its own seam. The split lines run along elements, from the apex toward the base, never across the cone.
Each seam gets an allowance. For a butt weld with a root opening, the sector is cut short by the opening, measured along the arc at the large end and in proportion at the small end, which is the same as reducing the sector angle slightly. For a seam welded with a backing strip, the allowance follows the weld procedure. Joanne writes the allowance on the template in pencil, because a template laid out with no allowance and used for a welded part is a common source of cones that are a little too big.
Rolled plate is stronger and forms more evenly when the direction of rolling at the mill runs along the cone's circumference rather than along its elements, but on most cone work the plate is chosen and nested for economy, and the mill rolling direction is noted on the material certificate only when the specification asks for it.
Forming a cone
A cone cannot be rolled like a cylinder, because its large end must travel farther through the rolls than its small end. On a plate roll, the operator sets the rolls at an angle, pinches the small end harder, and feeds the plate so that the element lines stay parallel to the rolls as it passes through. Some rolls have a cone-rolling attachment that drags the small end back. Thick or small cones are formed on a press brake instead, by a series of light bends along the element lines, each bend a few degrees, which gives a cone made of narrow flat strips that is close enough to round for most hoppers and ducts. The weather hood, in thin plate, is rolled.
Checking a cone is done at both ends. The diameter at the large end and at the small end is measured, either directly or by tape around the circumference. The height is checked with a straightedge across the large end and a rule to the apex, or to the small end on a truncated cone. A template cut to the element's straight line confirms the cone is straight along its slant, not bowed. A cone that has been rolled with the element lines skewed will be twisted, with its seam spiralling, and will not sit square.
| Check | How | What a fault looks like |
|---|---|---|
| Large end diameter | Tape around the circumference, divided by pi | Seam gap or overlap at closing |
| Height or slant | Straightedge across the base, rule to the apex | Cone too tall or too flat for its sector |
| Straight elements | Straightedge along element lines | Bowed surface from uneven rolling |
| Squareness | Base sits flat on a level table; seam runs straight to the apex | Twisted seam, rocking base |
Where right cones appear
The weather hood is a full cone. Most cones in boilermaker work are truncated, with the top cut off by a plane parallel to the base, so that they join two diameters: a hopper narrowing to an outlet, a reducer joining two shells, a cone roof on a tank meeting a center ring. The next lesson takes the radial-line method to those truncated cones, and to the eccentric cones where the method no longer works and triangulation takes over. Every one of them starts the same way: find the apex, find the slant heights, and swing the arcs.
Cones in thick plate
The weather hood is thin enough that the mean line and the inside line are only 1/8 in apart. On a thick cone, the thickness affects more than the circumference. The plate's thickness is measured square to the cone's surface, but the cone's ends are cut square to its axis, so at each end the plate's edge is cut at an angle to the plate's face, and the inside and outside edges fall at slightly different heights. On a cone joining two shells, those end bevels are part of the weld preparation and are shown on the drawing. Joanne's practice for thick cones is to develop the pattern on the mean surface, cut the ends square to the plate, and bevel them after forming to the angle on the drawing, checking the cone's height at the mean line rather than at the inside or outside corner.
Thick cones also spring back more after rolling than thin ones, so the roll operator rolls them in several passes, checking the large-end arc with a template after each pass. A cone that is over-rolled is much harder to open up than one that is under-rolled is to close.
Common mistakes
MistakeUsing the vertical height as the pattern radius.
InsteadThe pattern radius is the slant height, from the apex along an element.
MistakeSetting off the sector by stepping chords and trusting the result.
InsteadCalculate the sector angle and set it off by the chord across the opening; use steps only to mark element lines.
MistakeSplitting a large cone with a cut across it.
InsteadSplit lines run along elements, from the apex toward the base.
MistakeForgetting the seam allowance on a welded cone.
InsteadReduce the sector by the root opening, and write the allowance on the template.
MistakeRolling a cone with the element lines skewed in the rolls.
InsteadKeep the element lines parallel to the rolls, or the cone will twist.
Summary and key terms
- Every element of a right cone is the same length, the slant height, so its pattern is a sector of a circle.
- The slant height is √(R² + H²) and the sector angle is 360° × R ÷ L.
- The sector's arc equals the base circumference; a flat cone has a fuller sector than a tall one.
- Large cones are split along elements into equal sectors, each with its own seam allowance.
- Cones are rolled with the element lines kept parallel to the rolls, or brake-formed by light bends along the elements.
- Formed cones are checked for diameter, height, straightness and squareness.
- Right cone
- A cone with its apex directly above the center of a circular base.
- Element
- A straight line on a cone from the apex to the base.
- Slant height
- The true length of an element of a right cone.
- Half apex angle
- The angle between a cone's axis and its elements.
- Sector angle
- The included angle of a cone's flat pattern.
- Radial-line development
- Developing a surface whose lines meet at one point by swinging arcs about that point.
Practice problems
Work each problem on paper first, then reveal the answer to check.
A cone has a base radius of 16 in and a height of 12 in. What is its slant height?
Show answer
20 in.
What is the sector angle of that cone?
Show answer
360 × 16 ÷ 20 = 288 degrees.
Why are element lines marked on a cone pattern?
Show answer
As rolling lines, to keep the cone straight in the rolls.
A cone has a half apex angle of 30 degrees. What fraction of a full circle is its pattern?
Show answer
R ÷ L = sin 30° = 0.5, so half a circle: a 180 degree sector.
Lesson quiz · 5 questions
Score 60% or more to complete this lesson.
Create a free account to save your progress, take quizzes and earn a certificate.