
BLR-310 · Lesson 10 of 12 · 18 min
Fitting shells, heads and cones in the shop
By the middle of February, both of the winter's vessel-type jobs are ready to fit. V-414's three courses are rolled, fitted and welded into a shell, and its heads have passed receiving inspection. The Pinecrest hopper's three cone pieces are rolled and seam-welded into a cone, and its short cylindrical top course, which bolts to the collector, is rolled and welded. Joanne walks Kiera through both fit-ups. "A head or a cone is never quite the same size as the shell it goes on," she says. "Your job is to make them meet with the offset spread evenly, the parts square to each other, and the seam where the drawing wants it. And then prove it before anyone strikes an arc." This lesson covers how heads and cones are matched to shells, how the mismatch is measured and spread, the tools for pulling parts into line, the checks for square and level, and the fit-up record.
Getting ready to fit
Before the parts meet, each is checked on its own. The shell's end is checked for roundness by measuring diameters at several angles and for squareness by measuring from the end to a reference line scribed around the shell, a known distance in. The head's edge is checked the same way: circumference, roundness and the straight flange square to the tangent plane. The cone's large and small ends are checked for diameter, and the cone's height at several stations around it is checked against the drawing, which shows whether its ends are parallel. Every part has its orientation lines marked: the 0, 90, 180 and 270 degree lines on the shell, matched lines on the head and cone, and the seam positions.
Seam positions are checked against the drawing and the stagger rules. On V-414, the head's seam, if it has one, must not line up with a shell course's long seam; the drawing shows the head as seamless, so that check is easy. On the hopper, the cone's three seams must be staggered from the top course's long seam by more than the minimum distance in the shop's procedure, and none may fall where the inlet opening goes.
Matching circumferences
The most useful single measurement in a head or cone fit-up is circumference. A tape around the outside of the shell's end and the outside of the head's edge gives two numbers whose difference, divided by pi, is the difference in diameter. If the head is smaller, it will sit inside the shell's edge with an offset on every side; if it is larger, it will stand proud. Half the diameter difference is the offset at each point if the mismatch is spread evenly around the joint, and that offset is what is compared with the alignment limit for the seam.
For a circumferential seam on a vessel like V-414, the code's alignment tolerance depends on the joint category and the thickness; for its 5/8 in plate, Northgate's specification and the shop's procedure use a quarter of the thickness. If the measured mismatch would give an offset larger than that, the head or the shell must be reworked: the shell's end can be re-rolled slightly, or the head's edge can be trimmed or, if it is too small, the head returned. Mismatch is never pulled out by force alone, because forcing a head into shape leaves stresses in the knuckle and the weld.
Spreading the offset
Even when the circumferences match within the limit, the head and shell are rarely both perfectly round. The shell might be a few millimeters oval and the head a little flat on one side. The fitter's job is to turn the head until its high and low spots fall against the shell's, and then pull the edges together so that the offset is spread evenly, with no single point carrying all of it. Joanne's method is to tack at 0 degrees with the edges flush, work around in both directions, closing the gap and adjusting the offset a little at a time, and tack at short intervals, never letting the difference build up to the far side.
The tools are the same ones Kiera used last winter for the shell courses: dogs welded to one part with wedges driven between them and the other part to close a gap or lift an edge; strongbacks across the seam to hold edges in line; jacks and spiders inside to push out a flat spot. On a head, dogs and wedges are welded to the outside of the shell, never to the knuckle, and every temporary attachment's position is recorded so it can be removed, ground and checked after welding.
V-414's head fit
Kiera measures V-414's top course and top head. The shell's outside circumference at the top is 230 1/4 in and the head's is 229 7/8 in. Before any fitting, she runs the numbers.
# Fitting a head and a cone: matching circumferences and checking the fit (US units)
import math
from math import gcd
MODE = "in"

def frac(x, den=16):
    sign = "-" if x < 0 else ""
    n = round(abs(x) * den); whole, rem = divmod(n, den)
    if rem == 0:
        return f"{sign}{whole} in"
    g = gcd(rem, den)
    return f"{sign}{whole} {rem // g}/{den // g} in" if whole else f"{sign}{rem // g}/{den // g} in"

def show(x):
    x = 0.0 if abs(x) < 1e-6 else x
    return f"{x:,.0f} mm" if MODE == "mm" else frac(x)
shell_c, head_c, t = 230.25, 229.875, 0.625   # outside circumferences measured with a tape
dd = (shell_c - head_c) / math.pi      # difference in diameter
print("diameter difference", show(dd), "-> offset per side if spread evenly:", show(dd / 2))
lim = t / 4
print("allowed offset (1/4 t, shop rule for this seam):", show(lim), "->", "OK" if abs(dd / 2) <= lim else "TOO MUCH, re-round or trim")
# cone fit check: height of the cone's small end above the shell seam at 8 stations
hts = [52.125, 52.0, 51.875, 51.8125, 51.9375, 52.0625, 52.1875, 52.125]
nominal = 52
dev = [h - nominal for h in hts]
for k, v in enumerate(dev):
    print(f"  station {k * 45:3} deg  height {show(hts[k])}  deviation {show(v)}")
tilt = max(dev) - min(dev)
print("out-of-level across the small end:", show(tilt), "limit", show(0.25), "->", "OK" if tilt <= 0.25 else "re-fit")diameter difference 1/8 in -> offset per side if spread evenly: 1/16 in allowed offset (1/4 t, shop rule for this seam): 1/8 in -> OK station 0 deg height 52 1/8 in deviation 1/8 in station 45 deg height 52 in deviation 0 in station 90 deg height 51 7/8 in deviation -1/8 in station 135 deg height 51 13/16 in deviation -3/16 in station 180 deg height 51 15/16 in deviation -1/16 in station 225 deg height 52 1/16 in deviation 1/16 in station 270 deg height 52 3/16 in deviation 3/16 in station 315 deg height 52 1/8 in deviation 1/8 in out-of-level across the small end: 3/8 in limit 1/4 in -> re-fit
The circumference difference gives an even offset of about 1/16 in per side, well within the quarter-thickness limit, so the head can be fitted without rework. The second part of the code is for the hopper and is covered below. Kiera turns the head on the fitting stand until its slightly flat side faces the shell's slightly oval side, tacks at 0 degrees, and works around the joint. Her final readings at eight points show offsets from zero to 1/16 in, all on the same side, and the root opening within the procedure everywhere. Harjit checks the fit, records the readings on the fit-up check sheet and signs the hold point.
Squareness and the tangent line
A head that is fitted with even offsets can still be crooked, tilted on the shell so its axis does not line up with the shell's. The check is the distance from the head's tangent line, or its edge, to the reference line scribed on the shell, measured at several points around the joint: if the head is square, the distances are equal. For a vertical vessel, another check is to measure from the head's center mark to the shell's reference line at four points; equal distances mean the center is on the axis. On V-414, the overall length from tangent line to tangent line is also checked against the drawing, because the nozzles and supports on the heads are located from the tangent lines.
Fitting a cone
A cone is fitted to a shell the same way as a head, with one difference: a cone has two ends, and both must be square to the axis. On a hopper or a reducer, the cone's large end is fitted to the shell first, with the offset spread and the seam stagger checked. Then the small end is checked for level, or for square to the axis on a horizontal vessel. The test Joanne uses is the height of the small end above the joint, measured at eight stations around the cone; if the cone was rolled or fitted crooked, the heights will vary around the cone, and the difference between the highest and lowest is the out-of-level of the small end.
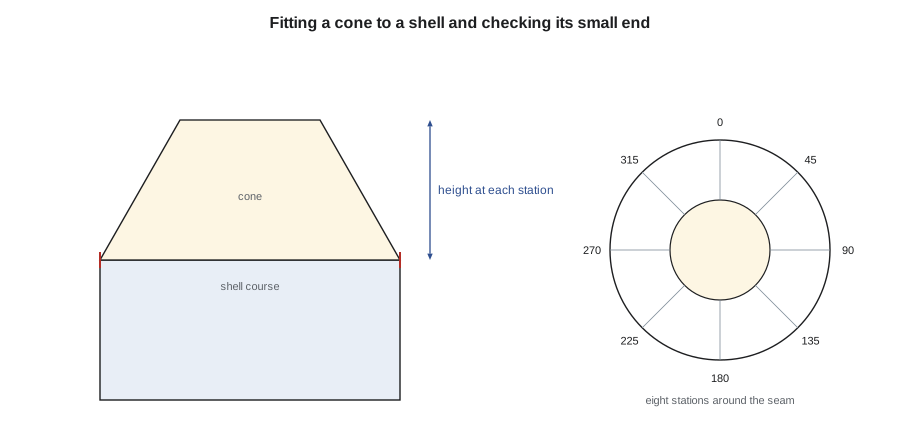
The second half of Kiera's code checks the hopper. With the cone fitted to the top course, she measures from the top course's flange face down to the cone's small end flange face at the eight stations, against a nominal of 52 in. The readings vary by 3/8 in, against the drawing's limit of 1/4 in for the outlet flange to sit square under the rotary valve. The pattern of the readings, low at 135 degrees and high at 270, shows the cone is tipped, not twisted. Kiera traces it to the large-end fit: at 135 degrees the cone sits 1/8 in deeper into the top course than at 315. She breaks the tacks there, lifts that side with wedges, re-tacks and measures again. The second set of readings varies by 3/16 in, and Harjit signs the hold point.
| Fault | How it shows | Cure |
|---|---|---|
| Head or cone smaller than the shell | Circumference short; offset all round | Within limit: spread evenly; over limit: rework |
| Shell end oval | Diameters differ by angle | Turn the head to match; push out with a spider |
| Head tilted on the shell | Unequal distances from tangent line to reference line | Break tacks and re-fit on the low side |
| Cone tipped | Small-end heights low on one side, high opposite | Re-fit the large end on the low side |
| Cone twisted | Seams spiral; heights uneven in no clear pattern | Re-roll or re-fit the cone pieces |
The fit-up record
Every head-to-shell and cone-to-shell joint on V-414 and the hopper has a fit-up check sheet. It records the parts and their heat numbers, the circumferences and the calculated offset, the root opening and the offset at eight or more points after tacking, the squareness readings, the seam positions and stagger, the positions of temporary attachments, and the fitter's and inspector's signatures. For a code vessel, the fit-up of every pressure seam is a hold point in the inspection and test plan, and welding does not start until it is signed. For the hopper, a non-code part, the record is still kept, because the customer's specification asks for it and because it is the evidence if the outlet does not line up in the field.
Rolling the vessel between fits
A shell with a head on one end is heavy and awkward, and every weld after the fit-up is easier in the flat position. Ironbridge's shop sets horizontal vessels on turning rolls, powered rollers that turn the vessel slowly under a fixed welding head or a welder at a comfortable height. Before V-414 goes on the rolls, Kiera checks that its tacks are strong enough to carry the weight as it turns, adds temporary braces inside the head joint if the drawing's tack spacing looks light for the load, and centers the shell on the rolls so it does not walk along them as it turns. A vessel that walks off its rolls is one of the shop's serious hazards, and the rolls' end stops are checked before every turn.
On the hopper, a vertical part, the cone-to-course joint is welded with the part standing on the fitting table, the welders working around it on platforms. The cone's small end is braced to the table with adjustable struts so that welding heat does not pull it out of level, and Kiera rechecks the small-end heights after the root pass.
Common mistakes
MistakePulling a head into a shell that is too far out of size by force.
InsteadMeasure circumferences first; rework the parts if the offset would exceed the limit.
MistakeTacking all round from one point without adjusting as you go.
InsteadWork around in both directions with short tack spacing, spreading the offset.
MistakeWelding dogs to the head's knuckle.
InsteadAttach fit-up hardware to the shell side, and record every temporary attachment.
MistakeChecking only the cone's large end.
InsteadCheck the small end's level or squareness at eight stations, and read the pattern of the readings.
MistakeStarting to weld before the fit-up is recorded.
InsteadThe fit-up is a hold point; welding waits for the signature.
Summary and key terms
- Each part is checked for roundness, squareness and orientation marks before fitting.
- The circumference difference divided by pi gives the diameter difference; half of it is the even offset per side.
- Offset is spread evenly by turning the head to match and tacking around in short steps.
- Squareness is checked from the tangent line or edge to a reference line on the shell.
- A cone's small end is checked at eight stations; the pattern shows tipping or twisting.
- Every pressure seam's fit-up is recorded and signed before welding.
- Circumference matching
- Comparing tape measurements around two parts to find their difference in diameter.
- Even offset
- The offset at each point of a joint when a diameter mismatch is spread evenly around it.
- Reference line
- A line scribed around a shell a known distance from its end, used to check squareness.
- Out-of-level
- The difference between the highest and lowest readings around the end of a part.
- Fit-up check sheet
- The record of a joint's measurements and approvals before welding.
Practice problems
Work each problem on paper first, then reveal the answer to check.
A shell measures 240 in around and a head 239 1/2 in. What is the even offset per side?
Show answer
Diameter difference = 1/2 ÷ π = 0.16 in; offset per side about 1/16 in.
Why are dogs welded to the shell side rather than to a head's knuckle?
Show answer
To avoid damaging and leaving stresses in the knuckle, where the head is most highly stressed.
A cone's small end reads low at 90 degrees and high at 270. What does that suggest?
Show answer
The cone is tipped toward 90 degrees and should be re-fitted at the large end on that side.
Why is a non-code hopper's fit-up still recorded?
Show answer
The customer's specification asks for it, and it is evidence if the parts do not line up in the field.
Lesson quiz · 5 questions
Score 60% or more to complete this lesson.
Create a free account to save your progress, take quizzes and earn a certificate.