
WLD-230 · Lesson 6 of 12 · 17 min
Vertical fillet welds (3F)
The first time a welder turns a T-joint on its end and tries to run a fillet up it, the pool behaves like water on a window. It sags, it runs down the joint ahead of the electrode, it undercuts the upper toe and piles up as a lumpy, convex bead. Learning to weld vertically is learning to make the pool freeze in place as fast as it is made. Devon starts his vertical work with fillets, the 3F position, because a fillet joint gives the pool a corner to sit in and the welder an easier shape to read than a groove. Everything he learns here carries straight into the vertical groove welds of the next lesson.
Uphill and downhill
A vertical weld can be made travelling up the joint, called vertical-up or uphill, or travelling down it, vertical-down or downhill. With low-hydrogen electrodes on structural plate, vertical welds are made uphill. Uphill welding lets the welder build each part of the weld on a shelf of frozen metal below it, gives deeper fusion and leaves a sound weld in plate of any thickness. Downhill welding is faster and gives a flatter bead with shallow penetration, which suits thin sheet, some pipeline work with cellulosic electrodes and a few special electrodes made for it. Hartwell's structural procedures, and the test procedure, call for vertical-up with E4918 (7018). A procedure qualified for uphill does not cover downhill, and the codes treat the direction of travel as a variable that cannot be changed without a new procedure.
Setting up the joint and the welder
Vertical welding is tiring, and a welder who is uncomfortable will not weld well. Before striking an arc, Devon sets the practice joint at a height where the middle of the weld is about level with his chest, so that he can weld the whole joint without moving his feet much. He stands slightly to the side, with his body turned so that his arm moves up the joint naturally, and he braces his elbow or forearm against his body or the bench wherever he can. He runs his hand up the joint once without the arc to make sure the lead and stinger will not drag or catch.
Priya Natarajan, Hartwell's safety coordinator, adds two points for vertical and overhead work. Sparks and spatter fall down the joint and onto the welder's hands and feet, so leather gloves, sleeves and boots with the laces covered matter more. And the welding lead should be hung over a hook or the bench so that its weight is not hanging from the welder's wrist, which causes fatigue and shoulder strain over a day of vertical work.
Current and arc length
Vertical welds need less current than flat welds of the same size, because a smaller, cooler pool freezes faster. For 3.2 mm (1/8 in) E4918 (7018) in the vertical-up position, Hartwell's starting range is about 95 to 120 A, roughly 10 to 15 percent below the flat setting. The arc is kept very short. A long arc in the vertical position puts more heat into the pool, spreads it out, lets the pool sag and lets air in.
# Starting current window by position and electrode size, from the flat range (illustrative shop factors)
FLAT = {"3.2 mm": (110, 140), "4.0 mm": (140, 180)}                  # electrode: (low, high) amps in the flat position
FACTOR = {"flat": 1.00, "horizontal": 0.95, "vertical up": 0.85, "overhead": 0.90}
for size, (lo, hi) in FLAT.items():
    row = []
    for pos, f in FACTOR.items():
        row.append(f"{pos} {round(lo * f / 5) * 5}-{round(hi * f / 5) * 5} A")
    print(f"{size:7}: " + "; ".join(row))
proc = (90, 130)          # test procedure range for the vertical position
for amps in (105, 118, 135):
print(f"vertical setting {amps} A: {'within' if proc[0] <= amps <= proc[1] else 'OUTSIDE'} the procedure range {proc[0]}-{proc[1]} A")3.2 mm : flat 110-140 A; horizontal 105-135 A; vertical up 95-120 A; overhead 100-125 A 4.0 mm : flat 140-180 A; horizontal 135-170 A; vertical up 120-155 A; overhead 125-160 A vertical setting 105 A: within the procedure range 90-130 A vertical setting 118 A: within the procedure range 90-130 A vertical setting 135 A: OUTSIDE the procedure range 90-130 A
The factors are Hartwell's rule of thumb for a starting point, not code values; the procedure gives the range that is allowed, and the welder tunes within it by watching the bead. Devon settles at about 105 A for his vertical-up fillets with a 3.2 mm (1/8 in) electrode, and about 115 A for the cap of a multi-pass weld.
Electrode angles
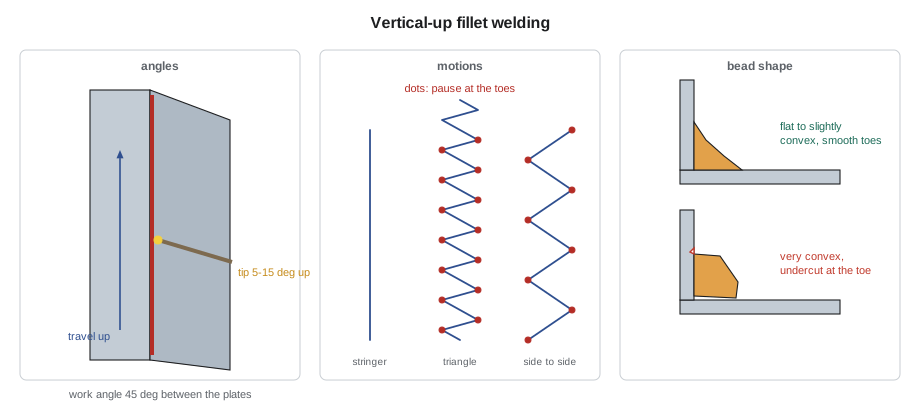
For a vertical-up fillet in a T-joint, the work angle is about 45 degrees, splitting the angle between the two plates. The travel angle is a slight push, with the electrode tip pointing up the joint about 5 to 15 degrees above square. Some welders describe it as holding the electrode almost square to the joint with the end tilted slightly upward. Pointing the electrode upward lets the arc force push the pool up against gravity and preheat the joint ahead. Pointing it down, in a drag, lets the arc push the pool down the joint and is the usual cause of a sagging bead.
The motions
A vertical-up fillet can be run as a stringer for small sizes, but most welders use a motion of some kind that lets the pool freeze between movements.
- Stringer with a slight up-and-back motion. For a single-pass fillet up to about 6 mm (1/4 in), the electrode moves straight up the joint with a small rhythm: up a little, back a little into the pool, up again. The pause lets the pool freeze.
- Triangle weave. The electrode moves from the root of the joint to one toe, across to the other toe and back to the root, tracing a small triangle, with pauses at the toes. The triangle builds a slightly thicker bead and makes sure the root is fused at each step. It is often used for the first pass of a larger fillet.
- Side-to-side weave with pauses. For the cap of a multi-pass fillet, the electrode moves straight across the bead from toe to toe, with a definite pause at each toe and a quick crossing in the middle. Each crossing moves up the joint by about the width of the electrode.
In every motion, the pauses at the toes do the work. They fill the edges of the bead so that it does not undercut, and they let the middle of the pool freeze before the electrode returns. A quick crossing in the middle keeps the bead from building up in the centre and becoming convex. Devon's early vertical beads are all too convex, with undercut at the toes, because he moves evenly across the bead instead of pausing at the sides and hurrying through the middle.
The shelf
The idea that makes vertical welding work is the shelf. Each part of the bead freezes into a small ledge that the next part of the pool rests on. The welder watches the pool and moves up only when the metal below has frozen enough to hold it. If he moves up too slowly, the pool grows too big for the shelf to hold and sags. If he moves up too quickly, the bead becomes thin and narrow and does not fuse at the toes. Marta tells Devon to watch the bottom of the pool, not the arc: as long as the bottom edge of the pool is a straight, crisp line across the joint, the shelf is holding.
Multi-pass vertical fillets
Larger vertical fillets are made in more than one pass. A common sequence for an 8 to 10 mm (5/16 to 3/8 in) fillet is a root pass run as a stringer or small triangle, cleaned and checked, then a single woven cap pass that covers the root and reaches both toes. For still larger fillets, the cap may be made as two or more passes, but most welders prefer one woven cap in the vertical position, because it is easier to keep a smooth face. Each pass is cleaned thoroughly: slag in a vertical fillet tends to collect at the upper toe of each weave and at the root.
On the Coldwater skid, the stiffener plates inside the base frame beams are welded vertically to the web with 8 mm (5/16 in) fillets, because the frame is too heavy to roll for each one. Glen gives these to Devon in week five, with Marta checking each one, as his first production vertical welds.
Heat input in vertical welds
A weave bead in the vertical position moves up the joint slowly, so its heat input is high. Procedures that limit heat input, which is common for bridge work and steels with toughness requirements, may limit the width of the weave or require stringers in the vertical position. The heat input is worked out from the travel speed up the joint, not from the speed of the electrode across it. A cap that moves up 50 mm (2 in) in a minute at 115 A and 23 V has a heat input of about 3.2 kJ/mm (79 kJ/in), more than twice that of a flat stringer. Devon's test procedure does not set a heat input limit for the plate test, but the Riverside bridge procedures do, and for those joints Marta has him run narrower weaves or split the cap.
Common vertical fillet defects
| Defect | Cause | Correction |
|---|---|---|
| Sagging bead, metal running down | Current too high, moving up too slowly, electrode pointed down | Lower current, move up sooner, point the electrode slightly upward |
| Undercut at the toes | No pause at the toes, weave too wide, long arc | Pause at each toe, shorten the arc |
| Very convex bead | Slow crossing in the middle, current too low | Hurry through the middle, check current |
| Slag at the upper toe of each weave | Motion too fast at the toe, poor cleaning | Pause at the toe, clean between passes |
| Lack of fusion at the root | Weave too wide on the first pass, arc not reaching the root | Use a small triangle on the first pass, aim into the root |
Checking the practice fillets
Each practice 3F fillet is checked the way the first SMAW course taught: visual inspection with a fillet gauge for leg size and convexity, then a break test, with the stem of the T pushed over so that the root of the weld is in tension. The break shows whether the root fused. By the end of week five, Devon's 3F break tests show complete root fusion, and his fillet gauge readings are within 1 mm (1/32 in) of size on both legs, with the face flat to slightly convex.
Sizes and sequences for larger vertical fillets
The size of a vertical-up fillet that can be made in one pass is larger than in the flat or horizontal position, because the weave builds the bead outward as it climbs. With a 3.2 mm (1/8 in) low-hydrogen electrode, a single woven pass can make a fillet of about 8 mm (5/16 in), and Hartwell's procedures allow single-pass vertical fillets up to that size. Above it, the weld is made in layers: a root, then a woven cap, or for the largest sizes, a root, a woven second pass and a woven cap.
A multi-pass vertical fillet is planned so that each weave is no wider than about 20 mm (3/4 in). A wider weave holds too much molten metal at once and sags, and the welder has to travel so slowly that the heat input climbs. For a 12 mm (1/2 in) fillet, Devon runs a triangle-weave root about 6 mm (1/4 in) in size, a second pass woven to about 9 mm (3/8 in) and a cap woven to full size. Each pass is cleaned and checked before the next.
Distortion on the skid stiffeners
The stiffeners on the Coldwater base frame are welded to the beam web on both faces, and each fillet pulls the web toward it as it shrinks. If all the fillets on one face are welded first, the web bows. Glen's sequence alternates sides: Devon welds one stiffener's fillet on the near face, then the matching fillet on the far face of the same stiffener, then moves to the next stiffener. He also starts each fillet about 25 mm (1 in) from the bottom flange and returns to fill the start after the rest of the fillet is done, so that the stiffener's corner clip, which keeps the weld away from the flange-to-web weld, is not filled in by accident.
Lucia checks the stiffener fillets with a fillet gauge on both legs, at three points along each weld. Vertical-up fillets made with a weave tend to be slightly larger on the leg that the welder favours, usually the plate on the side of the welding hand. Devon's first few are 1 mm (1/32 in) larger on the web than on the stiffener, and he corrects it by pausing slightly longer on the stiffener side of the weave.
Common mistakes
MistakeRunning low-hydrogen vertical welds downhill.
InsteadWeld vertical-up unless the procedure is qualified for downhill.
MistakePointing the electrode down the joint.
InsteadPoint it slightly upward, 5 to 15 degrees above square.
MistakeMoving evenly across a weave.
InsteadPause at the toes and cross the middle quickly.
MistakeUsing the flat current in the vertical position.
InsteadReduce the current about 10 to 15 percent and keep the arc short.
MistakeIgnoring heat input on wide vertical weaves.
InsteadCalculate heat input from travel up the joint and narrow or split the weave if needed.
Summary and key terms
- Low-hydrogen structural welds are made vertical-up.
- Set the joint at chest height, brace the arm, and take the weight of the lead off the wrist.
- Use about 10 to 15 percent less current than flat and a very short arc.
- Hold a 45 degree work angle and point the electrode slightly upward.
- Pause at the toes, cross quickly, and build on the frozen shelf below.
- Vertical weaves have high heat input; procedures may limit them.
- Vertical-up
- Welding in the vertical position with travel upward.
- Vertical-down
- Welding in the vertical position with travel downward.
- 3F
- A fillet weld in the vertical position.
- Triangle weave
- A weave in which the electrode traces a small triangle from the root to each toe.
- Shelf
- The frozen ledge of weld metal that supports the pool in vertical welding.
- Push angle
- A travel angle with the electrode pointing in the direction of travel.
Practice problems
Work each problem on paper first, then reveal the answer to check.
A vertical cap moves up 50 mm in one minute at 115 A and 23 V. What is the heat input?
Show answer
60 x 23 x 115 / (1000 x 50) = about 3.2 kJ/mm.
A flat setting of 130 A works for a 3.2 mm electrode. Roughly where should the vertical-up setting start?
Show answer
About 110 A, 10 to 15 percent lower.
A vertical fillet keeps undercutting at both toes. What should change?
Show answer
Pause longer at each toe and keep the arc short.
Lesson quiz · 5 questions
Score 60% or more to complete this lesson.
Create a free account to save your progress, take quizzes and earn a certificate.