
WLD-230 · Lesson 11 of 12 · 17 min
Weld defects, gouging and repairs
Every welder makes defects. The difference between a welder and a good welder is how often, how quickly they are found, and how well they are repaired. By week nine, Devon can name the defect in a failed bend specimen from across the bay, and Lucia moves him on to the second half of the subject: once a defect is found in a production weld, how is it taken out and the weld made sound again? This lesson reviews the defects of groove welds and their causes, then covers excavation by grinding and air carbon arc gouging, the repair weld itself and the records that go with it.
Defects and discontinuities
Inspectors are careful with words. A discontinuity is any interruption in the normal structure of a weld: a pore, a slag inclusion, a lap. A defect is a discontinuity that is larger or more numerous than the code or specification allows, and so must be repaired. A small pore in a fillet may be an acceptable discontinuity; a line of porosity along a groove weld that fails the visual or radiographic criteria is a defect. Devon learns to say that a weld has a discontinuity until Lucia has measured it.
| Discontinuity | What it is | Common causes in SMAW groove welds |
|---|---|---|
| Crack | A fracture in the weld or heat-affected zone | Hydrogen from damp electrodes, high restraint, no preheat on thick plate, crater left unfilled |
| Lack of fusion | Weld metal not fused to the base metal or to the previous pass | Low current, arc not aimed at the sidewall, too wide a weave, convex previous pass |
| Incomplete joint penetration | Weld not reaching through the joint | Root opening too tight, land too thick, root electrode held back |
| Slag inclusion | Slag trapped in the weld | Poor cleaning between passes, valleys at toes, drag angle too steep |
| Porosity | Gas pockets in the weld | Damp or exposed low-hydrogen electrodes, long arc, dirty joint, start without backing up |
| Undercut | A groove melted into the base metal at the toe | Current too high, wrong angle, no pause at the edge |
| Overlap | Weld metal lying on the surface without fusing | Current too low, travel too slow |
| Arc strike | A small melted spot outside the weld | Striking the arc on the plate instead of in the joint |
Cracks are treated differently from all the others. Any crack, of any size, is rejected in most structural work, and a crack found in a weld also raises a question about why it happened: if the cause is hydrogen or restraint, simply re-welding the same way will crack again. Lucia's rule is that any crack goes to Elena before it is repaired.
Finding defects
Surface defects, such as undercut, overlap, surface porosity, cracks open to the surface and arc strikes, are found by visual inspection, sometimes helped by magnetic particle testing, which shows fine surface cracks as lines of iron powder, or by liquid penetrant testing. Internal defects in groove welds are found by ultrasonic testing or radiography. On the Coldwater skid, the column splices and lifting lug welds are ultrasonically tested, and on the Riverside girders, the flange splices are ultrasonically tested and some are radiographed. A defect found by testing is marked on the weld with its position, length and depth below the surface, and reported on a nonconformance report.
Permission to repair
On code work, a repair is not something the welder decides to do on his own. The inspector identifies the defect and its location, and the repair is made to a repair procedure, which may be the original welding procedure or a separate one written for repairs, with any extra preheat or inspection it needs. Some specifications limit the number of times the same area may be repaired before the engineer must be consulted, because each repair adds heat and restraint to the same spot. After the repair, the weld is inspected again by the same method that found the defect.
On a welder qualification test, repairs are not allowed at all. A test plate that has a defect fails. The welder may grind and clean between passes, but once the cap is finished, it is tested as it is. That is why Devon's practice repairs are on practice plates, scrap and production work, never on a test plate.
Excavating the defect
The first step in a repair is to remove the defect completely, with a cavity, called an excavation, shaped so that it can be welded soundly. There are two main methods.
- Grinding. A grinder with a thin cutting disc or a grinding disc removes metal slowly and precisely. It is the best method for small, shallow defects such as undercut, porosity near the surface and arc strikes, and for finishing an excavation made by gouging.
- Air carbon arc gouging. As the first course showed, an arc between a copper-coated carbon electrode and the work melts the metal, and a jet of compressed air blows it out. Gouging removes metal very quickly and is the usual method for deep or long defects in groove welds and for back-gouging. It leaves a thin layer of carbon-rich, hardened metal and sometimes traces of copper on the surface of the cavity, which must be ground off, about 1 to 1.5 mm (1/32 to 1/16 in), before welding.
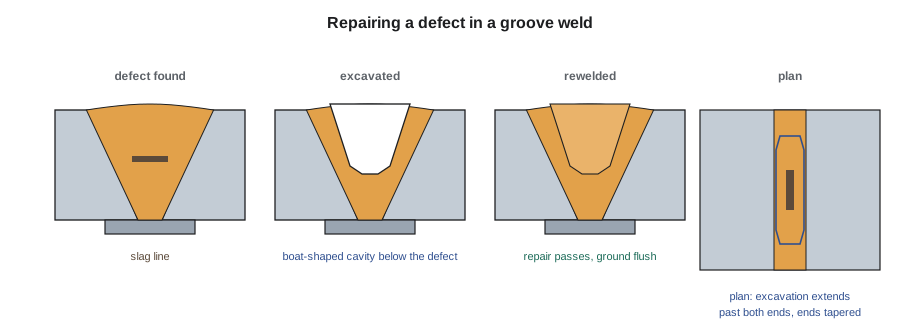
The excavation must go below the bottom of the defect and past its ends. A common practice, and the one Hartwell's repair procedure uses, is to remove the defect plus about 1.5 mm (1/16 in) of sound metal below it, and to extend the excavation about 25 mm (1 in) past each end of the indication, with the ends tapered. The sides of the cavity are shaped at an angle, so that the electrode can reach the bottom and the sidewalls can be fused, and the bottom is rounded, like the bottom of a boat. A narrow, deep, square-sided cavity is as hard to weld as a tight root, and a repair weld with lack of fusion in it is worse than the original defect.
Confirming the defect is gone
Before rewelding, the excavation is checked to make sure the whole defect has been removed. For slag and lack of fusion, a careful visual inspection of the bright, ground surface is usually enough. For cracks, the cavity is checked with magnetic particle or liquid penetrant testing, because a crack can continue as a hairline below what looks like sound metal. If the indication is still there, the excavation goes deeper. Devon learns this the hard way on a practice repair: he gouges out what he thinks is a slag line, grinds the cavity, welds it, and the next bend test opens in the same place. When Lucia cuts and etches the specimen, the original slag is still there, below the bottom of his repair.
Rewelding
The repair is welded like a small groove weld, with the same care. The cavity is preheated, often to a higher temperature than the original weld, because a small repair in a large, cold plate cools very quickly and is more prone to hydrogen cracking. Hartwell's repair procedure adds about 50 °C (100 °F) to the original minimum preheat for thick plate. The electrodes come fresh from the oven. The first pass fuses the bottom of the cavity, the following passes are stringers against each sloped side, and each pass is cleaned and checked. The ends of the excavation are built up carefully, with each pass started and stopped on the taper so that no crater is left inside the original weld. The finished repair is ground to blend with the surrounding weld, and, if the original weld was ground flush, ground flush too.
Sizing the repair
Before Glen schedules a repair, he wants to know how long it will take. The size of the excavation sets the gouging time, the grinding, the electrodes and the welding time.
# Repair excavation: size, metal removed, electrodes and time (illustrative rates)
import math
def repair(name, depth, length, below=1.5, extend=25, bottom=8, side_deg=20, rho=7.85e-6):
    d = depth + below                               # excavation depth
    L = length + 2 * extend                          # excavation length at the surface
    top = bottom + 2 * d * math.tan(math.radians(side_deg))
    area = (bottom + top) / 2 * d                    # trapezoid section
    vol = area * (L - extend)                        # tapered ends count about half
    mass = vol * rho
    elec = math.ceil(mass * 1.15 / 0.02)            # allow 15% extra for blending and reinforcement
    hours = mass / 0.8 / 0.25 + 0.5 * (L / 100)
    print(f"{name:20} cavity {d:.0f} deep x {L:.0f} long, top width {top:.0f} mm; {mass:.2f} kg to replace, about {elec} electrodes, {hours:.1f} h with gouging and grinding")
for args in [("splice slag line", 9, 60), ("lug sidewall LOF", 14, 90), ("cap porosity", 3, 40)]:
repair(*args)splice slag line cavity 10 deep x 110 long, top width 16 mm; 0.08 kg to replace, about 5 electrodes, 1.0 h with gouging and grinding lug sidewall LOF cavity 16 deep x 140 long, top width 19 mm; 0.19 kg to replace, about 11 electrodes, 1.7 h with gouging and grinding cap porosity cavity 4 deep x 90 long, top width 11 mm; 0.02 kg to replace, about 2 electrodes, 0.6 h with gouging and grinding
Even the largest of these repairs uses only a handful of electrodes. The time goes into gouging, grinding, preheating, checking the cavity, the careful welding of short passes, and the re-inspection afterwards. A repair often takes as long as the original weld, which is the strongest argument for getting the weld right the first time.
A production repair
In week nine, the ultrasonic report on the Coldwater column splices comes back with one indication: a slag line in the north column's outer flange, about 60 mm (2 3/8 in) long, 9 mm (3/8 in) below the face. Lucia marks it on the flange with a paint stick, writes the nonconformance report, and Elena confirms that the original procedure, with the higher repair preheat, will be used for the repair. Because the splice is vertical and the column is in place, Marta makes the repair in the vertical position, and Devon assists.
Marta gouges from the face side with a 6 mm (1/4 in) carbon, two passes to reach the depth, stopping often to look. She grinds the cavity bright, and Devon checks it with magnetic particle testing under Lucia's eye. There is no indication left. The flange is preheated, and Marta rewelds the cavity with seven stringer passes, the last two blending into the original cap. Lucia checks the repair visually, and the ultrasonic technician retests it the next morning: no indication. The nonconformance report is closed with the repair record attached: who made the repair, the procedure, preheat, electrodes, the inspection results and the date. Devon is asked to fill in the repair record himself, as practice.
Repairing arc strikes and surface defects
Arc strikes deserve a separate word. When a welder strikes the arc on the plate outside the joint, the tiny spot of melted metal cools almost instantly and can form a hard, brittle spot, sometimes with a small crack. On high-strength steel or in areas of high stress, arc strikes are treated as defects and must be ground out smoothly and, on some work, checked by magnetic particle testing. The fix is prevention: strike the arc in the joint or on a run-off tab, and keep the stinger from touching the work when it is laid down. Surface undercut beyond the limits is repaired by cleaning and adding a small stringer bead along the toe, then blending; overlap is ground off and the toe rewelded if needed.
What a repair record contains
A repair is not complete until it is recorded. Hartwell's repair record, attached to the nonconformance report, holds:
| Item | Example from the column splice repair |
|---|---|
| Location and defect | North column, outer flange splice; slag line 60 mm (2 3/8 in) long, 9 mm (3/8 in) deep, found by ultrasonic testing |
| Repair procedure | Original splice procedure with repair preheat added |
| Excavation method and check | Air carbon arc gouging and grinding; magnetic particle test of the cavity, no indication |
| Preheat and electrodes | Preheat checked both sides; E4918 (7018) from the oven |
| Welder | Marta Kowalchuk, qualified for vertical groove welds |
| Reinspection | Visual, then ultrasonic retest: no recordable indication |
| Sign-off | Inspector and date |
The record matters for two reasons. It shows the owner and the engineer that the weld was repaired properly, and it shows Hartwell where its defects come from. When Lucia reviews the year's repair records, she looks for patterns: the same defect in the same kind of joint, or repairs clustered on one welder or one shift. A pattern is a training or a procedure problem, and it is cheaper to fix than to keep repairing.
Common mistakes
MistakeCalling every discontinuity a defect.
InsteadA discontinuity is a defect only when it exceeds the acceptance criteria.
MistakeRewelding a crack the same way it was first welded.
InsteadFind the cause of the crack first; refer it to the welding engineer.
MistakeWelding over the gouged surface.
InsteadGrind the carbon-rich gouged layer off before welding.
MistakeLeaving a narrow, square-sided excavation.
InsteadShape the cavity like a boat, with sloping sides and a rounded bottom.
MistakeAssuming the defect is gone because the cavity looks clean.
InsteadCheck cracks with magnetic particle or penetrant testing before rewelding.
MistakeRepairing a test plate.
InsteadTest plates may not be repaired once the cap is complete.
Summary and key terms
- A defect is a discontinuity that exceeds the acceptance criteria.
- Cracks, lack of fusion, incomplete penetration, slag, porosity, undercut, overlap and arc strikes each have known causes.
- Code repairs follow a repair procedure, with inspector involvement and reinspection.
- Excavate below and past the defect with a boat-shaped cavity, by grinding or by gouging and grinding.
- Confirm removal, preheat, and reweld with stringers; blend the repair.
- Keep a repair record; repairs often take as long as the original weld.
- Discontinuity
- An interruption in the typical structure of a weld or base metal.
- Defect
- A discontinuity that does not meet the acceptance criteria.
- Excavation
- The cavity made to remove a defect before a repair weld.
- Air carbon arc gouging
- A process that melts metal with a carbon arc and blows it away with compressed air.
- Nonconformance report
- A record of work that does not meet requirements and how it is resolved.
- Arc strike
- A discontinuity caused by an arc outside the weld joint.
Practice problems
Work each problem on paper first, then reveal the answer to check.
A slag line is 9 mm deep and 60 mm long. Using Hartwell's practice, how deep and long is the excavation?
Show answer
About 10.5 mm deep and 110 mm long at the surface.
Why is a higher preheat used for a small repair in thick plate?
Show answer
A small repair cools quickly in a large, cold plate and is more prone to hydrogen cracking.
What is done to a gouged cavity before welding?
Show answer
It is ground about 1 to 1.5 mm to remove the carbon-rich layer.
Lesson quiz · 5 questions
Score 60% or more to complete this lesson.
Create a free account to save your progress, take quizzes and earn a certificate.