
WLD-230 · Lesson 2 of 12 · 16 min
Groove weld preparation and backing
A good groove weld starts long before the arc is struck. The bevels have to be cut to the right angle and cleaned, the root face has to be the right size, the plates have to be set at the right root opening on a backing bar that fits tight against them, and the assembly has to be tacked so that it does not close up or open as it heats. A welder who rushes the preparation spends the rest of the joint fighting it. Marta Kowalchuk gives Devon a full afternoon on preparation before she lets him strike an arc on a groove, and she makes him prepare his own practice plates for the rest of the course.
The joint the procedure calls for
Every groove weld at Hartwell is made to a welding procedure, and the procedure gives the joint details: the groove type, bevel angle, root face, root opening, backing and the tolerances on each. For Devon's practice plates and his test, Elena Marchetti has written the details on the test procedure sheet. They are the same details used in the standard plate test: a single-V groove, two plates bevelled to 22.5 degrees each, giving a 45 degree groove angle, no root face, a 6 mm (1/4 in) root opening, and a steel backing bar 6 mm (1/4 in) thick and about 25 mm (1 in) wide, long enough to run past both ends of the groove.
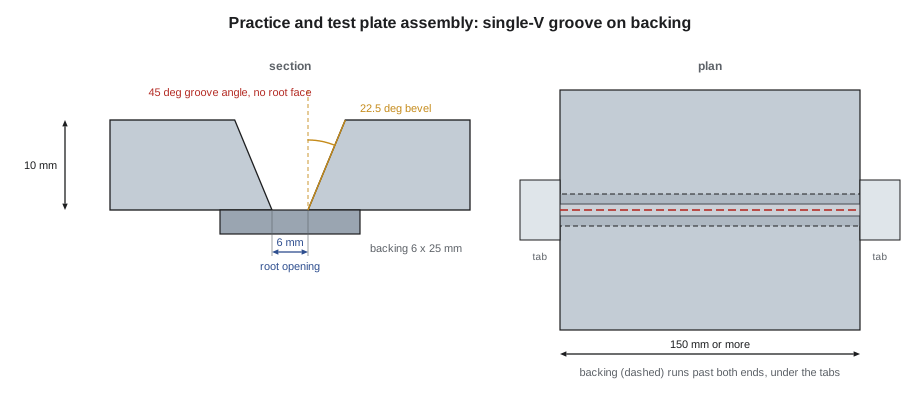
On production joints, the details come from the prequalified joint details in CSA W59 (AWS D1.1) or from a qualified procedure, and they are shown on the drawing by the groove weld symbol. The lifting lugs on the Coldwater base frame in the last course used a single-bevel groove with a 6 mm (1/4 in) root opening on backing; the column splices on the skid, which Devon will weld in the vertical position, use a single-V groove on backing like the test plate.
Cutting the bevel
Bevels are cut by one of four methods, and each leaves a different surface:
- Oxyfuel cutting with a bevelling track torch. This is the usual method for plate at Hartwell. The torch runs on a track at a set angle and leaves a smooth, accurate bevel with a thin oxide layer and, sometimes, a little slag on the bottom edge.
- Plasma cutting, by hand or on the CNC table. Plasma bevels are fast and accurate on thinner plate and leave a slightly harder surface.
- Machining, on a plate bevelling machine or a mill. Machined bevels are the most accurate and need almost no cleanup.
- Grinding. A grinder can cut a bevel on small pieces or repair a poor one, but it is slow and hard to keep straight.
Whatever the method, the bevel surface must be cleaned to bright metal before welding. Oxide, slag and the hard skin left by thermal cutting can cause slag inclusions and lack of fusion at the sidewall. Devon grinds each bevel with a flap disc, about 1 mm (1/32 in) deep, until the whole face is bright, and he grinds the plate surfaces back about 25 mm (1 in) from the edge on both sides to remove mill scale, paint and rust. The bottom edge of each bevel is lightly broken with the grinder so that there is no burr to hold the root open unevenly.
Checking the bevel
Bevel angle is checked with a bevel protractor or a fixed gauge cut to the right angle. A bevel that is too shallow narrows the groove and makes the sidewalls hard to reach; one that is too steep opens the groove and wastes filler. The procedure allows some range, usually more on the open side than on the tight side, because a groove that is slightly too wide is easier to weld than one that is slightly too narrow.
For a groove on backing with no root face, the bottom of the bevel should come to a sharp edge. If the cut has left a land, Devon grinds it off. On open-root joints, which come in lesson 4, the root face is deliberately left and ground to a set size, because it controls how much the root pass melts through.
Cleanliness
Low-hydrogen electrodes are used for structural groove welds because they keep hydrogen out of the weld. Anything on the joint that contains hydrogen, such as oil, grease, paint, moisture or the marking crayon used to lay out the plate, can undo that. Devon wipes the bevels and backing with a clean rag and solvent after grinding, lets them dry, and keeps the prepared plates on the rack, not on the floor, where they pick up dirt and moisture. In winter, plates brought in from the yard are left to warm up before they are prepared, because condensation forms on cold steel in a warm shop.
The backing bar
A backing bar supports the root pass so that the welder can fuse both bevels and the bar at the bottom of the groove without the weld pool falling through. For a complete joint penetration weld on backing, the root pass must fuse into the backing along its whole length. The backing becomes part of the weld and, unless the drawing says it is to be removed, stays in place.
The rules for backing are short, and every one of them matters:
- Material. The backing must be a steel compatible with the base metal, usually the same grade or one the procedure allows. A backing bar cut from an unknown scrap bin can crack.
- Fit. The backing must be tight against both plates for the full length of the joint. A gap between the backing and the plates lets slag run under the root and causes lack of fusion at the bottom of the bevel. Hartwell's procedure allows no more than 1.5 mm (1/16 in) of gap, and Devon aims for none.
- Length. The backing runs past both ends of the groove, under the run-off tabs, so that the starts and stops of each pass are off the part.
- Continuity. Backing that must be spliced is joined with a complete penetration weld before it is used, so that there is no gap in it under the root.
On the CWB and AWS plate tests, the backing is removed before the bend specimens are cut, by grinding or machining it flush with the plate. On production work, backing left in place on a structure in fatigue loading can be a problem, because the unfused line between the backing and the plate acts like a notch. The Riverside girder flange splices in the last course were back-gouged double-V welds for that reason, not welds on backing.
Run-off tabs
A weld pass is hard to start and stop cleanly. At the start the plate is cold, so fusion may be poor, and at the end the crater can crack or hold slag. Run-off tabs, also called weld tabs or extension bars, are short pieces of plate with the same groove prepared in them, tacked to the ends of the joint so that each pass can start and stop beyond the part. After welding, the tabs are cut off and the ends ground smooth. On the test plates, the ends of the groove are cut off and thrown away when the specimens are taken, which serves the same purpose.
Setting the root opening
The root opening is set with a gauge or a spacer. Many welders use a piece of filler rod or a bare electrode core of the right diameter, a 6 mm (1/4 in) bar for this joint, laid along the groove while the plates are pushed against it. Devon uses a step gauge and checks the opening at both ends and in the middle.
Root opening matters more than any other detail of a backed groove. Too tight, and the root pass cannot reach the bottom corners of the bevels, where it leaves lack of fusion against the backing. Too wide, and the root takes more passes, the plate distorts more, and the fill passes have more metal to put in. On the test plate, a root opening that is 2 mm (1/16 in) tight is the most common cause of a failed root bend.
Tacking
The plates are tacked to the backing, not to each other, so that the root opening stays where it was set. On the test plates, the CWB examiner or Lucia will usually want the tacks on the backing outside the groove, or in the groove only at the very ends where the material will be cut off, so that no tack is left inside the weld that will be tested. Production tack welds that will be incorporated into the root must be made by a qualified welder with the same electrode and preheat as the root, and they must be cleaned and their ends feathered with a grinder so that the root pass fuses over them.
Devon tacks each plate to the backing at both ends and in the middle, on the underside, then checks the root opening again. Tacking pulls the plates together a little, and a tack made too hot on one side will close the gap at that end.
Allowing for distortion
A single-V groove has more weld metal at the top of the joint than at the root, so it shrinks more across the top as it cools. The result is angular distortion: the two plates tilt up toward the side of the cap. A plate that starts flat ends up with the plates bent a few degrees, which on a test plate can make the specimens hard to cut and bend, and on a production joint can put a structure out of tolerance. The answer is to pre-set the plates, tacking them with the outer edges lowered slightly so that the shrinkage pulls them flat. For a 10 mm (3/8 in) single-V plate on backing, Marta has Devon pre-set each plate about 2 to 3 degrees, which on a plate 150 mm (6 in) wide means lowering the outer edge by about 5 to 8 mm (3/16 to 5/16 in).
# Groove preparation check: measured joint against the procedure, and weld metal for the joint
import math
PROC = {"bevel": (22.5, -2.5, 5.0), "root_opening": (6.0, -1.5, 6.0), "root_face": (0.0, 0.0, 1.0), "backing_gap": (0.0, 0.0, 1.5)}
def check(name, value):
    nominal, minus, plus = PROC[name]
    ok = nominal + minus <= value <= nominal + plus
    return f"{name:13} {value:7.1f}  allowed {nominal + minus:.1f} to {nominal + plus:.1f}  {'ok' if ok else 'OUT'}"
readings = [("bevel", 23.0), ("bevel", 21.5), ("root_opening", 6.5), ("root_opening", 4.0), ("root_face", 0.5), ("backing_gap", 0.5)]
for name, value in readings:
    print(check(name, value))
t, g, b = 10, 6.0, math.radians(22.5)
area = g * t + t * t * math.tan(b)                      # no root face, before reinforcement
length = 150
mass = area * length * 7.85e-6
print(f"groove area {area:.0f} mm2; weld metal for {length} mm of joint about {mass:.3f} kg before reinforcement")bevel 23.0 allowed 20.0 to 27.5 ok bevel 21.5 allowed 20.0 to 27.5 ok root_opening 6.5 allowed 4.5 to 12.0 ok root_opening 4.0 allowed 4.5 to 12.0 OUT root_face 0.5 allowed 0.0 to 1.0 ok backing_gap 0.5 allowed 0.0 to 1.5 ok groove area 101 mm2; weld metal for 150 mm of joint about 0.119 kg before reinforcement
The check catches what Devon found on his second practice plate: one end of the root opening was 4 mm (5/32 in), below the 4.5 mm (3/16 in) minimum, because a hot tack had pulled the plates together. He broke the tack, reset the gap and tacked again, cooler. The weld metal estimate also shows how little steel a single test plate needs; the time goes into the passes, not the metal.
Preparing practice plates efficiently
Devon will weld about forty practice plates in this course, so he sets up a routine. He cuts a batch of strips on the shear and bevels them on the track torch in one setup, grinds them in a batch, and stores them in pairs with their backing bars, ready to tack. Each pair is marked with a paint stick on the outside face, away from the groove, with a number he records in his practice log along with the position, electrode, current and result. After a few weeks, the log shows him which settings work in each position and which mistakes he keeps making.
Common mistakes
MistakeWelding over oxide or slag left on a cut bevel.
InsteadGrind every bevel to bright metal and clean back from the edge.
MistakeLeaving a gap under the backing bar.
InsteadThe backing must be tight against both plates for the full length.
MistakeSetting the root opening by eye.
InsteadUse a gauge or spacer and check both ends and the middle after tacking.
MistakeTacking the plates to each other inside the groove on a test plate.
InsteadTack to the backing, outside the tested length.
MistakeStarting with the plates dead flat.
InsteadPre-set the plates a few degrees so shrinkage pulls them flat.
Summary and key terms
- The procedure sets the groove type, bevel angle, root face, root opening, backing and their tolerances.
- Bevels may be oxyfuel cut, plasma cut, machined or ground, and must be cleaned to bright metal.
- Low-hydrogen welding needs clean, dry joints free of oil, paint and crayon.
- Backing must be compatible steel, tight to both plates and longer than the groove.
- Run-off tabs keep starts and stops off the part.
- Root opening is the most important detail of a backed groove and is checked after tacking.
- Pre-setting the plates offsets angular distortion.
- Bevel
- An angled edge cut on a member to form part of a groove.
- Root face
- The flat portion at the bottom of a bevel.
- Run-off tab
- A piece of plate attached at the end of a joint so that weld passes can start and stop off the part.
- Angular distortion
- Rotation of the members of a joint caused by uneven shrinkage through the thickness.
- Pre-set
- Positioning members before welding so that shrinkage brings them into alignment.
- Backing bar
- A strip of material under the root of a groove weld that supports and becomes part of the root pass.
Practice problems
Work each problem on paper first, then reveal the answer to check.
A test plate's root opening reads 6.5 mm at one end and 4.0 mm at the other. Is it acceptable to a 6 mm opening with -1.5/+6 mm tolerance?
Show answer
No; 4.0 mm is below the 4.5 mm minimum. Reset the gap.
Why are the plates tacked to the backing rather than to each other in the groove on a test plate?
Show answer
So no tack remains inside the length that will be bend tested.
What does a gap between the backing bar and the plates cause?
Show answer
Slag can run under the root, causing lack of fusion at the bottom of the bevels.
Lesson quiz · 5 questions
Score 60% or more to complete this lesson.
Create a free account to save your progress, take quizzes and earn a certificate.