
WLD-230 · Lesson 5 of 12 · 17 min
Fill and cap passes
Once the root is in, the rest of the groove is filled layer by layer until the weld stands just above the plate surface. The fill passes make up most of the weld metal, and the cap, the final layer, is what the inspector sees first. A welder who lays fill passes carelessly will trap slag between them or leave the sidewalls unfused, and these defects are invisible from the top until a bend test or a radiograph shows them. This lesson covers how a groove is filled: how passes are placed, when to weave and when to run stringers, how to clean between passes, how full to make the groove before the cap, and how to run a cap that meets the visual criteria. It works in the flat and horizontal positions, where the technique is easiest to see; the next four lessons take it to vertical and overhead.
Layers and passes
A layer is one level of weld across the groove. A pass is one bead. Near the root, where the groove is narrow, a layer may be a single pass. Higher up, where the groove is wider, a layer may need two, three or more passes side by side. The procedure often limits how wide a single pass may be, either directly or through limits on weaving, and Hartwell's procedures say that when a layer becomes wider than about 16 mm (5/8 in), it must be split into more than one pass.
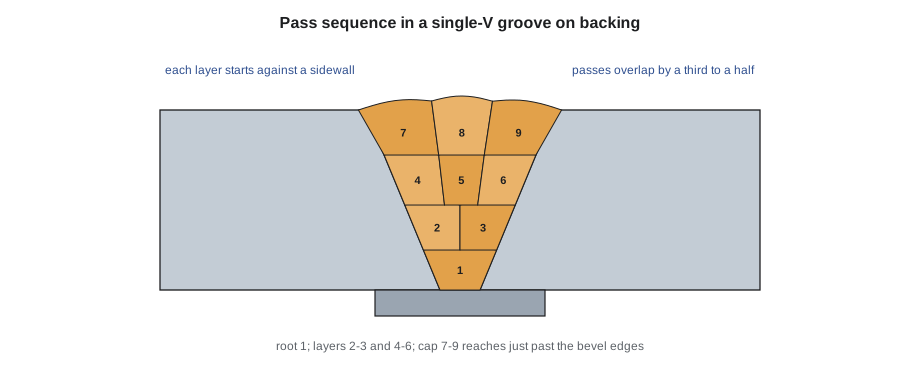
The usual order is to place the first pass of a layer against one sidewall, the next against the other sidewall, and any remaining passes in the middle. A sidewall pass must fuse into the bevel face and into the previous layer, and the arc is aimed slightly toward the sidewall to make sure of it. A middle pass then fills the valley between the two sidewall passes. Each pass overlaps the one beside it by about a third to a half of its width, so that the layer comes out level with no deep valley between beads.
Stringers and weaves
A stringer bead is run straight along the joint with little or no side-to-side motion. A weave bead moves the electrode from side to side as it travels, making a wider bead in one pass. Each has its place.
- Stringers give the best control of fusion and slag, and the lowest heat input. They are used for most fill passes in the flat and horizontal positions and in all positions where the procedure limits heat input.
- Weaves cover a wider area in one pass and are used mainly for vertical-up welding, where a weave helps support the pool, and for caps in some positions. A weave puts more heat into each pass and can trap slag at the sides if the welder does not pause there.
On the CWB-style test plates at the training centres, the usual rule is that all passes are stringers except the vertical cap, which may be woven. Hartwell's training follows the same idea: Devon runs stringers in the flat and horizontal positions and learns the vertical weave in lesson 7.
Cleaning between passes
Every pass leaves slag on top, and every bit of it must be removed before the next pass. Low-hydrogen slag usually lifts off easily with a chipping hammer when the pass is right, and sticks stubbornly when the bead is convex or undercut at the edges. After chipping, the pass is wire brushed. Then Devon looks for three things before he moves on:
- Slag lines along the toes of the beads, where the bead meets the sidewall or the bead beside it. These are removed with the point of the chipping hammer, a needle scaler or a thin grinding disc.
- Convex beads with deep valleys at their edges. These are ground flat, the same as a crowned root.
- Porosity, cracks or holes. These are ground out before the next pass, never welded over.
Marta has a simple test for whether a pass is ready for the next one: if a fingernail drawn across the joint catches anywhere, it is not ready.
Interpass temperature
Each pass heats the plate, and on a small test plate the heat builds up quickly. Many procedures set a maximum interpass temperature, the highest temperature the joint may be at when the next pass starts, and some also set a minimum, equal to the preheat. Too hot a plate makes the pool larger and harder to control, slows the cooling of each pass and can lower the toughness of the weld and heat-affected zone on some steels. On Devon's test procedure, the maximum interpass temperature is 250 °C (500 °F), which a small plate can reach after four or five passes run back to back. He checks with a temperature-indicating crayon or a contact thermometer before each pass, measured on the plate about 25 mm (1 in) from the joint, and lets the plate cool in air if it is too hot. Quenching a test plate in water to cool it is not allowed by the test rules, and it can crack the weld.
How full before the cap
The fill passes bring the weld up to just below the plate surface. A common guide is to stop the fill when the groove is filled to about 1 to 1.5 mm (1/32 to 1/16 in) below the surface, with the original bevel edges still visible along both sides. The visible edges are the welder's guide for the cap: the cap must fuse into them and extend just past them. If the fill is too low, the cap must be too tall or the welder must add another layer; if it is too high, the cap has nothing to follow and comes out too wide and too high.
The cap
The cap is the final layer. Its job is to fill the groove flush or slightly above the plate, fuse into both plate surfaces just past the bevel edges, and leave a smooth surface with no undercut, overlap or sharp notches at the toes. On plate in the flat position, Devon runs the cap as two or three overlapping stringers, starting at one edge. Each edge pass is aimed so that it melts the bevel edge and wets about 1.5 to 2 mm (1/16 in) onto the plate surface, and the pass is run fast enough not to pile up.
The test standards set visual limits on the cap, and Lucia uses the same limits for Devon's practice plates:
| Feature | Limit used at Hartwell for test and practice plates |
|---|---|
| Cracks | None of any size |
| Reinforcement height | No more than 3 mm (1/8 in) above the plate |
| Cap width | No more than about 3 mm (1/8 in) past each original bevel edge |
| Undercut | No more than 1 mm (1/32 in) deep |
| Craters | Filled to the full cross-section of the weld |
| Fusion | Complete fusion to both plates along the full length |
| Porosity | No visible porosity on test plates |
Planning the passes
Knowing how many passes a joint will take helps the welder plan the work and keeps the passes the right size. The calculation divides the groove into layers, works out the width of each, and splits any layer wider than the limit.
# Pass plan for a single-V groove on backing: layers, passes, weld metal and electrodes
import math
def plan(t, gap=6, bevel=22.5, layer=3.0, max_width=16, dep=0.02, length=150, rho=7.85e-6):
    tb = math.tan(math.radians(bevel))
    depth, n_layers, passes = 0.0, 0, []
    while depth < t - 1e-9:
        top = min(depth + layer, t)
        width = gap + 2 * top * tb
        n = max(1, math.ceil(width / max_width))
        passes.append(n); depth = top; n_layers += 1
    cap_w = gap + 2 * t * tb + 2 * 1.5
    cap = max(1, math.ceil(cap_w / max_width))
    area = gap * t + t * t * tb + (2 / 3) * cap_w * 2
    mass = area * length * rho
    return n_layers, passes, cap, mass, math.ceil(mass / dep)
for t in [10, 16, 25]:
    nl, p, cap, mass, elec = plan(t)
print(f"plate {t} mm: {nl} fill layers with passes {p}, cap {cap} passes; total {sum(p) + cap} passes, {mass:.3f} kg, about {elec} electrodes for {150} mm")plate 10 mm: 4 fill layers with passes [1, 1, 1, 1], cap 2 passes; total 6 passes, 0.147 kg, about 8 electrodes for 150 mm plate 16 mm: 6 fill layers with passes [1, 1, 1, 1, 2, 2], cap 2 passes; total 10 passes, 0.273 kg, about 14 electrodes for 150 mm plate 25 mm: 9 fill layers with passes [1, 1, 1, 1, 2, 2, 2, 2, 2], cap 2 passes; total 16 passes, 0.528 kg, about 27 electrodes for 150 mm
The plan for the test plate is close to what Devon actually runs: the root and two or three more single-pass layers, then a two-pass cap, seven or eight electrodes in all. On 25 mm (1 in) plate the same groove takes between three and four times the weld metal and about three times as many passes, which is why thick test plates take a whole morning. The model is simple and assumes even layers; in practice the welder splits layers by eye, using the procedure's width limit as the rule.
Horizontal groove welds
In the horizontal position, 2G, the plates stand vertically and the weld runs across them. Gravity pulls the pool down onto the lower plate, so the groove is often prepared with the bevel only on the upper plate, or with a larger bevel on the upper plate, and the passes are stacked as stringers from the bottom up. Each pass is run with the electrode pointed slightly upward, about 5 to 15 degrees above horizontal, and aimed at the upper toe of the previous pass, so that the new bead sits on top of the last one like a brick on a wall. Weaving is avoided, because a woven pool in the horizontal position sags onto the lower plate and undercuts the upper one. The cap is also stacked stringers, with the last, top pass run a little faster and with a slightly lower angle so that it does not undercut the upper plate. Devon finds 2G easier than he expected, because each pass has the previous one to sit on.
Restarts and tie-ins in fill passes
Fill passes have restarts too, and on a production joint they are almost as important as root restarts. The same method applies: chip and brush the crater, start ahead of it, move back to remelt it, and then continue. On a layer of two or more passes, the restarts of neighbouring passes should not line up across the joint, because a column of restarts stacked on top of each other concentrates any small defects in one place. Devon staggers his restarts by at least 25 mm (1 in) from those in the layer below and in the pass beside.
Where a pass ends at a run-off tab, the arc is carried onto the tab and broken there, so that the crater is off the part. Where it ends at the end of a production joint with no tab, the welder turns the electrode back over the bead to fill the crater, and the end of the joint is ground and checked. On the test plates, the first and last 25 mm (1 in) or so of the plate are cut off before the specimens are taken, which is one reason the starts and stops on a test plate are less risky than the restarts in the middle.
Some test procedures require a tie-in in the middle of the plate: the welder must stop and restart at least once in the tested length, so that the examiner can see whether the welder can make a sound restart. Marta has Devon practise deliberate tie-ins in the middle of every practice plate from week three on, so that restarting is routine by the time he tests.
Common fill and cap defects
| Defect | Where it shows | Usual cause |
|---|---|---|
| Slag between passes | Bend test, radiograph | Poor cleaning, convex beads, valleys left at the toes |
| Lack of sidewall fusion | Bend test opening along the bevel line | Arc not aimed at the sidewall, current too low, pass too wide |
| Undercut at the cap toe | Visual | Current too high, travel too fast at the edge, wrong angle |
| Excess reinforcement | Visual | Fill too high, cap passes too slow |
| Underfill | Visual | Fill too low, too few cap passes |
| Overlap | Visual, at the cap toe | Travel too slow, current too low, pool rolling over cold plate |
Common mistakes
MistakeStarting a layer in the middle of the groove.
InsteadPlace sidewall passes first, then fill the middle.
MistakeRunning one wide weave to fill a layer.
InsteadSplit layers wider than about 16 mm (5/8 in) into stringers.
MistakeWelding over slag or porosity.
InsteadClean every pass; grind out defects before the next pass.
MistakeFilling the groove proud before the cap.
InsteadStop the fill about 1 to 1.5 mm (1/32 to 1/16 in) below the surface, with the bevel edges visible.
MistakeCooling a test plate in water.
InsteadLet it cool in air; quenching is not allowed and can crack the weld.
Summary and key terms
- A layer may be one pass or several; split layers wider than the procedure allows.
- Place sidewall passes first, overlapping each pass by a third to a half.
- Use stringers for most passes; weave mainly for vertical caps.
- Clean every pass and grind convex beads and defects.
- Check interpass temperature before each pass.
- Leave the bevel edges visible for the cap, and keep the cap within the visual limits.
- Layer
- One level of weld metal across a groove, made of one or more passes.
- Stringer bead
- A bead made with little or no side-to-side motion.
- Weave bead
- A bead made with a side-to-side motion of the electrode.
- Interpass temperature
- The temperature of the weld area when the next pass is started.
- Cap
- The final layer of a groove weld.
- Underfill
- A weld face or root surface below the adjacent base metal surface.
- Overlap
- Weld metal that has flowed over the base metal surface without fusing.
Practice problems
Work each problem on paper first, then reveal the answer to check.
A layer in a groove is 18 mm wide. How many passes should it have under a 16 mm rule?
Show answer
Two.
The plate reads 280 C before the next pass on a 250 C maximum. What should the welder do?
Show answer
Wait for it to cool in air, then check again.
How far below the plate surface should the fill stop before the cap?
Show answer
About 1 to 1.5 mm, with the bevel edges visible.
Lesson quiz · 5 questions
Score 60% or more to complete this lesson.
Create a free account to save your progress, take quizzes and earn a certificate.