
WLD-230 · Lesson 3 of 12 · 16 min
Root passes on plate with backing
The root pass is the most important pass in a groove weld. It is the first metal in the joint, it has to fuse three surfaces at once, the bottom of each bevel and the backing bar, and every pass after it is laid on top of it. If the root is good, a careful welder can usually make the rest of the joint good. If the root has lack of fusion at a corner or slag trapped along one side, nothing done on top will fix it, and on a bend test the root side is where the specimen will open. This lesson covers the root pass on a backed groove in the flat position, which is where Devon starts, before the same pass is moved to vertical and overhead.
What the root has to do
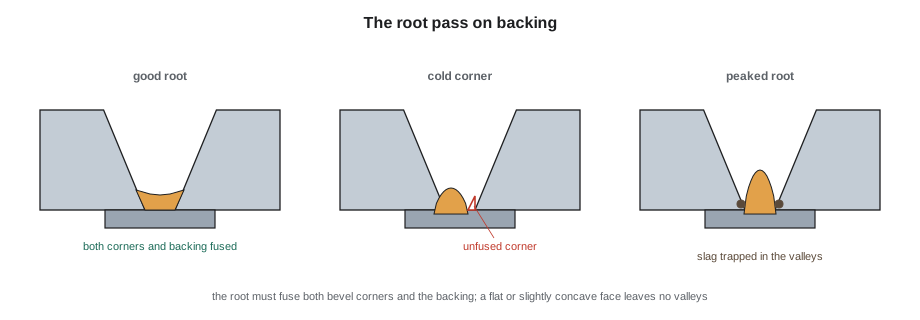
In a single-V groove on backing with a 6 mm (1/4 in) root opening and no root face, the root pass sits in a narrow channel with the backing as its floor and the two bevel edges as its walls. It must melt into the backing for the full width of the opening and fuse into the bottom corner of each bevel. The two bottom corners are the hard part. They are deep in the groove, the arc tends to jump to the nearest sidewall rather than reach into the corner, and slag from the electrode collects there if the pool does not wash it out. A root that is fused to the backing in the middle and not at the corners looks fine from above and fails at the first bend.
Electrode and current
For backed groove welds in plate, Hartwell uses a 3.2 mm (1/8 in) E4918-H4 (7018-H4) low-hydrogen electrode for the root and usually for the fill and cap as well. On thicker plate in the flat position, the fill may go to a 4.0 mm (5/32 in) electrode. The electrodes come from the holding oven, and Devon takes out only what he can use within the exposure limit from the first SMAW course.
In the flat position, Devon starts the root at about 120 A and adjusts from there. The current needs to be high enough for the arc to dig into the backing and corners, but not so high that the pool becomes too fluid to control or the electrode overheats in the second half of its length. The current is set by the bead, not by the number on the dial: Marta has him run a short bead on the run-off tab, look at the shape and the sound, and correct it before he moves onto the joint.
| Electrode | Flat | Horizontal | Vertical up | Overhead |
|---|---|---|---|---|
| 3.2 mm (1/8 in) | 110-140 A | 105-135 A | 95-120 A | 100-125 A |
| 4.0 mm (5/32 in) | 140-180 A | 135-170 A | 120-155 A | 125-160 A |
Angles and arc length
For the root on backing, the electrode is held with a work angle of 90 degrees to the plate, square across the groove, so that the arc reaches both bevels equally. The travel angle is a drag of about 5 to 15 degrees, the electrode leaning back toward the finished weld. A steeper drag pushes the pool ahead of the arc and puts slag in front of it; less drag keeps the arc digging into the backing.
The arc is kept short, about the diameter of the core wire or less, which with a low-hydrogen electrode means the coating is almost touching the work. A long arc with E4918 (7018) lets air into the arc and causes porosity, especially at the start, and spreads the heat so that the arc no longer reaches the corners. In a narrow root, Devon can rest the coating lightly on the bevel edges and drag the electrode along, which keeps the arc length constant without effort.
Stringer or slight weave
With a 6 mm (1/4 in) root opening and a 3.2 mm (1/8 in) electrode, the root can be made as a single pass with a slight side-to-side motion, pausing at each side just long enough to wash the pool into the corner, or as two stringer beads, one against each bevel. Marta teaches the single pass first, because it is the way most welders run a test root, and the two-bead method for wider openings, where a single bead would have to weave too far.
The motion in the single-pass root is small, no wider than the root opening. The electrode moves to one corner, holds for a fraction of a second while the pool wets the corner and the backing, crosses quickly to the other corner, holds, and returns. The pauses at the sides do the work; the crossing is quick so that the middle of the bead does not build up. Done right, the root comes out flat or slightly concave across its face, with smooth fusion lines at both sidewalls.
Watching the pool
The welder reads the root by watching the pool through the lens. A good root pool on backing has a bright, fluid leading edge that wets both bevel faces, with the slag running behind it. If the slag runs forward of the arc, or the pool looks dull and stiff at one side, the arc is not reaching that side. If the pool grows wide and starts to sag behind the electrode, the current is too high or the travel too slow. Devon learns to watch the corners rather than the arc, because the corners are where the root fails.
Starts, stops and restarts
Each 3.2 mm (1/8 in) electrode runs about 150 to 200 mm (6 to 8 in) of root bead in this joint, so a root on a production joint needs several restarts, and even a 150 mm (6 in) test plate may need one. Each start and stop is a chance for a defect: porosity at a cold start, a crater crack at a stop, or slag trapped where the new bead laps over the old one.
- Start on the run-off tab, or about 10 to 15 mm (1/2 in) ahead of the end of the previous bead, then move back over the crater and continue forward once the pool is established. This preheats the start and remelts the crater.
- Stop by shortening the arc and moving back over the bead a short distance before breaking the arc, so the crater fills.
- Before restarting, chip the slag from the crater and grind the crater to a taper, so that the new bead fuses into sound metal rather than over a pocket of slag.
Low-hydrogen electrodes are prone to porosity at the start if they are struck on the work and immediately run, because the coating has not built up its gas shield. Starting ahead and backing up keeps the first few millimetres of bead, the part most likely to be porous, inside metal that is remelted.
Cleaning the root
After the root pass, the slag is chipped off and the bead is cleaned with a wire wheel or a power brush. Then Devon looks at the shape of the bead. If it is flat or slightly concave and fused smoothly into both bevels, he moves on to the fill. If it is convex, with a crown in the middle and valleys at the sides, he grinds the crown down until the valleys are open. A valley next to the sidewall is where slag from the next pass gets trapped, and it is too deep and narrow for the next pass to fuse into. Grinding the root is normal on test plates and on critical production joints; it costs a minute and saves a failed bend.
The root should also be checked from the back on a practice plate, by knocking off the backing bar after the plate is finished or by cutting a section. The underside shows whether the root fused into the backing across its full width. On a production joint the backing stays and cannot be inspected, which is why the procedure, the fit-up and the welder's technique all have to be right the first time.
How many electrodes a pass takes
Knowing how much metal each pass needs helps the welder plan restarts and keeps the electrodes from sitting out of the oven longer than they should. The deposited metal per electrode depends on its size, its coating and how much stub is left.
# Root and hot pass on a backed groove: electrodes needed and restarts
import math
T, GAP, LENGTH = 10, 6, 600           # plate, root opening, joint length (mm)
DEP = {"3.2 mm": 0.020, "4.0 mm": 0.032}                                  # deposited metal per electrode, kg (illustrative)
RUN = 175                                  # bead length per electrode, mm (typical for a root)
RHO = 7.85e-6
def layer_area(depth_from, depth_to, bevel=22.5):
    # area of the groove between two depths measured up from the backing
    tb = math.tan(math.radians(bevel))
    w0 = GAP + 2 * depth_from * tb; w1 = GAP + 2 * depth_to * tb
    return (w0 + w1) / 2 * (depth_to - depth_from)
root = layer_area(0, 3.5)
mass = root * LENGTH * RHO
for size, dep in DEP.items():
    n = mass / dep
    print(f"root layer {root:.0f} mm2 x {LENGTH} mm: {mass:.3f} kg -> about {math.ceil(n)} electrodes of {size}")
print(f"at about {RUN} mm of bead per electrode, the root needs {math.ceil(LENGTH / RUN) - 1} restart(s) on this joint")root layer 26 mm2 x 600 mm: 0.123 kg -> about 7 electrodes of 3.2 mm root layer 26 mm2 x 600 mm: 0.123 kg -> about 4 electrodes of 4.0 mm at about 175 mm of bead per electrode, the root needs 3 restart(s) on this joint
For the 600 mm (24 in) column splice flange Devon will weld later, the root layer alone takes about seven 3.2 mm (1/8 in) electrodes and three restarts. On a joint that long, Marta has him plan where the restarts fall, so that none lands at the end of the joint or at a tack.
Tack welds in the root
On production joints, tack welds are often placed in the root of the groove and become part of the root pass. When the root reaches a tack, the welder must fuse it completely: the tack's ends are ground to a taper before welding, and the arc is held a moment longer at the start and end of the tack so that the pool melts through it into the backing. A tack that is simply welded over leaves cold edges inside the root. On the test plates, there are no tacks in the tested length, but Devon practises welding through tapered tacks on scrap plate, because it is part of every production root.
Common root defects and their causes
| Defect | What it looks like | Usual cause |
|---|---|---|
| Lack of fusion at a corner | A dark line at the bottom of a bevel on a bend or etch | Root opening too tight, arc not reaching the corner, too little pause at the side |
| Slag along the sidewall | A line of slag at the toe of the root, found by the next pass or the bend | Convex root with deep valleys, poor cleaning, drag angle too steep |
| Porosity at a start | A cluster of pores at the beginning of a bead | Long arc at the start, no backing up over the start, damp electrode |
| Crater crack | A short crack at the end of a bead | Arc broken at the end without filling the crater |
| Unfused backing | Backing comes away clean when knocked off | Current too low, travel too fast, gap between backing and plates |
Devon's first eight practice roots are a mixed bag. Two have a cold corner on the right side, because he is right-handed and drifts toward the left bevel; two have porosity at the start; one has a crater crack where he broke the arc too quickly. By the end of the second week, after deliberately pausing longer on the right and starting every bead ahead and backing up, he has six good roots in a row, checked by knocking off the backing and by cutting one plate and etching the section.
Common mistakes
MistakeWeaving wide in the root.
InsteadKeep the motion no wider than the root opening and pause at the sides.
MistakeRunning a long arc with a low-hydrogen electrode.
InsteadKeep the arc about the core diameter or shorter.
MistakeLeaving a crowned root with deep valleys.
InsteadGrind the crown so the valleys are open before the next pass.
MistakeBreaking the arc at the end of a bead.
InsteadBack up over the bead to fill the crater before breaking the arc.
MistakeWelding over a tack without preparing it.
InsteadTaper the ends of tacks and fuse them completely.
Summary and key terms
- The root must fuse the backing and both bevel corners.
- Use low-hydrogen electrodes from the oven, at a current set by the bead on a run-off tab.
- Hold a 90 degree work angle, a slight drag and a short arc.
- Pause at the sides and cross quickly to keep the root flat.
- Start ahead and back up; fill craters; grind restarts to a taper.
- Grind convex roots so the next pass has no valleys to trap slag.
- Root pass
- The first pass of a groove weld, deposited at the root of the joint.
- Cold corner
- Lack of fusion at the bottom corner of a bevel in the root of a groove.
- Drag angle
- A travel angle with the electrode leaning back toward the completed weld.
- Crater
- The depression left at the end of a weld bead when the arc is broken.
- Restart
- The point where a new electrode continues a bead that was stopped.
Practice problems
Work each problem on paper first, then reveal the answer to check.
A root bead is crowned with valleys at both sides. What should be done before the next pass?
Show answer
Grind the crown down until the valleys are open.
Where should a restart on a root be struck?
Show answer
About 10 to 15 mm ahead of the crater, then moved back over it.
Why does a right-handed welder often leave a cold corner on one side?
Show answer
The hand drifts toward one bevel; pause longer on the other side to compensate.
Lesson quiz · 5 questions
Score 60% or more to complete this lesson.
Create a free account to save your progress, take quizzes and earn a certificate.