
WLD-210 · Lesson 11 of 12 · 16 min
All-position fillet and groove welds with GMAW and FCAW
The Riverside girders cannot all be welded flat. The bearing stiffeners are welded to the web vertically, the bottom flange splice plates have overhead welds when the girder is set on its supports for trial assembly, and the field splices on the bridge will be welded wherever they end up. Welders are qualified by position, and a welder's value to a shop grows with each position they can weld to code. This lesson brings together everything in the course to make fillet and groove welds in all positions with gas-shielded flux-cored wire and pulsed solid wire: the position names, joint preparation, backing and back-gouging, settings and techniques for each position, multipass sequences, and the cleaning and inspection between passes. It is the preparation for Devon's first welder qualification tests with flux-cored wire.
Welding positions
Welding positions are named by a number and a letter. The number is the position: 1 flat, 2 horizontal, 3 vertical, 4 overhead. The letter is the joint: F for fillet, G for groove. Pipe adds positions 5G (pipe horizontal and fixed, welded around in all positions), 6G (pipe fixed at 45 degrees) and others covered in the pipe welding course. Welder qualification tests in plate usually qualify the welder for the position tested and some easier ones; a groove test in the vertical and overhead positions together generally qualifies for all plate positions in grooves and fillets, within limits set by the code.
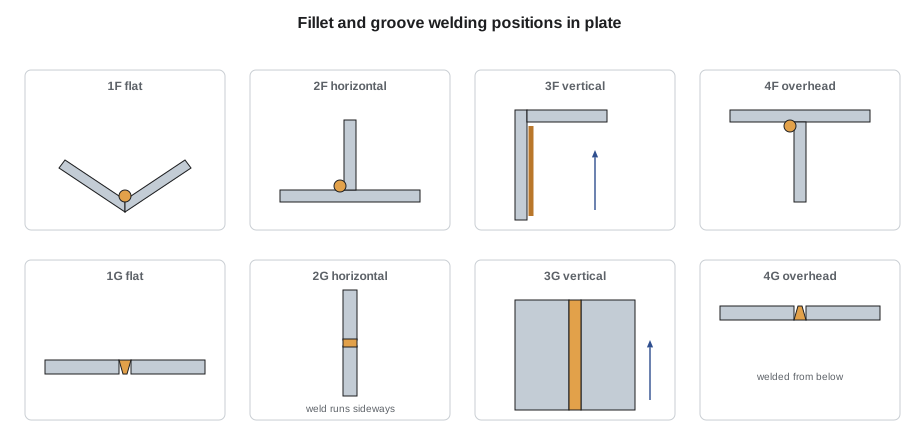
Preparing groove joints
A complete joint penetration groove weld fuses through the full thickness of the plate. For plate over a few millimetres thick, the edges are bevelled to give the arc access to the root. A single-V or single-bevel groove has a typical included angle of 30 to 60 degrees and a root opening of a few millimetres; thicker plate uses double-V or double-bevel grooves welded from both sides, which use about half the weld metal and balance the distortion. The procedure gives the groove angle, root opening and root face with tolerances, and the fitter must hit them: a root opening that is too tight gives incomplete penetration, and one that is too wide gives burn-through and extra weld metal.
There are three common ways to make the root of a groove weld sound:
- Steel backing: a bar tacked behind the root opening. The root pass fuses into the backing, which stays on unless the drawing calls for its removal. Backing must be continuous or joined with a complete penetration weld, fit tightly, and be of weldable steel.
- Ceramic backing: a ceramic tile strip on an aluminum foil tape behind the joint. It holds the root pool and shapes the back bead, and it is removed after welding. It is popular for one-sided flux-cored roots where steel backing is not wanted.
- Back-gouging: weld one side, then gouge or grind out the root from the other side to sound metal and weld that side. This is standard for double-sided grooves on the Riverside girder flange splices. The gouged groove is inspected, often by magnetic particle testing, before welding.
Before tacking, Devon checks the bevels are clean and bright for at least 25 mm (1 in) back from the joint on both faces, with no mill scale, rust, paint, oil or moisture, and with any cut surfaces ground smooth of notches and slag.
Settings by position
The same wire runs at different settings in different positions. In the flat and horizontal positions, the pool can be large, so the current can be high. Vertically and overhead, gravity pulls the pool out of the joint, so the current is lowered to keep it small, and the welder relies on the slag shelf of a T1 wire, or on a pulse program with solid wire, to hold it. The table shows the kind of ranges Hartwell's procedures give for 1.2 mm (0.045 in) T1 gas-shielded wire with a 75 and 25 mix.
| Position | Current | Voltage | Technique |
|---|---|---|---|
| Flat (1F, 1G) | 220 to 280 A | 25 to 28 V | Stringers or slight weave, drag 5 to 15 degrees |
| Horizontal (2F, 2G) | 200 to 260 A | 24 to 27 V | Stringers stacked from the bottom, drag, aim slightly up |
| Vertical up (3F, 3G) | 170 to 210 A | 23 to 25 V | Weave with pauses at the toes, gun 0 to 10 degrees up |
| Overhead (4F, 4G) | 180 to 220 A | 23 to 26 V | Stringers, small pool, slight drag, fast travel |
# Choose a starting setting by position and check it against the procedure range
wps = {  # position: (min amps, max amps, min volts, max volts)
    "flat": (220, 280, 25, 28), "horizontal": (200, 260, 24, 27),
    "vertical up": (170, 210, 23, 25), "overhead": (180, 220, 23, 26),
}
def start(pos):
    lo, hi, vlo, vhi = wps[pos]
    amps = lo + 0.4 * (hi - lo)      # start in the lower half of the range
    volts = vlo + 0.4 * (vhi - vlo)
    return round(amps), round(volts, 1)
for pos in wps:
    a, v = start(pos)
    wfs = 0.034 * a                    # rough wire speed for this wire, m/min
print(f"{pos:11} start near {a} A, {v} V, wire speed about {wfs:.1f} m/min")flat start near 244 A, 26.2 V, wire speed about 8.3 m/min horizontal start near 224 A, 25.2 V, wire speed about 7.6 m/min vertical up start near 186 A, 23.8 V, wire speed about 6.3 m/min overhead start near 196 A, 24.2 V, wire speed about 6.7 m/min
Fillets in all positions
- Flat fillets (1F): aim the wire into the root at a 45 degree work angle with a drag; a single pass can be large. Watch for a convex bead at too low a voltage.
- Horizontal fillets (2F): lower the work angle to about 40 degrees, toward the horizontal plate, and aim the wire slightly onto the bottom plate so the pool does not sag; larger fillets are made in several stringer passes, the first in the root, then a bottom pass, then a top pass overlapping it.
- Vertical-up fillets (3F): weld from the bottom up with a triangle or side-to-side weave, pausing briefly at each toe to fill the edge and prevent undercut, and moving quickly across the middle. The slag shelf should form just below the arc. Point the gun slightly up.
- Overhead fillets (4F): use stringers, a small pool and a little higher travel speed than in flat; let each pass freeze before running the next beside it. Stand to the side, out from under the arc, and wear a cap and fire-resistant collar.
Grooves in all positions
Groove welds are built up in passes: a root pass, hot or second pass, fill passes and cap passes. The root pass must fuse both root faces and the backing; it is the pass most likely to have lack of fusion or slag at its edges. The fill passes are placed so each one ties into the sidewall and the previous pass; the cap is wide enough to cover the groove edges by about 1.5 to 3 mm (1/16 to 1/8 in) on each side, with smooth toes and reinforcement within the code limit.
- Flat grooves (1G): root with a narrow weave between the bevels, then layers of stringers or weaves split into two or three beads per layer as the groove widens. Wide weaves in flat position raise heat input; split layers keep it within limits.
- Horizontal grooves (2G): build up with stringers stacked from the bottom bevel upward, each one overlapping the one below about half its width, so the lower bead supports the upper. Aim slightly upward.
- Vertical grooves (3G): weave between the sidewalls with pauses at each, keeping the pool flat or slightly concave. Each layer covers the full width of the groove until the groove is too wide to weave in one pass.
- Overhead grooves (4G): stringers with a small pool, placed to tie into each sidewall, with careful cleaning between passes.
# Single-V groove with backing: weld metal and an estimate of passes (illustrative)
import math
t = 25                 # plate thickness, mm
angle = 45              # included groove angle, degrees (22.5 per side)
root = 6              # root opening, mm
reinf = 2            # cap reinforcement height, mm
cap_w = 2 * t * math.tan(math.radians(angle / 2)) + root + 3      # cap width
area = t * root + t ** 2 * math.tan(math.radians(angle / 2)) + 2 / 3 * cap_w * reinf
per_pass = {"flat": 40, "vertical up": 55, "overhead": 25}    # typical bead area per pass, mm2
print(f"groove area about {area:.0f} mm2; weld metal {area * 0.00785:.2f} kg per m")
for pos, a in per_pass.items():
print(f" {pos:12} about {math.ceil(area / a):2} passes")groove area about 448 mm2; weld metal 3.52 kg per m flat about 12 passes vertical up about 9 passes overhead about 18 passes
The estimate shows why vertical-up flux-cored welding is so productive: each weave pass fills more of the groove than a flat stringer, while overhead passes must be small. The number of passes is only a starting point for planning; the WPS limits on bead width and thickness govern.
Starts, stops and craters
A wire process starts and stops more cleanly than stick, but starts and stops are still where defects collect. At the start, the plate is cold and the arc needs a moment to establish penetration, so welders start a little ahead of the beginning, or on the end of the previous bead, and move back. At the stop, the crater must be filled: on a constant-voltage machine, the welder pauses or reverses briefly before releasing the trigger, and many machines have a crater-fill setting that lowers wire speed and voltage at the end. An unfilled crater on a T1 weld often has a crater crack. Restarts on multipass welds are staggered so that they do not line up through the thickness of the weld.
Cleaning and inspection between passes
Lucia's rule for multipass flux-cored welds: every pass is inspected before it is buried. Slag is removed completely, including from the toes and the corners where the bead meets the sidewall. Any convex or peaked bead that would trap slag is ground to a smooth profile. Porosity, cracks, undercut at the sidewall and unfused spots are ground out before the next pass. The interpass temperature is checked against the procedure. On the Riverside girder splices, the root of the first side and the back-gouged root of the second side are also checked by magnetic particle testing.
For multipass welds with solid or metal-cored wire, the silicon islands on each bead must also be removed before the next pass when they are large, because they can cause lack of fusion if the next pass is laid over them.
Practising for qualification
Devon practises on test plates with backing in the shop's qualification booth: 10 mm (3/8 in) plate in the vertical and overhead positions first, because those are the ones he will be tested in, then 25 mm (1 in) plate for the procedure work on the girders. Each practice plate is cut into strips and bent around a mandrel in the shop's bend tester. The first ones open up at the root with small slag lines; by the end of the week the bends are clean. Marta makes him keep the broken strips; she says the bad ones teach more than the good ones.
# Evaluate practice bend strips: largest opening on the convex surface against a limit
limit = 3.0                       # largest allowed open discontinuity, mm (illustrative)
strips = {"face 1": 0.0, "face 2": 1.0, "root 1": 2.5, "root 2": 4.0}   # largest opening seen, mm
for name, opening in strips.items():
    status = "pass" if opening <= limit else "FAIL"
    print(f"{name}: largest opening {opening} mm -> {status}")
print("plate result:", "pass" if all(v <= limit for v in strips.values()) else "fail")face 1: largest opening 0.0 mm -> pass face 2: largest opening 1.0 mm -> pass root 1: largest opening 2.5 mm -> pass root 2: largest opening 4.0 mm -> FAIL plate result: fail
Common mistakes
MistakeRunning flat-position current in vertical up.
InsteadLower the current and use a weave so the slag shelf can hold the pool.
MistakeWeaving wide in the flat position to fill a groove quickly.
InsteadSplit wide layers into stringers to control heat input and slag.
MistakeBurying a pass with slag in the toes.
InsteadClean and inspect every pass before covering it.
MistakeReleasing the trigger at the end of a bead without filling the crater.
InsteadPause or use crater fill; unfilled craters crack.
MistakeLining up restarts through the thickness of a multipass weld.
InsteadStagger starts and stops.
Summary and key terms
- Positions are named 1 to 4 for flat, horizontal, vertical and overhead, with F for fillet and G for groove.
- Groove joints need correct bevels, root opening and root face, and a sound root by backing, ceramic backing or back-gouging.
- Current is lowered vertically and overhead; T1 slag or pulse holds the pool.
- Vertical-up welds use a weave with pauses at the toes; overhead welds use small stringers.
- Grooves are built up in passes that each tie into the sidewalls and the previous pass.
- Craters are filled, restarts staggered, and every pass cleaned and inspected before it is covered.
- 1F, 2F, 3F, 4F
- Fillet welds in the flat, horizontal, vertical and overhead positions.
- 1G, 2G, 3G, 4G
- Groove welds in the flat, horizontal, vertical and overhead positions.
- Complete joint penetration
- A groove weld that fuses through the full thickness of the joint.
- Backing
- Material behind the root that supports the root pass.
- Back-gouging
- Removing the root of a weld from the second side to sound metal before welding that side.
- Slag shelf
- Frozen slag just below the arc that supports the pool in vertical-up welding.
- Crater fill
- A setting or technique that fills the crater at the end of a bead.
Practice problems
Work each problem on paper first, then reveal the answer to check.
What does 3G mean?
Show answer
A groove weld in the vertical position.
A 25 mm single-V groove needs about 450 mm² of weld metal. About how many vertical-up passes at 55 mm² each?
Show answer
450 / 55 ≈ 8.2, so about 9 passes.
Why are horizontal groove beads stacked from the bottom?
Show answer
Each lower bead supports the one above it.
Lesson quiz · 5 questions
Score 60% or more to complete this lesson.
Create a free account to save your progress, take quizzes and earn a certificate.