
SMW-120 · Lesson 8 of 12 · 13 min
Rectangular elbows
Rectangular duct turns corners too, and its elbows are built differently from round ones. A rectangular elbow is made of four parts: two flat sides called cheeks, which carry the shape of the turn, and two curved or flat strips called the throat and the heel, which wrap around the inside and outside of the turn. The cheeks are flat patterns drawn with arcs or straight lines; the throat and heel are strips developed by the parallel line method, because their surfaces are made of straight element lines running across the duct. This lesson develops the two common types, the radius elbow and the square-throat elbow, and the mitred rectangular elbow, and shows how one drawing of the cheek gives every dimension the shop needs.
Names and orientation
A rectangular duct is described by its width and depth, and an elbow turns in the plane of one or the other. The dimension that lies in the plane of the turn, across the cheek from throat to heel, is the width of the elbow for pattern purposes. The other dimension, across the throat and heel strips, is the depth. Shop drawings show which way an elbow turns with a symbol or a note, and Lin always wrote the turn plane on the fitting tag, because a 600 × 400 (24 × 16) elbow that turns across its 600 side is a very different fitting from one that turns across its 400 side.
An elbow that turns across the wider dimension is sometimes called a hard bend, and one that turns across the narrower dimension an easy bend. The names come from how hard the elbow is on the air: a hard bend has a deep cheek and a sharper ratio of radius to width, so it loses more pressure. The pattern maker does not choose which, but must read it correctly.
The radius elbow
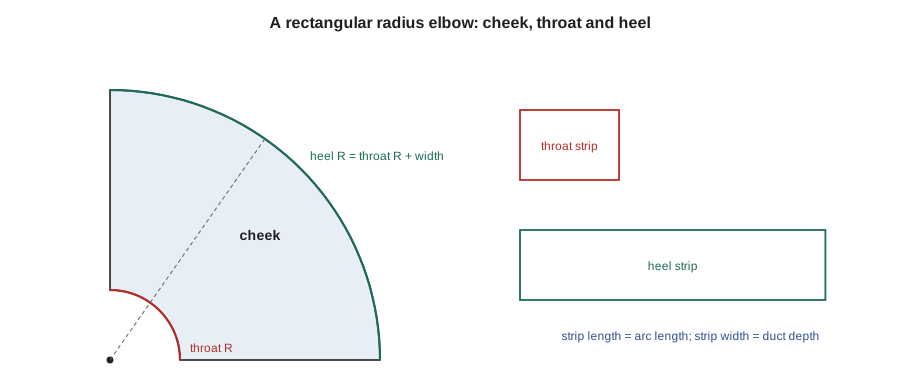
A radius elbow has a curved throat and a curved heel, both arcs centred on the same point, the centre of the turn. Its cheek is a flat ring segment, an annular sector, bounded by the throat arc, the heel arc and the two straight ends. Its throat and heel are strips the depth of the duct and as long as the arcs they wrap. The elbow is defined by its width W, its depth, its turn angle θ and its throat radius or centreline radius. The heel radius is the throat radius plus the width; the centreline radius is the throat radius plus half the width.
Specifications usually set the minimum radius. A common requirement for rectangular elbows without turning vanes is a centreline radius at least equal to the width in the plane of the turn, which gives a ratio of centreline radius to width of 1.0 or more; tighter elbows need splitter vanes. Lin's Ashgrove drawings showed radius elbows with a throat radius of 150 mm (6 in) on the 400 mm (16 in) side ducts, with splitter vanes noted on two tight ones near the rooftop units.
Drawing the cheek
The cheek pattern is laid out directly on the sheet. Mark the centre of the turn and draw two straight lines from it at the turn angle; for a 90-degree elbow they are at right angles. With trammels from the centre, swing the throat arc at the throat radius and the heel arc at the heel radius. If the elbow has straight extensions, called tangents or extensions, at its ends, draw them as straight lines continuing from the arcs, square to the end lines. The cheek is the area bounded by the two arcs, the two end lines and any extensions. Two cheeks are needed, a left and a right, and they are mirror images, so the second is either traced from the first turned over or laid out mirrored on the same sheet.
Along the curved edges, the cheek needs an allowance for the seam that joins it to the throat and heel. On Keelson's duct, the cheeks carried the single flange edge and the throat and heel carried the Pittsburgh pocket, or the reverse depending on the machine, and on a curved edge the flange has to be formed by hand or on a curved-edge machine because a straight lock former cannot follow an arc. The allowance is laid out as a band of constant width outside the net arcs, swung from the same centre at the throat radius minus the allowance and the heel radius plus the allowance.
Developing the throat and heel
The throat and heel are parts of cylinders: their element lines are straight lines running across the depth of the duct, parallel to the axis of the turn. So their patterns are parallel line developments, and because the cylinders are cut square by the cheeks, each develops into a plain rectangle. Its width is the depth of the duct; its length is the arc length of the throat or heel, plus the straight extensions.
Which radius goes into the arc length depends on how the throat and heel join the cheeks. If they sit inside the cheek flanges, their length is measured on the net arcs of the cheek. If the metal is heavy or the seam wraps around, the length is taken at the mean of the metal, the same mean-dimension rule as for round pipe, and the shop's allowance chart says which. For light duct gauges the difference is small: on a 90-degree heel of 550 mm (22 in) radius, a 1 mm (1/32 in) change in radius changes the strip length by only about 1.6 mm (1/16 in). But for heavy gauge, a stainless grease duct or a wide architectural elbow, it matters.
The script lays out a radius elbow from its width, throat radius, turn and extensions, and prints the radii for the cheek, the lengths of the throat and heel strips, and the ratio of centreline radius to width so it can be checked against the specification.
# Rectangular radius elbow: cheek radii and strip lengths
import math
width, depth = 400, 600          # mm               # width in the plane of the turn, depth across the strips
turn = 90                     # degrees
r_throat = 150               # mm
ext = 50                # mm                       # straight extension at each end
r_heel = r_throat + width
r_centre = r_throat + width / 2
arc = lambda r: math.pi * turn / 180 * r
print(f"cheek: throat radius {r_throat}, heel radius {r_heel} mm from one centre")
print(f"centreline radius {r_centre} mm, ratio to width {r_centre / width:.2f}")
print(f"throat strip {arc(r_throat) + 2 * ext:.1f} x {depth} mm")
print(f"heel strip {arc(r_heel) + 2 * ext:.1f} x {depth} mm")cheek: throat radius 150, heel radius 550 mm from one centre centreline radius 350.0 mm, ratio to width 0.88 throat strip 335.6 x 600 mm heel strip 963.9 x 600 mm
For the Ashgrove elbow turning across its 400 mm side, the centreline radius is 350 mm, a ratio of 0.88. That is below 1.0, which is why the drawing called for a splitter vane in that elbow. Kai would not have noticed if Lin had not pointed to the note, and from then on he checked the ratio on every rectangular elbow before cutting.
The square-throat elbow
Where space is too tight for a radius elbow, a square-throat elbow is used: the throat is a sharp corner, and the heel is either a sharp corner too, making a mitred box, or a radius. A square elbow with no vanes has a very high pressure loss, so specifications require turning vanes inside it: a row of small curved blades, held in rails, that guide the air around the corner. With good vanes, a square elbow can perform about as well as a generous radius elbow. The vanes are a separate shop product, usually bought or run on a vane machine, and are covered in SMW-220.
A square-throat, square-heel elbow is the simplest rectangular fitting to lay out. Its cheeks are squares or rectangles with one corner removed, or simply two rectangles mitred at 45 degrees; its throat and heel are each two straight strips with a bend at the corner. The mitre line across the cheek runs from the inside corner to the outside corner, at 45 degrees for a 90-degree elbow, and the vane rail is fixed along it. Because everything is straight, the whole fitting can be brake-formed.
For a square-throat elbow turning less than 90 degrees, the mitre still bisects the angle, at half the turn from square, the same rule as the round two-piece elbow of Lesson 6. Each straight piece of the throat and heel is cut to its length on that mitre, and the pattern maker finds the lengths by drawing the cheek full size or by the tangent of half the turn times the width.
Elbows that change size
Some rectangular elbows change size as they turn, for example from 600 × 400 (24 × 16) to 500 × 400 (20 × 16), combining an elbow with a reducer. If the change is in the depth, across the throat and heel strips, the cheeks stay as before but the strips taper and must be developed as trapezoids or by triangulation in SMW-210. If the change is in the width, in the plane of the turn, the throat and heel arcs are no longer concentric: the heel is drawn with a different centre or radius so the width shrinks smoothly from one end to the other. Lin's practice was to draw such cheeks full size from the fitting's dimensions, then measure the throat and heel arcs along the drawn curves with a flexible rule or by stepping small chords, accepting the small error because the strip is trimmed at assembly. Most shops draw these fittings with software now, and SMW-410 returns to them.
Building and checking
A rectangular elbow is assembled by locking the throat and heel strips to the cheeks along all four curved or straight edges. The strips are rolled to their radius on the slip roll first, or for a large heel formed by the lock as it closes. The order matters: Keelson's practice was to fit the heel first, because it is the longest edge and sets the overall shape, then the throat. A finished elbow is checked by laying it on a flat bench to see that its ends are square to each other and that the cheeks are flat and not twisted, and by measuring the ends to see that they match the connecting duct within the shop's tolerance.
Rectangular elbows that turn less than 90 degrees
A radius elbow of any turn angle is laid out the same way: the two end lines of the cheek are drawn from the centre at the turn angle, the arcs are swung between them, and the strip lengths are the arcs for that angle. A 45-degree radius elbow has throat and heel strips exactly half as long as a 90's of the same radii. Because the end lines of the cheek are radial, the ends of the elbow are square to the duct at both ends, which is what makes it connect to straight duct.
For square-throat elbows at odd angles, the cheek is a pair of rectangles meeting on a mitre at half the turn, and the vanes are set along the mitre at the same angle. Vane rails for odd angles are cut and bent to the mitre, and the vanes are fixed at the standard spacing along it.
Material, gauge and reinforcement
Rectangular elbows are made in the same gauge as the duct they connect to, which duct construction standards set from the duct's largest dimension and its pressure class. Cheeks on large elbows are wide flat panels and may need cross-breaking or beading to stiffen them, which is laid out on the cheek pattern before forming. For the Ashgrove supply ducts, the cheeks of the 600 × 400 (24 × 16) elbows were cross-broken from corner to corner, two shallow creases in an X that stiffen the panel and stop it drumming when the fan starts. The cross-break lines run from the corners of the cheek's net outline, not from the allowance corners, so they are drawn after the net cheek and before the allowances.
Kai's first radius elbow had its cheeks cross-broken in the wrong direction, so the X bulged into the duct instead of out. It still worked, but Walt pointed out that a cheek that bulges inward catches dust and reduces the airway slightly, and the second one was creased the right way.
Common mistakes
MistakeReading the turn plane wrongly on a fitting tag.
InsteadConfirm which dimension is in the plane of the turn before laying out the cheek.
MistakeDrawing the heel arc with a different centre on a constant-size elbow.
InsteadThroat and heel arcs share one centre unless the elbow changes width.
MistakeMaking both cheeks identical instead of mirror images.
InsteadTurn the first pattern over for the second cheek.
MistakeBuilding a square elbow without vanes because none were drawn.
InsteadSquare elbows need turning vanes; check the specification.
MistakeIgnoring a centreline radius below the specified ratio.
InsteadCheck radius-to-width and add the vanes the drawing calls for.
Summary and key terms
- A rectangular elbow has two flat cheeks and two strips, the throat and the heel.
- Radius elbow cheeks are annular sectors with throat and heel arcs from one centre.
- Throat and heel strips develop into rectangles as long as their arcs and as wide as the duct depth.
- Arc length = π/180 × angle × radius; check the radius-to-width ratio against the specification.
- Square-throat elbows mitre at half the turn and need turning vanes.
- Elbows that change width need non-concentric arcs; changes in depth need triangulation.
- Cheek
- One of the two flat sides of a rectangular elbow, carrying the shape of the turn.
- Throat strip
- The strip that wraps the inside of a rectangular elbow.
- Heel strip
- The strip that wraps the outside of a rectangular elbow.
- Turning vanes
- Curved blades in a square elbow that guide air around the corner.
- Splitter vane
- A curved divider in a radius elbow that improves flow in a tight turn.
- Hard bend
- A rectangular elbow that turns across the wider dimension.
Lesson quiz · 5 questions
Score 60% or more to complete this lesson.
Create a free account to save your progress, take quizzes and earn a certificate.