
SMW-120 · Lesson 6 of 12 · 13 min
Two-piece elbows
An elbow changes the direction of a duct. The simplest round elbow is two pieces of pipe, each cut at an angle, joined along their cut edges. It is called a two-piece elbow, or a single-mitre elbow, because it has one joint. It is rarely the best elbow for airflow, because the sharp turn creates turbulence and pressure loss, which is why duct specifications usually call for multi-piece elbows with more gradual turns. But two-piece elbows are used for small angles, for exhaust and drain lines, for architectural work such as downspout offsets, and wherever space is too tight for anything else. And the two-piece elbow is the building block of every gore elbow in Lesson 7, so it is worth understanding thoroughly.
The geometry of the joint
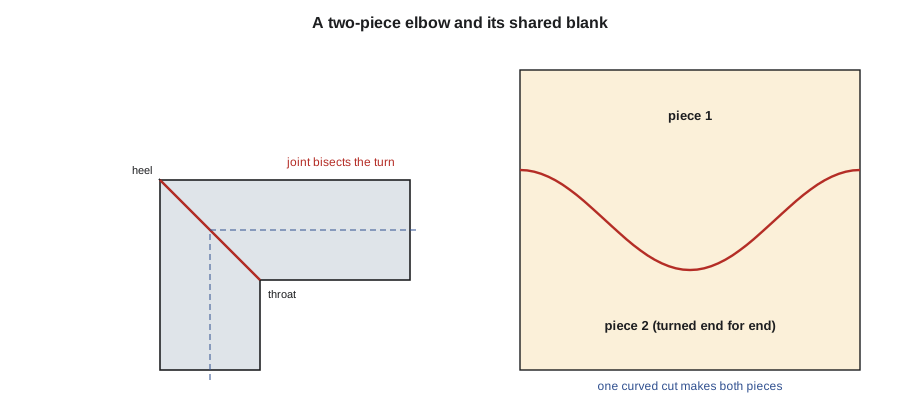
When two pipes of the same diameter meet at an angle, they join along a plane that bisects the angle between their axes. In the elevation, the joint appears as a straight line, the mitre line, running from the throat, the inside of the turn, to the heel, the outside. Each piece is a pipe cut at an angle by that plane, exactly like the pipe in Lesson 5, so each piece's pattern is a Lesson 5 pattern.
The angle at which each piece is cut depends on how far the elbow turns. A duct that turns through an angle θ is cut, on each piece, at half that angle from square. A 90-degree elbow has each piece cut at 45 degrees. A 45-degree elbow has each piece cut at 22.5 degrees. A 60-degree elbow, 30 degrees. The angle is always measured the same way, from a plane square to the pipe, because that is the angle that goes into the ordinate formula.
The turn angle is not the same as the angle between the two pipes as seen on a drawing. A drawing may show the two legs of an elbow meeting at, say, 135 degrees, the included angle. The duct turns through 180 minus 135, which is 45 degrees, and each piece is cut at 22.5 degrees. Confusing the included angle with the turn angle produces an elbow that turns the wrong amount, and it is one of the errors Lin saw most often from new pattern makers.
Developing the pattern
The pattern is developed exactly as in Lesson 5. Draw one leg of the elbow in elevation with its base line and the mitre line at α from square. Draw the half plan, divide it into equal parts and number from the throat. Project the points to the mitre line. Lay out the stretchout at the mean diameter, divide it, number it with the seam at the throat at both ends, and carry the heights across. Join the points with a fair curve.
The two pieces of a two-piece elbow are identical, if the two legs are the same length. That gives a useful saving. Because the cut curve of one piece is the mirror of the other when one is turned end for end, both pieces can be cut from one rectangular blank with a single curved cut across the middle. One piece is the bottom of the blank; the other is the top, turned around. The blank's height is the sum of the two legs' heel lengths, or equivalently the sum of the throat and heel of one piece, and no metal is wasted along the joint.
For a 250 mm two-piece 90-degree elbow, each piece cut at 45 degrees, the cut rises across the pipe by the mean diameter, 249.3 mm, because the tangent of 45 degrees is one. If each piece is 150 mm long at its throat, its heel is 399.3 mm. A single blank 783.2 mm wide by 549.3 mm tall gives both pieces with one curved cut.
When the two pieces are cut from one blank this way, the seam of one ends up at its throat and the seam of the other at its heel, because turning the piece end for end swaps them. That is usually what is wanted: seams on opposite sides of the joint are easier to close and do not stack up. If both seams must be at the throat, for appearance or because the elbow will be lagged and the seams must be underneath, the pieces are cut from separate blanks and each pattern is laid out with the throat at its ends.
Lengths: throat, heel and centre line
An elbow is usually specified by its turn angle, its diameter and the lengths of its legs, measured either to the intersection of the centre lines or along the throat or heel. Lin's drawings gave the centre line dimension, the distance from the end of each leg to the point where the two centre lines cross. From that, the pattern maker finds the throat and heel lengths of each piece.
Along the centre line, the mitre is at the centre of the pipe, so the centre line length of each piece is the given dimension. At the throat, the piece is shorter by the mean radius times the tangent of α; at the heel, it is longer by the same amount. So for a 45-degree cut on a pipe of mean radius r, the throat is r shorter than the centre line and the heel is r longer. That relationship makes it easy to set out an elbow from a centre line dimension without drawing it.
The script works out the cut angle, throat and heel lengths and ordinates for a two-piece elbow of any turn angle, from the centre line length of a leg. It also prints the size of the single blank that gives both pieces.
# Two-piece round elbow: cut angle, throat and heel, ordinates and blank
import math
d_out, t = 250, 0.70
turn = 60                    # degrees the duct turns
centre_len = 300     # mm                # centre line length of each leg to the intersection
alpha = turn / 2
r = (d_out - t) / 2
rise = r * math.tan(math.radians(alpha))
throat, heel = centre_len - rise, centre_len + rise
stretch = math.pi * 2 * r
print(f"each piece cut at {alpha} deg from square")
print(f"throat {throat:.1f} mm, heel {heel:.1f} mm, stretchout {stretch:.1f} mm")
for k in range(0, 7):            # half the pattern; the rest mirrors it
    phi = math.pi * k / 6
    print(f"line {k + 1}: {throat + rise * (1 - math.cos(phi)):.1f} mm")
print(f"one blank {stretch:.1f} x {throat + heel:.1f} mm gives both pieces")each piece cut at 30.0 deg from square throat 228.0 mm, heel 372.0 mm, stretchout 783.2 mm line 1: 228.0 mm line 2: 237.7 mm line 3: 264.0 mm line 4: 300.0 mm line 5: 336.0 mm line 6: 362.3 mm line 7: 372.0 mm one blank 783.2 x 600.0 mm gives both pieces
The ordinates are printed for half the pattern, lines 1 to 7, from the throat to the heel. The other half mirrors them, lines 6 back to 1, because the pipe is symmetrical about the plane of the elbow.
Elbows that turn less than 90 degrees
Most elbows in a duct system are 90s and 45s, but a pattern maker regularly sees odd angles: 30-degree, 22.5-degree and 11.25-degree turns for offsets, and angles that come from field measurement of an existing building. The method does not change. Only α changes, and with it the rise of the cut. A small turn gives a gentle cut and a flat, nearly straight pattern curve; for a 20-degree turn, each piece is cut at 10 degrees and the cut rises only about 0.18 times the diameter across the pipe.
Very small angles are where measurement errors matter most, because the rise of the cut is small and a 2 mm (1/16 in) error is a large fraction of it. For field-measured angles, Aggie had Kai measure the rise over a long base, rather than the angle with a protractor, and compute the angle from the tangent. Over 1 m (3 ft), a rise of 176 mm (6 5/16 in) is 10 degrees, and a rise error of 2 mm (1/16 in) is barely a tenth of a degree.
Closing the joint
The two pieces of an elbow are joined along the mitre with a seam that suits the job. For low-pressure duct, a common joint is an Acme lock or a standing seam, or the pieces are simply lapped and screwed and sealed. For exhaust, kitchen grease duct and anything airtight, the joint is welded, and the pattern has no lap at the mitre at all, just a clean fit. For architectural downspouts in copper, the pieces are lapped and soldered. Each joint needs its own allowance at the mitre edge, which Lesson 11 introduces and SMW-130 explains, and the allowance follows the curve: it is added as a band of constant width outside the curved cut line.
Because the allowance follows a curve, the edge with the allowance is no longer the same curve as the net cut, and two pieces cut from a single blank can no longer share one cut. Where the joint needs allowances, the blank is made taller by the two allowances and the cut is made twice, once along each piece's allowance line. Kai worked this out the hard way on his first elbow, a 150 mm (6 in) downspout offset for the church, when the two pieces came out 12 mm (1/2 in) short of overlapping.
A note on airflow
A sharp two-piece 90-degree elbow has a much higher pressure loss than a smooth or multi-piece elbow of the same size, which costs fan energy for the life of the system. Duct design guides give loss coefficients for each type, and the differences are large: a two-piece 90 can lose several times as much pressure as a five-piece elbow with a generous radius. That is why HVAC specifications usually limit two-piece elbows to small angles, and why Lesson 7's gore elbows are the normal fitting for supply and return air. The pattern maker does not choose the fitting, but should recognize when a drawing calls for a fitting that seems wrong and ask before making it.
Two-piece elbows in architectural work
Two-piece elbows are common in architectural sheet metal, where airflow does not matter and a clean line does. A downspout that steps out from a wall and back again is made of two-piece elbows, usually of 60 or 75 degrees for round downspouts, set so the offset clears a cornice or a foundation ledge. Gutter outlets, leader heads and the bends in copper scuppers use the same pattern. At St. Brendan's, the replacement copper downspouts needed eight elbows, each a two-piece 75-degree elbow on 75 mm (3 in) round copper, and each was developed exactly as in this lesson, with a soldered lap allowance added at the mitre on one piece only.
On visible work the seam position matters more than economy. Copper downspout elbows are usually laid out with both seams at the back, against the wall, so the pieces are cut from separate blanks rather than nested. The extra copper is a small cost against the appearance of a seam running down the face of a church.
Checking a two-piece elbow
A finished two-piece elbow is checked in three ways. Its turn angle is checked with a protractor or an angle gauge across the two ends. Its pieces should meet all the way round the mitre without a gap, which shows the cut curves match. And the two ends should be round and the right size, which shows the stretchouts were right. If the angle is off but the joint is tight, the cut angle was wrong on both pieces; if the joint gaps at the throat or the heel only, one piece was cut at a different angle from the other, or rotated before joining.
Kai's first 90-degree elbow turned 92 degrees. The joint was tight, so both pieces had been cut at 46 degrees instead of 45, an error he traced to a protractor that was a degree out. From then on he laid out mitre angles from their tangents, as Lesson 1 advised, and never used that protractor again.
Patterns by the dozen
Where a job needs many identical elbows, the shop makes a hard pattern of one piece, as Lesson 5 described, and traces it. For two-piece elbows the hard pattern is usually made for the pair, the full blank with its single shared curve, so the tracer marks both pieces and the shared cut in one pass. It is stamped with diameter, gauge and turn angle.
Common mistakes
MistakeCutting each piece at the full turn angle.
InsteadCut each piece at half the turn angle from square.
MistakeReading the included angle on a drawing as the turn angle.
InsteadTurn angle = 180 degrees − included angle; check on a sketch.
MistakeCutting two pieces from one blank when the joint needs allowances.
InsteadAdd both allowances to the blank and cut each piece along its own allowance line.
MistakeMeasuring small field angles with a protractor.
InsteadMeasure rise over a long base and compute the angle.
MistakeMaking a sharp 90 where the specification calls for a gore elbow.
InsteadCheck the fitting type; ask if a drawing seems to call for the wrong one.
Summary and key terms
- A two-piece elbow is two pipes cut at half the turn angle and joined on the bisecting plane.
- Each piece is developed exactly like a pipe cut at an angle.
- Throat and heel differ from the centre line length by r tan α.
- With no joint allowance, both pieces can come from one blank with one curved cut.
- Allowances follow the curve, so pieces with allowances need separate cuts.
- Two-piece elbows lose more pressure; specifications usually prefer gore elbows.
- Two-piece elbow
- An elbow made of two pieces of pipe joined on one mitre.
- Turn angle
- The angle through which a duct changes direction.
- Included angle
- The angle between the two legs of an elbow as drawn.
- Centre line length
- The length of a leg measured along the pipe centre line to the intersection.
- Loss coefficient
- A number expressing how much pressure a fitting loses relative to the velocity pressure.
Lesson quiz · 5 questions
Score 60% or more to complete this lesson.
Create a free account to save your progress, take quizzes and earn a certificate.