
SMW-120 · Lesson 1 of 12 · 16 min
Geometry for layout
In SMW-110 Kai learned to measure and mark a sheet, check it for square and work out a simple stretchout. This course turns those skills into pattern development: the craft of drawing, on a flat sheet, the exact shape that will fold, roll or seam into a fitting that has length, width and depth. Pattern development is one of the things that separates a sheet metal worker from someone who only runs machines. A good pattern maker can look at a drawing of an elbow, a tee or an offset and produce a flat pattern that fits the first time, with nothing to trim and nothing left open.
There are three classic pattern methods. Parallel line development, the subject of this course, is used for objects whose surfaces are made of parallel lines: prisms, cylinders, elbows, tees and offsets built from pipe and rectangular duct. Radial line development, covered in SMW-210, is used for cones and pyramids whose lines all meet at a point. Triangulation, also in SMW-210, breaks awkward transitions into triangles. The Red Seal occupational standard for the trade lists all three, along with computer pattern development, as tasks every journeyperson performs, and the methods build on each other, so the parallel line method comes first.
Every pattern method rests on a small set of geometric constructions done with a straightedge, a square, dividers and a scriber or pencil. Aggie spent Kai's first morning of the course on them. "Software will draw you a pattern," she said, "but on a roof with a strange curb, you will have a tape, a square, a pair of dividers and a piece of cardboard. Learn the geometry and you can make anything."
Tools and habits for geometric construction
Constructions are done full size on the sheet or on layout paper, which is a stable, gridded paper kept in the shop for practice and for templates. The tools are the ones from SMW-110: a steel rule and straightedge for lines, a combination square and framing square for right angles, dividers for small arcs and stepping off equal distances, trammel points for large arcs, a sharp scriber for lines that will be cut away, and a fine marker or hard pencil for lines on visible surfaces. Dividers are set by placing one point on a rule graduation and opening the other to the distance wanted, then checking the setting a second time before using it.
Three habits keep constructions accurate. First, lines are thin. A thick line is about 0.5 mm (1/64 in) wide, and when two thick lines cross, nobody knows exactly where the point is. Second, intersecting arcs should cross at a good angle, ideally close to a right angle; arcs that cross at a shallow angle meet over a long, vague region. Third, points are marked lightly with a prick punch or a fine circle, and every point that will be used again is labelled, usually with a number or letter. Labels are what make the later steps of a pattern possible.
Perpendiculars and bisectors
The most common construction is a line at right angles to another line, a perpendicular. A square gives a perpendicular quickly for short distances, but for long lines across a sheet, a construction with arcs is more accurate than any square.
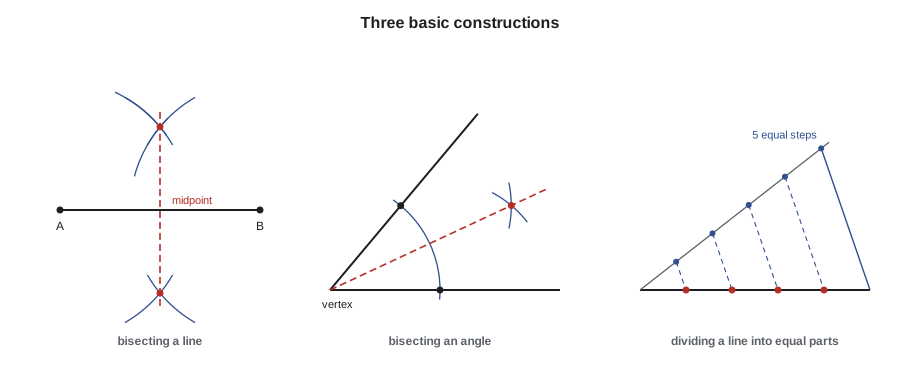
To bisect a line, that is, to find its midpoint and draw the perpendicular through it, set the dividers or trammels to a little more than half the length of the line. With the point at one end, swing an arc above and below the line. Without changing the setting, swing the same two arcs from the other end. The two places where the arcs cross lie on the perpendicular bisector, and the straight line through them crosses the original line exactly at its middle. This one construction finds the centre of a sheet, the centre line of a duct panel and, as later lessons show, the centre of a circle through three points.
To erect a perpendicular at a point on a line, swing equal arcs from the point to cut the line on each side, then bisect the distance between those two marks as above. To drop a perpendicular from a point above a line, swing an arc from the point that cuts the line in two places and bisect between them. And at the very end of a line, where there is no room to swing arcs on both sides, the 3-4-5 triangle from SMW-110 is the fastest method: mark three units along the line and swing an arc of four units from the end and an arc of five units from the mark; the crossing is square to the end.
Bisecting an angle
Angles appear wherever two parts of a fitting meet. A mitre, the joint between two pieces at an angle, lies on the line that bisects the angle between them. To bisect an angle, swing an arc from the corner, the vertex, that cuts both sides. From each of those two marks, swing equal arcs that cross inside the angle. The line from the vertex through the crossing divides the angle exactly in half. In Lesson 6, the mitre line of a two-piece elbow is found exactly this way, and in Lesson 4 the mitre of a rectangular coping is found the same way on a drawing of the corner.
An angle can also be laid out by measuring with a protractor, and for most shop work that is accurate enough. For the large patterns of elbows, though, a small error at the vertex grows over the length of the line, so the angle is either constructed or laid out by measuring two sides of a right triangle with the correct tangent. A 15-degree mitre, for instance, rises about 268 units for every 1,000 units of run, because the tangent of 15 degrees is about 0.268. Lesson 7 uses that idea for the gores of a round elbow.
Dividing a line into equal parts
Parallel line patterns depend on dividing things into equal parts: the circumference of a pipe into 12 or 16 spaces, the width of a duct panel into equal widths, the stretchout of a pattern into the same number of spaces as the plan view. When the length is a round number of units, the parts can simply be measured. When it is not, there is a construction that divides any line into any number of equal parts without arithmetic.
From one end of the line, draw a second line at any convenient angle. Along it, step off the number of equal spaces wanted with the dividers, using any convenient setting. Join the last mark to the far end of the original line. Then draw lines parallel to that one through each of the other marks, using a square sliding along a straightedge or a pair of set squares. Where the parallels cross the original line, they divide it into equal parts. The method works because of similar triangles, and it is how pattern makers divide an awkward stretchout of, say, 783.2 mm (31 5/16 in) into 12 equal spaces without ever dividing by 12.
In practice, many shops divide the stretchout by calculation and mark the spaces with a rule, which is fast and accurate if the arithmetic is right. Aggie taught both. "The construction cannot make an arithmetic mistake," she said, "and the arithmetic cannot be thrown off by a bent square. Use one to check the other."
Circles, arcs and polygons
Circles are drawn with dividers or trammels from a marked centre. To find the centre of an existing circle or arc, such as an existing pipe end or a curved opening traced in the field, mark any three points on it, join them with two chords, and draw the perpendicular bisector of each chord. The two bisectors cross at the centre. This is how Sean found the centre of an old round vent opening at Ashgrove from a cardboard template.
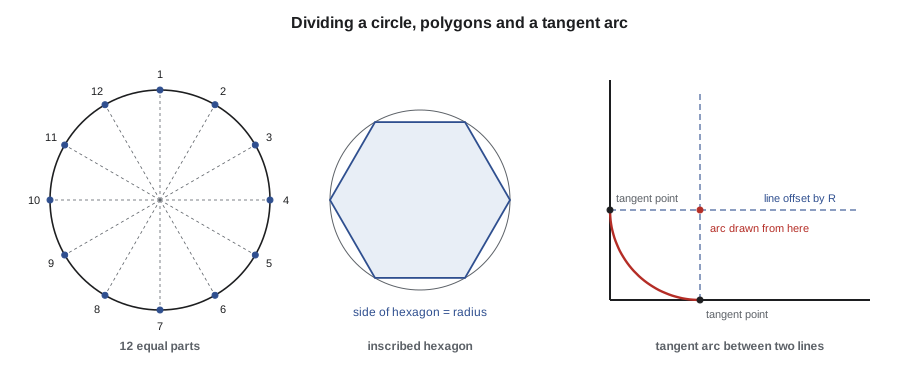
Dividing a circle into equal parts is the heart of round-pipe pattern work. A circle divides into six equal parts with the dividers set to its radius, because a regular hexagon inscribed in a circle has sides equal to the radius. Bisecting each of those six arcs gives 12 parts, and bisecting again gives 24. Four parts come from two diameters at right angles, eight from bisecting those, and 16 from bisecting again. Most pattern makers use 12 parts for small pipe and 16 or 24 for large pipe, because more parts give more points on the pattern curve and a smoother, more accurate line.
The same divisions give the regular polygons. Joining every point of a six-part division gives a hexagon, joining every other point an equilateral triangle, and joining the four points of the diameters a square. An octagon, used for some architectural work such as finials and cupola caps, comes from the eight-part division. For a polygon of a given side length rather than a given circle, the pattern maker calculates the radius of the circle that circumscribes it, which is the side divided by twice the sine of 180 degrees over the number of sides.
The script prints the chord, the straight distance between neighbouring points, for a circle divided into any number of parts, and the radius needed to inscribe a regular polygon of a given side. Setting the dividers to the chord and stepping it around the circle is a fast check on a division done by other means: if the last step does not land on the first point, something is wrong.
# Chords for dividing a circle, and the circle that fits a regular polygon
import math
diameter = 250    # mm
for parts in (6, 8, 12, 16, 24):
    chord = diameter * math.sin(math.pi / parts)
    print(f"{parts:>2} parts: chord {chord:.1f} mm, arc length {math.pi * diameter / parts:.1f} mm")

side, sides = 200, 8    # mm, number of sides
r = side / (2 * math.sin(math.pi / sides))
print(f"a regular {sides}-sided figure with {side} mm sides fits a circle of radius {r:.1f} mm")6 parts: chord 125.0 mm, arc length 130.9 mm 8 parts: chord 95.7 mm, arc length 98.2 mm 12 parts: chord 64.7 mm, arc length 65.4 mm 16 parts: chord 48.8 mm, arc length 49.1 mm 24 parts: chord 32.6 mm, arc length 32.7 mm a regular 8-sided figure with 200 mm sides fits a circle of radius 261.3 mm
For the 250 mm branch ducts at Ashgrove, the chord for 12 parts is 64.7 mm while the arc between points is 65.4 mm. The difference is why a pattern's stretchout is never stepped off with dividers around a curve: the chord is shorter than the arc, and 12 short steps make a pattern almost 9 mm too small.
Worked problem
Laying out an octagonal finial base
St. Brendan's Church needs a new copper base for a small finial, octagonal in plan with sides of 200 mm. What radius of circle should Kai draw to lay out the octagon?
Show solution
- \[r = \frac{s}{2 \sin(180^\circ / n)} = \frac{200}{2 \sin 22.5^\circ}\]
- \[r = \frac{200}{2 \times 0.3827} = 261.3\ \text{mm}\]
Answer: A circle of about 261 mm radius, divided into eight parts.
Tangent arcs and blending curves
A tangent is a line or arc that touches a curve at one point without crossing it. Tangent arcs appear in the throat and heel of rectangular elbows, in rounded corners of flashings and in the curved profiles of architectural trim. The rule that makes them easy is that the radius to the point of tangency is always at right angles to the tangent line. So to join two straight lines with an arc of a given radius, draw a line parallel to each one at a distance equal to the radius, on the side where the arc will be. Where the two parallel lines cross is the centre of the arc. Drop perpendiculars from that centre to each original line to find exactly where the arc starts and stops.
The same idea joins an arc to another arc. The centre of an arc tangent to a circle lies on a circle drawn around the first circle's centre, at a radius equal to the sum of the two radii for an outside tangent or the difference for an inside one. Architectural sheet metal, such as the ogee gutter profile on older buildings, is often a chain of tangent arcs, and SMW-320 returns to them for moulded shapes.
Accuracy and checking
Constructions are only as good as the points they start from, so every pattern is checked as it is drawn. A useful check for any divided circle is that opposite points are on a diameter: point 1 and point 7 of a 12-part division should line up with the centre. For a perpendicular, the 3-4-5 test or a diagonal check from SMW-110 confirms it. For a bisected line, measuring both halves confirms it. Aggie's rule was that every construction gets one independent check before anything is cut, and that the check is written on the layout paper, so that the next person can see it was done.
By the end of the morning Kai had filled two sheets of layout paper with bisected lines, divided circles and tangent arcs. Some were good. Aggie circled the ones that were not, and he drew them again.
Common mistakes
MistakeDrawing thick lines and marking points with heavy punch marks.
InsteadKeep lines fine and points light, and label every point that will be used again.
MistakeSwinging arcs that cross at a shallow angle.
InsteadChoose arc settings so the crossings are near a right angle.
MistakeStepping off a stretchout with dividers around the circle.
InsteadCalculate or construct the stretchout along a straight line; chords are shorter than arcs.
MistakeTrusting a protractor for a long mitre line.
InsteadConstruct the angle or lay it out from the tangent over a long base.
MistakeJoining two lines with an arc by eye.
InsteadFind the arc's centre from offset lines and the tangent points from perpendiculars.
Summary and key terms
- Parallel line, radial line and triangulation are the three classic pattern methods; parallel line comes first.
- The perpendicular bisector, the angle bisector and dividing a line into equal parts are the core constructions.
- A circle divides into six parts with the radius and into 12, 16 or 24 by bisecting.
- A chord is shorter than its arc, so stretchouts are measured on a straight line, not stepped around a curve.
- The centre of a tangent arc lies where lines offset by the radius cross.
- Every construction gets an independent check before cutting.
- Pattern development
- Drawing the flat shape that will form a three-dimensional fitting.
- Perpendicular bisector
- The line at right angles through the midpoint of a line.
- Vertex
- The point where the two sides of an angle meet.
- Chord
- A straight line joining two points on a circle.
- Tangent
- A line or arc that touches a curve at one point without crossing it.
- Layout paper
- Stable gridded paper used for practice layouts and templates.
Lesson quiz · 5 questions
Score 60% or more to complete this lesson.
Create a free account to save your progress, take quizzes and earn a certificate.