
SMW-120 · Lesson 10 of 12 · 16 min
Offsets and breeches
Ducts rarely run in straight lines from one end of a building to the other. They step up over a beam, jog sideways around a column, drop under a sprinkler main, and split into two to serve two rooms. The fittings that make those moves are offsets and breeches. An offset moves a duct sideways or up and down while keeping it running in the same direction. A breeches, also called a Y-branch or pants fitting, splits one duct into two, or joins two into one. Both are built from the pieces already developed in this course, cut pipes, two-piece elbows and gores, and the pattern work is mostly a matter of finding the right angles and lengths from the dimensions on the drawing. This lesson covers round offsets in one plane, rolling offsets in two planes, rectangular offsets and an introduction to the breeches.
The round offset
A round offset is two elbows turning in opposite directions, joined by a straight piece or joined directly. The duct leaves its original line at an angle θ, runs at that angle until it has moved over by the required amount, and turns back through the same angle onto a line parallel to the first. The amount it moves over, measured square to the original line, is the offset or rise. The distance it travels along the original direction while doing so is the run or advance. The length of the sloping section, centre line to centre line between the two turns, is the travel.
The three are related by the trigonometry of a right triangle. The offset is the travel times the sine of θ, and the run is the travel times the cosine of θ. On a drawing, the offset is usually given, and either the angle or the run is fixed by the space available. Common offset angles are 45 degrees, 30 degrees and 22.5 degrees, because they use standard elbows and familiar cut angles.
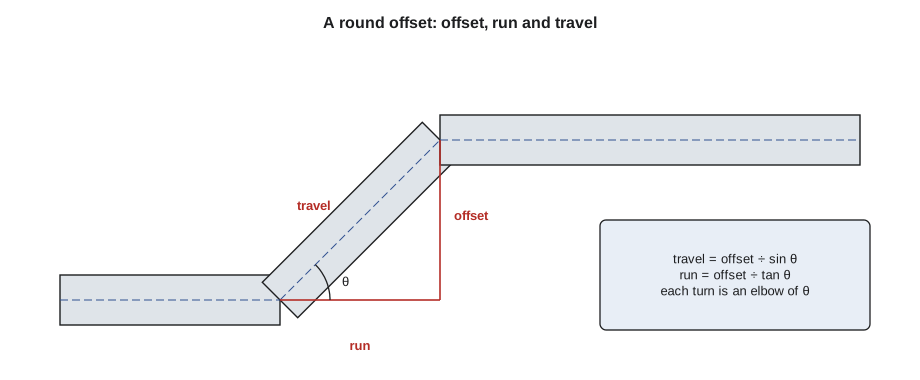
Each turn of the offset is an elbow of angle θ, so with two-piece elbows each cut is at θ/2 from square, exactly as in Lesson 6. A common shop version makes the whole offset from three pieces: an end piece cut at θ/2, a middle piece cut at θ/2 at both ends, and a second end piece. Because the two cuts on the middle piece slope the same way relative to each other, the middle piece is a parallelogram in elevation, not a wedge, and its pattern has the curve of Lesson 5 at the top and the same curve, shifted, at the bottom. Where the specification calls for a smoother offset, each turn is a gore elbow, and the straight piece between them is lengthened or shortened so the centre lines meet the required offset.
The length of the middle piece is the travel less whatever the elbows themselves take up along the sloping line. For two-piece turns, the elbows meet the middle piece right at the mitres, so the middle piece's centre line length is the full travel. And because its two mitres are parallel, every one of its element lines is that same length: the throat and heel of the middle piece are equal, unlike a gore. For gore elbows, each elbow uses a length R tan(θ/2) along each of its legs, measured on the centre line from the point where the centre lines cross, so the middle piece is the travel less two of those.
The script lays out an offset from the offset, angle and diameter, and prints the travel, the run, the cut angle and the shape of the middle piece of a three-piece offset.
# Round offset: travel, run and the middle piece of a three-piece offset
import math
d_out, t = 250, 0.70
offset = 300           # mm, to clear a beam
angle = 45                    # degrees the duct leaves its line
r = (d_out - t) / 2
a = math.radians(angle)
travel, run = offset / math.sin(a), offset / math.tan(a)
cut = angle / 2
rise = r * math.tan(math.radians(cut))
print(f"travel {travel:.1f} mm, run {run:.1f} mm, cut {cut} deg from square at each turn")
print(f"middle piece: every element line is {travel:.1f} mm long (a parallelogram in elevation)")
print(f"each cut curve rises {2 * rise:.1f} mm across the pipe; the bottom curve is the top curve moved down by the travel")travel 424.3 mm, run 300.0 mm, cut 22.5 deg from square at each turn middle piece: every element line is 424.3 mm long (a parallelogram in elevation) each cut curve rises 103.3 mm across the pipe; the bottom curve is the top curve moved down by the travel
At Ashgrove, one 250 mm branch had to rise 300 mm over a steel beam in the corridor. A 45-degree offset gave a travel of 424 mm and a run of 300 mm, which fitted between the beam and the next hanger. Kai made it from three pieces in one afternoon; it was his first fitting to go up in the building.
The rolling offset
Sometimes a duct must move both sideways and up at the same time, for example to drop under a sprinkler main while also shifting over to miss a light fixture. That is a rolling offset: an offset in two planes at once. The trick is that a rolling offset is still a single offset, in a plane that is tilted. Its true offset is the diagonal of the two separate moves, the square root of the sum of their squares, and it lies in the plane that contains both the original and the final duct lines. Once the true offset is known, the fitting is laid out exactly as a plain offset in that tilted plane, and the elbows are rotated by the roll angle when the pieces are assembled.
For round duct the roll does not change any pattern, because round pipe looks the same from any direction. It only changes how the pieces are turned relative to one another before the mitres are joined: the second elbow is rotated around the duct's axis by the roll angle. Getting that rotation right is the hard part, and fitters usually tack the offset together loosely on the bench, check it against a full-size layout chalked on the floor, then join it. For rectangular duct, a rolling offset is much harder, because the cheeks no longer lie in one plane; such fittings are usually split into two separate offsets.
Worked problem
A rolling offset at Ashgrove
A 250 mm branch must drop 225 mm and shift sideways 300 mm to pass under a sprinkler main and clear a light. What is the true offset, and what is the travel at 45 degrees?
Show solution
- \[\text{true offset} = \sqrt{225^2 + 300^2} = 375\ \text{mm}\]
- \[\text{travel} = \frac{375}{\sin 45^\circ} = 530.3\ \text{mm}\]
- \[\text{roll angle} = \arctan\frac{300}{225} = 53.1^\circ\]
Answer: A 375 mm offset with 530 mm of travel, laid out as a plain 45-degree offset and rolled about 53 degrees.
The numbers in that example are a 3-4-5 triangle scaled up, which is no accident: Aggie picked them so that Kai could check his arithmetic in his head. Field numbers are rarely so tidy.
Rectangular offsets
A rectangular offset moves a rectangular duct sideways in the plane of one pair of its sides. Its two cheeks, the sides lying in the plane of the move, carry the shape of the offset, and the other two sides are strips that bend to follow it, like the throat and heel of a rectangular elbow. There are two common shapes. A mitred offset has straight sloping cheeks: each cheek is a parallelogram, and the strips are bent at two sharp angles. A radius offset, sometimes called an ogee or S offset, has cheeks shaped like a stretched S made of two tangent arcs, and the strips are rolled to follow the curves.
For the mitred offset, the cheek is laid out from the offset, run and the duct width with a few straight lines; each corner angle is the offset angle, and each strip is cut to the developed length of the cheek's edge, which is the two straight ends plus the travel. For the radius offset, the cheek's curved edges are drawn with Lesson 1's tangent arcs: each arc's centre is found from lines offset by the radius, and the two arcs meet at a common tangent point in the middle of the offset. The strip lengths are the arc lengths, found as in Lesson 8, plus any straight tangents.
A rectangular offset that moves in the plane of the other pair of sides, a vertical offset in a horizontal duct for example, is the same fitting turned on its side. If the duct must move in both directions at once, the shop usually builds two separate offsets, one in each plane, unless the space is too tight, in which case the fitting is a transition developed by triangulation in SMW-210.
Breeches and Y-branches
A breeches splits one duct into two branches that leave it at angles, like a pair of trousers, or joins two into one. In round duct, a symmetrical Y-branch with two equal branches each turning through the same angle from the main's direction is a parallel line fitting: each branch is a pipe cut by a plane through the Y's centre, and the two branches meet each other along a straight seam in the plane of symmetry. The main collar meets both branches along curved lines. A pattern maker develops one branch, mirrors it for the other, and develops the collar with the cutting-plane method of Lesson 9.
A breeches whose branches are smaller than the main, or unequal, has curved intersections everywhere and usually includes a tapered transition, which is radial line or triangulation work for SMW-210. Kitchen exhaust work avoids breeches entirely in many cases, because grease duct must be smooth and fully welded, and the code requirements for grease duct fittings are part of SMW-410. In Keelson's shop, most breeches were drawn by Lin in software and cut on the plasma table, but Aggie made Kai lay out an equal Y by hand once, so that he would understand what the software was doing.
Laying out offsets on site
Many offsets are fitted to the building as found, not to the drawing. Sean's field method was simple and worth learning. Measure the true offset needed between the two duct centre lines with a plumb line and a tape. Pick the offset angle the space allows. Calculate the travel and run. Mark the run on the structure or the floor to confirm it fits. Only then phone the measurements to the shop. A field-measured offset that arrives with all three numbers, the offset, the angle and the travel, can be checked in the shop before it is cut; one that arrives with only a length cannot.
Choosing the offset angle
The offset angle is usually a choice between space and pressure loss. A steep angle such as 60 degrees uses the least run but makes the sharpest turns. A shallow angle such as 22.5 degrees turns gently but needs a long run, more than twice the offset. Where the space allows, 45 degrees is the common compromise, and for supply duct with high velocities, designers prefer 30 degrees or less. Whatever the angle, both turns of a plain offset use the same angle, so the duct ends parallel to where it started.
When the run is fixed by the building, between two beams for example, the angle follows from the offset and the run: it is the arctangent of the offset over the run. If that angle comes out at an odd value, such as 38.7 degrees, the pattern maker can either make elbows to that angle or adjust the run slightly to use a standard angle, and the decision is usually made by the foreman with the drawing in hand.
Checking an offset
A finished offset is checked by laying it on a flat surface and measuring the distance between the centre lines of its two ends, square to them; that is the offset, and it should match the drawing. The two ends should be parallel, which a pair of straightedges across them shows. For a rolling offset, the check is done against a full-size layout of the two duct lines chalked on the floor or a sheet of plywood, with the fitting set over it and its ends plumbed down to the lines.
Common mistakes
MistakeUsing the offset distance as the length of the sloping piece.
InsteadTravel = offset ÷ sin θ; the sloping piece is longer than the offset.
MistakeAdding the rise and roll of a rolling offset.
InsteadCombine them as a diagonal: √(rise² + roll²).
MistakeMaking the middle piece of a three-piece offset a wedge.
InsteadBoth cuts slope the same way, so it is a parallelogram in elevation.
MistakeForgetting to rotate the second elbow of a rolling offset.
InsteadRotate it by the roll angle; tack and check against a full-size layout.
MistakeBuilding a two-direction rectangular offset as one twisted fitting.
InsteadSplit it into two offsets, or treat it as a transition.
Summary and key terms
- An offset moves a duct over while keeping its direction; a breeches splits or joins ducts.
- Offset, run and travel form a right triangle: travel = offset ÷ sin θ.
- Each turn of a round offset is an elbow, cut at θ/2 for two-piece turns.
- A rolling offset is a plain offset in a tilted plane, with true offset √(rise² + roll²).
- Rectangular offsets have mitred or tangent-arc cheeks and strips cut to the developed edge.
- Symmetrical round Y-branches are parallel line work; unequal breeches need SMW-210 methods.
- Offset
- A fitting that moves a duct sideways while keeping its direction; also the distance moved.
- Run
- The distance an offset advances along the original line.
- Travel
- The centre line length of the sloping part of an offset.
- Rolling offset
- An offset that moves a duct in two directions at once.
- Roll angle
- The angle by which the plane of a rolling offset is tilted.
- Breeches
- A fitting that splits one duct into two or joins two into one.
Lesson quiz · 5 questions
Score 60% or more to complete this lesson.
Create a free account to save your progress, take quizzes and earn a certificate.