
PLB-220 · Lesson 3 of 12 · 23 min
Lavatories, sinks and faucets
Once the water closets were set on the third floor, Maya moved on to the vanities and kitchen sinks. The cabinet installers had left the vanity tops loose so the plumbers could fit the faucets and drains on a bench before the tops were set. Luis showed her why. "Everything under a sink is easier on the bench than on your back in a cabinet," he said. "Faucet, drain, pop-up, tailpiece. Set it up here, check it, then set the top and you only have the trap and the supplies to make up inside."
This lesson covers the fixtures used for washing hands, food and dishes: lavatories, kitchen sinks, bar and utility sinks and laundry tubs, together with the faucets that supply them and the drains and traps that carry their water away. These fixtures are simple, but they are touched more than any others, and the details of a good installation, such as a drain that does not leak at the slip nut or a faucet that does not wobble, are what a building's occupants remember.
Lavatories
A lavatory is a basin for washing hands and face. It may be a drop-in or self-rimming basin set into a countertop, an undermount basin fixed under a stone or solid surface top, a vessel basin sitting on top of the counter, a wall-hung basin on a bracket or carrier, a pedestal basin standing on a china column, or an integral basin moulded into a vanity top. Each type has its own installation details, but they share the same parts: a waste outlet with a strainer and usually a stopper, an overflow on most basins, faucet holes or a deck for the faucet, and a trap below.
The overflow is a channel in the basin that lets water escape into the drain if the stopper is closed and the faucet is left running. It reduces the chance of a flood. When an overflow is present, the drain body must have a matching slot or opening so that water from the overflow can reach the drain; a drain without the slot, fitted to a basin with an overflow, defeats it. Vessel basins and many commercial basins have no overflow and use a grid drain with no stopper.
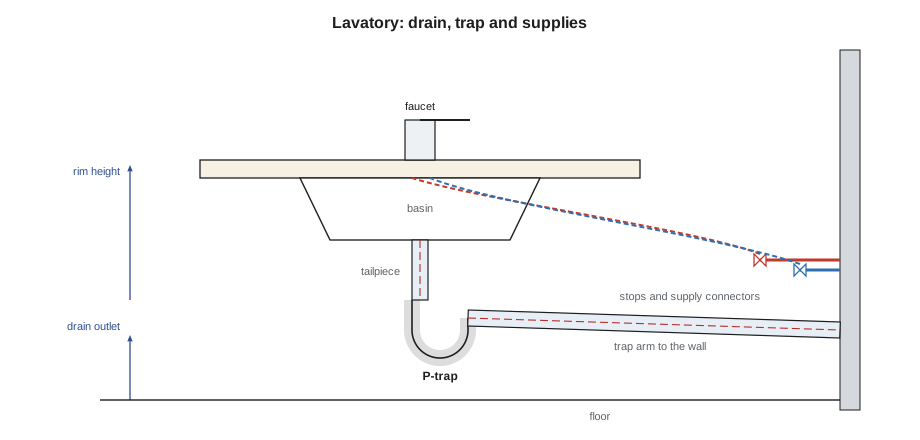
The rim height of a standard lavatory is commonly about 800 to 860 mm above the floor, set by the vanity height or by the bracket on a wall-hung basin. Accessible lavatories have a maximum rim height and require knee and toe clearance underneath, as Lesson 5 explains. The waste outlet in the wall is usually roughed in about 400 to 500 mm above the floor and centred on the basin, with the hot and cold supplies about 100 mm on each side of centre and a little higher, hot on the left and cold on the right as the user faces the fixture.
Hot on the left is not a matter of taste. Users expect it, and many codes require it for faucets with separate handles and for the hot side of single-handle faucets. A faucet installed backwards is a scald risk, especially for children and older people who rely on habit, and it is a callback every time.
Kitchen sinks
Kitchen sinks are larger and deeper than lavatories and usually have two compartments, sometimes one or three. They are made of stainless steel, enamelled cast iron, composite granite or fireclay, and they may be drop-in, undermount or apron-front. The waste outlets are larger than lavatory outlets, and each compartment has a basket strainer. A dishwasher and a food waste disposer often connect to the sink drain, and Lesson 11 covers those connections.
For a double-bowl sink, the two outlets are joined by a continuous waste, which is a set of tubular fittings that brings both outlets into a single trap. The continuous waste may join the outlets with an end outlet, where one bowl's outlet runs horizontally to the other, or with a centre outlet, where both run to a tee in the middle. A kitchen sink drain is usually 40 mm, with the waste outlet in the wall about 380 to 450 mm above the floor so that the trap can sit below a disposer.
Commercial sinks follow the same principles at a larger scale. The ground-floor café at Kingsway had a three-compartment sink for washing, rinsing and sanitizing, a separate hand sink required by public health rules, a prep sink and a mop sink. PLB-210 covered the code and health rules that require these fixtures and the indirect connections some of them need. In this course Maya installed them, and she learned that the food service equipment contractor often supplies the sinks while the plumbing contractor connects them.
Faucets
A faucet controls the flow and temperature of water at a fixture. Faucets are described by how they mount, how they are controlled and what valve mechanism they use. Deck-mounted faucets sit on the basin or counter; wall-mounted faucets project from the wall above a basin or sink. A centreset faucet has its handles and spout on a single base for basins with three holes spaced close together. A widespread faucet has separate handles and spout for three holes spread farther apart. A single-hole faucet has one lever that controls both flow and temperature.
Inside the faucet, the valve that actually controls the water may be a compression stem with a rubber washer, the oldest type and the one that drips when the washer wears; a ball valve; a cartridge; or a ceramic disc valve, in which two polished ceramic plates slide over each other. Ceramic disc valves are the most common in new faucets because they last a long time and do not need washers. Knowing the mechanism matters most at service time: a dripping compression faucet needs a washer and possibly a seat, a dripping cartridge faucet needs a new cartridge, and a ceramic disc faucet usually needs a new disc assembly or seals.
Commercial and public fixtures often use metering faucets, which run for a set time after being pressed, or sensor faucets, which run while hands are under the spout. Both save water and reduce the spread of germs. Sensor faucets need power, either from batteries or a transformer, and the plumber coordinates with the electrician for hard-wired units. Many public lavatories also need tempered water, which is delivered by a mixing valve under the counter. Lesson 4 explains mixing valves and the temperature limits they enforce.
Faucet flow is limited by an aerator or flow restrictor at the spout. The code sets maximum flow rates, and many specifications require lower ones. An aerator also catches debris, and a faucet with low flow after a new installation usually has an aerator clogged with debris from the piping. That is why Luis had Maya flush the supplies before connecting faucets, and remove and clean the aerators after the first use.
Drains, tailpieces and traps
Below the basin, the drain carries water to the trap. A lavatory drain body passes through the basin outlet, sealed with a gasket underneath and either a gasket or plumber's putty under the flange inside the bowl, as the manufacturer directs. Putty is not used with some stone, solid surface and plastic basins because it can stain or attack them; silicone or the supplied gasket is used instead. A pop-up drain uses a lift rod or push button to raise and lower the stopper. The tailpiece runs from the drain body to the trap.
The trap is a U-shaped bend that holds water to seal the drain against sewer gas. For lavatories and sinks, the trap is usually a tubular P-trap, made of plastic or chrome-plated brass, with slip-joint connections that can be taken apart for cleaning. The trap's outlet connects to the trap arm, which runs to the drain in the wall and its vent. PLB-120 explained trap seals and trap arms; in finishing, the job is to make the trap up neatly, with the trap seal depth the code requires and no strain on the joints.
Slip-joint connections seal with a tapered washer compressed by a slip nut. They are allowed only on the inlet side of the trap and at the trap itself, where they can be reached, never in concealed locations. The washer's taper must face the joint, and the nut is tightened by hand and then a little more with a wrench on plastic or a little more again on metal. Overtightened plastic slip nuts crack; undertightened ones drip. Every slip joint is checked with the water running hard and then with a full basin let out at once.
The code limits the vertical distance from the fixture outlet to the trap weir, so that the water leaving the fixture does not build up enough speed to siphon the trap. For a lavatory, the tailpiece should be no longer than needed. Luis's rule was to cut the tailpiece so the trap sat as high as it could while still reaching the trap arm, which also keeps the cabinet space clear.
Worked problem
Making up a lavatory trap
Maya is connecting a lavatory in a Kingsway suite. The drain outlet in the wall is 450 mm above the floor. The bottom of the basin drain body is at 700 mm. The P-trap kit is 32 mm, and the trap arm adapter in the wall is already installed. How does she lay out the tailpiece and trap?
Show solution
- Hold the trap with its outlet level with the trap arm adapter, so the trap arm will have the proper slope back to the wall.
- Measure from the bottom of the drain body to the top of the trap inlet to find the tailpiece length, and cut the tailpiece square with a tube cutter or fine saw.
- Deburr the cut end, slide on the nut and washer with the taper facing the joint, and assemble the trap loosely.
- Align everything without strain, tighten the slip nuts, then run water hard and drain a full basin to test.
Answer: Lay out from the trap arm back to the fixture, keep the trap high and free of strain, and test with a full basin.
Setting the fixture and supplies
Setting a lavatory or sink brings the bench work and the wall connections together. For a drop-in basin, the cutout is checked against the template, a bead of sealant is laid under the rim and the basin is pressed in place and wiped. For an undermount basin, the countertop fabricator usually attaches the basin with clips and adhesive before the top is set, and the plumber checks that the faucet holes line up with the basin and that the overflow is not blocked by the clips. Wall-hung basins hang on a bracket fastened to blocking in the wall or on a carrier.
The water supplies at the wall are fitted with stop valves, usually quarter-turn ball-type angle stops, so that each fixture can be isolated for service without shutting down the riser. The stops connect to the faucet with supply connectors, which may be braided stainless steel hoses or rigid tubes. Braided connectors are fast and forgiving but have a service life, and many building owners and insurers now specify connectors with a certified rating and a date tag, and require them to be replaced at a set interval. Rigid supplies last longer but take more time to bend and fit.
Every joint in the supply is checked under pressure, first with the stops open and the faucet closed, then with the faucet running. Maya kept a dry paper towel and wiped each joint after a minute; a damp spot showed a weep that would have been invisible to the eye. Small leaks under a sink rot the cabinet floor long before anyone notices.
# Tailpiece length for a lavatory trap layout (all dimensions in mm)
drain_body_bottom = 700      # height of the bottom of the basin drain body
trap_arm_centre = 450        # height of the trap arm adapter in the wall
trap_rise = 75               # centre of trap outlet to top of trap inlet (from the kit)
tailpiece = drain_body_bottom - (trap_arm_centre + trap_rise)
print("cut tailpiece to about", tailpiece, "mm")
seal = 50                    # trap seal depth of this trap, mm
print("trap seal", seal, "mm", "ok" if 50 <= seal <= 100 else "outside the usual 50-100 mm")cut tailpiece to about 175 mm trap seal 50 mm ok
The calculation gives the length of tailpiece that brings the trap inlet up to meet the drain body when the trap outlet lines up with the wall adapter. In practice Maya holds the trap in place and marks the tailpiece, but doing the arithmetic first tells her whether the parts in the box will work, or whether she needs a longer tailpiece or an extension. The trap seal check reminds her that a trap must hold a seal between 50 and 100 mm.
Laundry tubs, utility sinks and bar sinks
Laundry tubs and utility sinks are deep, often plastic or stainless steel, and are used for rough cleaning and for draining clothes washers. A clothes washer may discharge into a laundry tub, but the tub must be large enough for the washer's pump-out flow, and the drain must not be so small that the tub overflows. Many codes treat a washer discharging into a tub as an indirect connection, with the hose secured above the flood level rim. Bar sinks and prep sinks are small sinks that follow kitchen sink practice at a smaller scale.
Mop sinks, also called service sinks, are floor-mounted basins for cleaning crews. They need a faucet with a hose thread, a vacuum breaker to protect the water supply from a hose left in the bucket, and often a wall-mounted hanger for the hose. The Kingsway mechanical room and the café both had mop sinks, and on both Maya fitted the faucet with an integral vacuum breaker so that the backflow protection could not be removed.
Common mistakes
MistakeInstalling faucets with hot on the right.
InsteadHot is on the left as the user faces the fixture.
MistakeUsing a drain body without an overflow slot on a basin with an overflow.
InsteadMatch the drain to the basin so the overflow can drain.
MistakeUsing plumber's putty on stone, solid surface or plastic basins.
InsteadUse the gasket or sealant the manufacturer specifies.
MistakeHiding slip-joint connections behind a wall.
InsteadKeep slip joints accessible on the inlet side of the trap and at the trap.
MistakeConnecting faucets without flushing the supplies.
InsteadFlush the lines first and clean the aerators after first use.
Summary and key terms
- Lavatories may be drop-in, undermount, vessel, wall-hung, pedestal or integral; all need a drain, trap and supplies.
- The drain body must have an overflow slot when the basin has an overflow.
- Hot is on the left as the user faces the fixture.
- Faucets use compression, ball, cartridge or ceramic disc valves; public fixtures often use metering or sensor faucets.
- Traps must hold a seal between 50 and 100 mm; slip joints are allowed only where accessible at and before the trap.
- Each fixture gets accessible stop valves and listed supply connectors, tested under pressure.
- Mop sink faucets need vacuum breakers to protect the water supply.
- Lavatory
- A basin for washing hands and face.
- Overflow
- A channel in a basin that lets water reach the drain if the stopper is closed and the faucet left on.
- Tailpiece
- The short pipe from a fixture drain body to the trap.
- Continuous waste
- Tubular fittings joining the outlets of a multi-compartment sink into one trap.
- Slip joint
- A joint sealed by a tapered washer compressed by a nut, used at and before a fixture trap.
- Angle stop
- A shut-off valve where a supply comes out of the wall, turning the flow 90 degrees to the fixture.
Practice problems
Work each problem on paper first, then reveal the answer to check.
Which side is hot as the user faces the fixture?
Show answer
The left.
Why must the drain body match a basin with an overflow?
Show answer
So water from the overflow can reach the drain through the slot.
Where are slip joints allowed?
Show answer
At the trap and on its inlet side, where they are accessible.
What is the usual kitchen sink drain size?
Show answer
40 mm.
Why flush supplies before connecting a faucet?
Show answer
To keep debris out of the faucet and aerator.
What protection does a mop sink faucet need?
Show answer
A vacuum breaker.
Lesson quiz · 5 questions
Score 60% or more to complete this lesson.
Create a free account to save your progress, take quizzes and earn a certificate.