
PLB-220 · Lesson 2 of 12 · 25 min
Roughing in and setting water closets and urinals
The first fixture Maya set on her own at Kingsway Tower was a water closet in a third-floor suite. Luis had set the one next door while she watched, talking through each step. "A toilet looks simple," he said, "and that's why people get it wrong. It has to seal to the drain so gas and water can't get out, it has to sit solid so it never rocks, it has to be the right distance from the wall, and it has to be connected to the water so it can't siphon anything back into the supply. Get one of those wrong and you'll be back."
This lesson covers the two fixtures that receive human waste: water closets and urinals. It starts with the rough-in, the part of the work done before the walls and floors are finished, then follows the setting of a floor-mounted water closet step by step, covers wall-hung water closets and their carriers, and ends with urinals.
How a water closet works
A water closet carries waste out of the bowl and into the drainage system by a rush of water, then refills its trap so that the seal against sewer gas is restored. The trap is built into the china: the outlet of the bowl rises over a weir and then drops to the outlet at the floor or wall. The water standing in the bowl is the trap seal.
Most residential water closets are gravity tank types. Water stored in the tank flows into the bowl when the flush valve opens, partly through a jet near the trapway that starts a siphon, and partly through holes under the rim that wash the bowl. Once the siphon starts, it pulls the contents of the bowl through the trapway and down the drain. When air reaches the trapway, the siphon breaks with the familiar gurgle, and the refill water from the fill valve restores the trap seal. Pressure-assisted tanks use a sealed vessel inside the tank, in which incoming water compresses air, to give a stronger flush with the same volume. Flushometer water closets, used in commercial buildings, have no tank at all and are covered in Lesson 6.
Inside a gravity tank there are two main valves. The fill valve, sometimes called a ballcock, refills the tank and sends part of its flow down the refill tube into the overflow tube, which refills the bowl. It must have an anti-siphon feature, with its critical level marked on the valve, set a minimum distance above the overflow so that tank water cannot be siphoned back into the supply. The flush valve, at the bottom of the tank, opens when the handle is pressed and closes when the tank empties. A flapper or a canister seal closes the flush valve; a worn flapper is the most common cause of a toilet that runs.
The water closet rough-in
The rough-in for a floor-mounted water closet is the closet flange, set on the end of the closet bend at the correct distance from the finished wall, plus a water supply stub at the correct height and offset. The most common rough-in distance is 305 mm from the finished wall to the centre of the flange, with 254 mm and 356 mm models also made. The flange is the anchor for the closet bolts and the seat for the seal, so its position and height decide whether the toilet will fit and seal.
The finished wall, not the framing, is the reference. Maya learned early to add the thickness of drywall and tile when she measured from a stud. A flange set the correct distance from the framing ends up too close to the finished wall by the thickness of the finish, and the tank will not fit. Luis checked every flange location twice before the floor was poured or the subfloor was closed, because moving a flange later means cutting concrete or flooring.
Flange height matters as much as location. The top of the flange should be at or slightly above the finished floor, so that the seal compresses properly. A flange set below the finished floor, which happens when tile is added after the rough-in, leaves the seal too thin; the fix is a flange extension or spacer, not a stack of wax rings. A flange set well above the floor can make the toilet rock. Flanges must be fastened to the floor with corrosion-resistant screws or anchors, so that the closet bolts pull against a solid base. In a concrete slab like Kingsway Tower's, the flange is set on the closet bend in a sleeve or box-out and secured after the topping is placed, with the top about 6 mm above finished floor where a thick finish is expected.
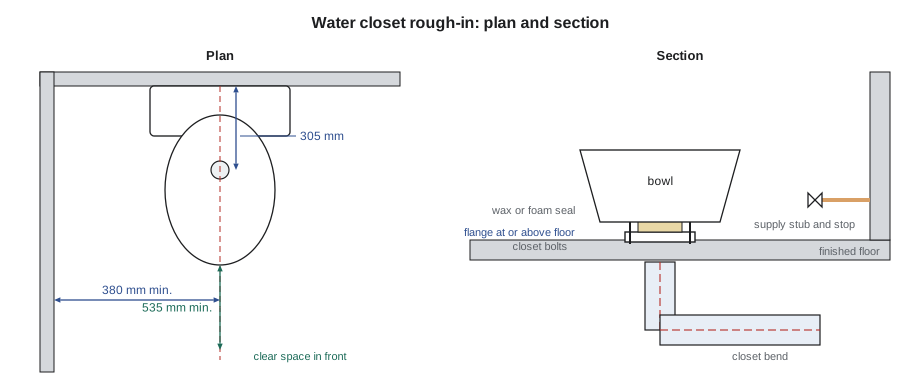
Clearances around the water closet come from the code. The common rule is a minimum of 380 mm from the centre of the water closet to any side wall, partition or vanity, and a clear space in front of the bowl of at least 535 mm to a wall or door, with larger numbers for barrier-free water closets. Two water closets side by side need at least 760 mm between their centres. These numbers are worth memorizing, because they are checked at the framing and rough-in inspections, when they are still easy to fix.
The water supply stub for a close-coupled water closet usually comes out of the wall about 150 to 200 mm above the floor and about 150 mm to the left of the centre line, but the fixture's rough-in sheet is the authority. A stub in the wrong place may leave the supply riser kinked or bent across the trapway. The stub is fitted with a quarter-turn stop valve so that the toilet can be isolated for service.
# Check a water closet rough-in against the code clearances and the fixture sheet
finish_mm = 13 + 10            # drywall plus tile on the wall behind the toilet
flange_from_stud = 330          # measured from the face of the stud
rough_in = flange_from_stud - finish_mm
side_left, side_right = 410, 395   # centre of flange to vanity and to side wall
front = 600                     # front of bowl to door
print("rough-in from finished wall:", rough_in, "mm",
      "ok for 305 mm bowl" if abs(rough_in - 305) <= 6 else "PROBLEM")
for name, d in (("left side", side_left), ("right side", side_right)):
    print(f"{name}: {d} mm", "ok" if d >= 380 else "under 380 mm")
print("front clearance:", front, "mm", "ok" if front >= 535 else "under 535 mm")rough-in from finished wall: 307 mm ok for 305 mm bowl left side: 410 mm ok right side: 395 mm ok front clearance: 600 mm ok
In this example the flange sits a little more than the target distance from the finished wall, which is within the slot of the bowl and the clearance behind the tank. Had the finish been forgotten, the measurement from the stud would have looked like an error of more than 20 mm. That is the most common rough-in mistake, and the reason Maya now writes the finish thickness on the layout before she measures.
Setting a floor-mounted water closet
Setting a water closet is a short job when everything is ready and a long one when it is not. Luis's sequence, which Maya wrote on the inside of her toolbox lid, went like this.
- Check the fixture against the schedule, open the carton and inspect the bowl and tank for cracks and chips before going further.
- Remove the rag or cap from the flange, check that the drain is clear, and scrape off any old wax or debris on a replacement.
- Check the flange: secure to the floor, not cracked, at the right height. Fix it now if anything is wrong.
- Insert the closet bolts in the flange slots, heads down, parallel to the wall, with retaining washers to hold them upright.
- Fit the seal: a wax ring, a wax ring with a horn, or a foam or rubber seal, as the manufacturer recommends. Set it on the bowl outlet or the flange as directed.
- Lower the bowl straight down over the bolts so the seal is compressed evenly, without sliding or twisting it.
- Press the bowl down with body weight, check it with a level both ways, and shim with plastic shims if the floor is uneven.
- Fit the washers and nuts and tighten them alternately, a little at a time, until snug. Stop when the nut meets firm resistance; vitreous china cracks before the bolt does.
- Cut the bolts to length and fit the caps.
- Fit the tank to the bowl with its gasket and bolts, tightening evenly so the tank sits level and does not rock on the bowl.
- Connect the supply with a listed connector from the stop to the fill valve, open the stop and check for leaks.
- Flush several times, check the tank water level against the mark, check for leaks at the base and the supply, and adjust.
- Seal the base to the floor as the code and the manufacturer require, and fit the seat.
Two parts of this sequence deserve extra attention. The first is the seal. A wax ring forms a gasket only once, as it is squeezed; if the bowl is lifted after it has been set, the wax must be replaced. A foam or rubber seal can sometimes be reset, but the manufacturer's instructions decide. The second is tightening. More callbacks come from cracked bowls caused by overtightened nuts than from any other setting mistake. A level bowl that is pressed down firmly needs only enough nut pressure to keep it from lifting.
Sealing the base is required by many codes and specifications so that cleaning water cannot get under the bowl. Some plumbers leave a small gap in the sealant at the back so that a leak at the seal will show on the floor instead of hiding under the fixture and rotting the subfloor. Others seal all the way around. Luis followed the code and the specification first, and on the Kingsway job the specification called for a continuous bead of mould-resistant sealant.
Worked problem
Fixing a low flange under new tile
In a Kingsway suite, the tile setter added a 15 mm porcelain tile on top of a self-levelling underlayment after the flanges were set. Maya finds that the top of the flange is now 9 mm below the finished floor. What should she do before setting the water closet?
Show solution
- A flange below the finished floor leaves the seal too thin to compress reliably.
- Do not stack two wax rings; they can slide apart and leak.
- Fit a listed flange extension or spacer kit that raises the flange face to at or slightly above the tile, sealed to the old flange as the kit directs.
- Use longer closet bolts to suit the raised flange, then set the bowl normally.
Answer: Raise the flange to the finished floor with a proper extension. Stacked wax rings are a common cause of hidden leaks.
Wall-hung water closets and carriers
Wall-hung water closets are common in commercial washrooms and are increasingly used in residential buildings. The bowl hangs on the wall with no base on the floor, so the floor can be cleaned underneath. The bowl's weight, and the weight of the person using it, are carried by a carrier, which is a steel frame bolted to the floor behind the wall. The carrier also holds the waste fitting that connects the bowl outlet to the drain.
A carrier must be chosen for the bowl, the wall thickness and the type of drainage connection, whether horizontal or vertical, single or back to back. It is anchored to the structural floor with the anchors the manufacturer specifies, set plumb, and adjusted so that the bowl will hang at the right height. Getting the carrier height right during the rough-in is important, because the bowl rim height is fixed once the wall is closed. Standard bowls hang with the rim at a little under 400 mm; accessible bowls hang higher, as Lesson 5 explains.
In-wall tank systems combine a carrier with a concealed tank behind the wall, operated by a push plate on the wall. They let a wall-hung toilet be used without a flushometer. The access panel behind the push plate must stay accessible, because the flush and fill valves are serviced through it. Maya's crew installed in-wall tank carriers in the Kingsway amenity washrooms, and the drawings showed the push plate openings so that the drywall crew would leave them open.
Urinals
Urinals are used in public and staff washrooms. They save water compared with water closets and are faster to use. Like water closets, most urinals have a built-in trap, and they are either flushed by a flushometer valve or are waterless. Wall-hung urinals are the most common, supported by a carrier or a hanger bracket on backing, with the outlet at a height set by the fixture's rough-in sheet.
The rough-in for a wall-hung urinal includes the waste outlet, usually 50 mm, set at the height the fixture sheet shows, the water supply for the flush valve above it, and blocking or a carrier behind the wall. The code sets minimum spacing: at least 380 mm from the centre of a urinal to a side wall or partition and at least 760 mm between urinal centres. Partitions or privacy screens are often required between urinals in public washrooms.
Waterless urinals use a trap cartridge or a liquid seal that floats on top of the urine to block odours. They save water but need regular cartridge changes and correct maintenance, and the drain line behind them must be sized and sloped so that concentrated urine does not deposit scale. Some codes and many specifications require a water supply to be roughed in behind a waterless urinal anyway, so that a flushing urinal can be installed later if needed.
| Item | Typical value | Where it comes from |
|---|---|---|
| Water closet rough-in | 305 mm (also 254 and 356 mm) | Fixture sheet |
| Centre to side wall | 380 mm minimum | Code |
| Clear space in front | 535 mm minimum | Code (larger for barrier-free) |
| Urinal centre to side | 380 mm minimum | Code |
| Urinal centre to centre | 760 mm minimum | Code |
| Flange top | At or slightly above finished floor | Manufacturer and good practice |
Testing, adjusting and handing over
After a water closet or urinal is set, it is tested in use. Each fixture is flushed several times while Maya watches the base, the supply connection and the tank-to-bowl joint for leaks. She checks that the tank fills to the water line marked inside it and that the fill valve shuts off fully, that the bowl refills to a full trap seal, and that the flush clears test media such as crumpled paper. Flushometer valves are adjusted for the right volume, as Lesson 6 explains. Any leak at the base means the bowl comes off and the seal is replaced; it never means more sealant around the base.
On a large job like Kingsway, every fixture is recorded on a checklist with its suite number, tag and test result. Luis explained that the checklist protects the contractor. When a tenant calls a year later about a running toilet, the record shows it was tested and working at turnover, and the problem is a maintenance issue rather than a defect.
Common mistakes
MistakeMeasuring the rough-in from the stud instead of the finished wall.
InsteadAdd the drywall and tile thickness and measure from the finished face.
MistakeStacking wax rings on a low flange.
InsteadRaise the flange to finished floor with a listed extension or spacer.
MistakeOvertightening closet bolts or tank bolts.
InsteadTighten alternately until snug; stop at firm resistance.
MistakeSetting the fill valve below the overflow critical level.
InsteadSet the fill valve so its critical level mark is at the required height above the overflow.
MistakeSealing over a leak at the base.
InsteadPull the bowl, find the cause and replace the seal.
Summary and key terms
- The usual water closet rough-in is 305 mm from the finished wall to the flange centre.
- The closet flange must be fastened down and set at or slightly above the finished floor.
- Code clearances: at least 380 mm from centre to a side wall and 535 mm of clear space in front of a water closet.
- Set the bowl straight down on a fresh seal, level and shim it, and tighten the nuts only until snug.
- Fill valves must be anti-siphon types with the critical level set above the overflow.
- Wall-hung water closets and urinals hang on carriers anchored to the floor.
- Urinals need at least 380 mm from centre to side and 760 mm between centres.
- Closet flange
- The fitting on the end of the closet bend that anchors the bolts and seats the seal of a floor-mounted water closet.
- Closet bolts
- Bolts set in the flange slots that hold a floor-mounted water closet to the flange.
- Fill valve
- The valve that refills a gravity tank and sends refill water to the bowl through the overflow tube.
- Flush valve
- The valve at the bottom of a gravity tank that opens to release the flush.
- Carrier
- A steel frame anchored to the floor behind the wall that supports a wall-hung fixture and its waste fitting.
- Critical level
- The level marked on an anti-siphon device that must be set above the flood level or overflow.
Practice problems
Work each problem on paper first, then reveal the answer to check.
What is the usual rough-in distance for a water closet?
Show answer
305 mm from the finished wall to the flange centre.
What is the minimum distance from the centre of a water closet to a side wall?
Show answer
380 mm.
What do you do if the flange is below the new tile?
Show answer
Fit a listed flange extension or spacer; do not stack wax rings.
Why must the bowl be lowered straight down?
Show answer
So the seal compresses evenly without sliding or twisting.
What supports a wall-hung water closet?
Show answer
A carrier anchored to the structural floor.
What is the minimum spacing between urinal centres?
Show answer
760 mm.
Lesson quiz · 5 questions
Score 60% or more to complete this lesson.
Create a free account to save your progress, take quizzes and earn a certificate.