
PHOT-340 · Lesson 6 of 12 · 27 min
Portraits and group photos
Most event coverage is documentary, but every event also needs posed images: couple portraits, wedding party photos, family formals, award winners with sponsors, speakers with organizers, and the large group photo that everyone appears in. These images are often the ones printed, framed and passed down. They must be made quickly, under pressure, in whatever light and location the event allows, with people who may be nervous, tired or impatient. This lesson covers directing people warmly and efficiently, posing individuals and couples, organizing small and large groups, choosing lenses and settings for sharp groups, using light outdoors and indoors, and handling difficult situations such as family tensions and children. Lighting fundamentals are in PHOT-220; flash at events is in lesson 7.
Directing people
Good event portraits depend more on the photographer's direction than on equipment. Most people feel awkward in front of a camera, and the photographer's job is to make them comfortable and to look good quickly. Effective direction is:
- Confident and kind. Speak clearly, smile, use names, and give simple instructions one at a time.
- Demonstrated. Show a pose rather than describing it, then mirror it for the subject.
- Prompt-based. Instead of saying "smile," give prompts that create real expressions: "tell each other one thing you love about today," "walk towards me and talk about the speeches," "look at your partner, then back at me."
- Encouraging. Tell people when it looks good, never criticize their bodies, and fix problems discreetly, such as a crooked tie or a strand of hair.
- Efficient. Know what you want before you start, keep the camera ready, and move on once you have it.
Posing individuals and couples
A few principles flatter most people. Angle the body slightly away from the camera rather than square on, shift weight to the back foot, and give hands something to do, such as holding flowers, a jacket or a partner's hand. Lift the chin slightly forward and down to define the jawline. Leave a little space between arms and body. For couples, connection matters more than perfect posing: touching, leaning in, foreheads together, walking hand in hand, or a quiet moment looking at each other. Vary between posed images and lightly directed candid moments, and between close portraits and wider images that show the place.
Body types, heights, mobility and cultural norms all affect posing. Ask about preferences rather than assuming, offer chairs for people who need them, and adapt poses for wheelchairs by bringing other people to the same height. Some couples, families or cultures prefer less physical affection in photographs; respect that.
Organizing groups
Groups are about logistics as much as posing. A plan agreed before the day, as in lesson 3, saves most of the time.
- Choose the location in advance: even light, a simple background, enough room, and a short walk from the ceremony.
- Call names from the list with the help of a family member, and keep the next group waiting nearby.
- Build groups by adding or removing a few people instead of rearranging everyone.
- Arrange people by height and relationship, with the couple or main subjects at the centre, closest family next to them, and taller people towards the back or the edges.
- Stagger heads so no face hides behind another, and check that every face can see the camera lens; if they cannot see it, it cannot see them.
- Keep feet and hands tidy, with arms around waists or hands in front rather than hanging stiffly.
- Take several frames of each group, because someone always blinks; burst mode and blink-checking during review help.
For very large groups, such as all wedding guests, find a high viewpoint, such as a balcony, staircase or ladder, so faces in the back rows are visible, and use a wide lens.
Sharp groups: focus and depth of field
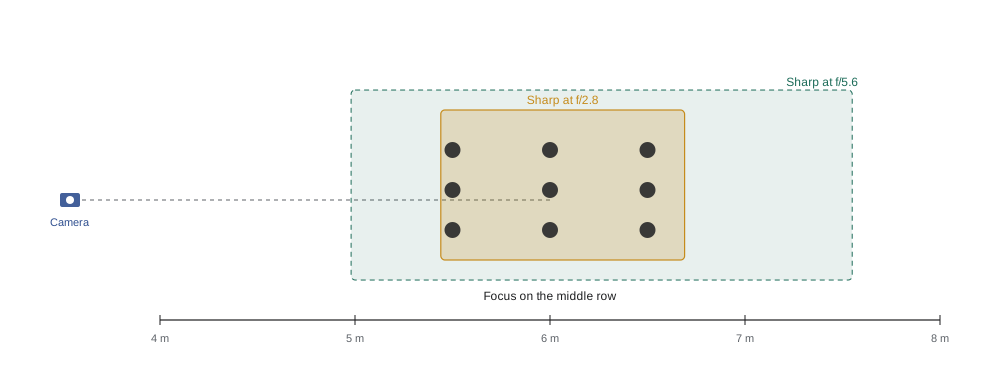
A group photo fails if someone in the back row is soft. The depth of field calculations from PHOT-330 apply. Focus on the middle row, or about one third of the way into the group, and choose an aperture that keeps all rows within the zone of acceptable sharpness. Wider apertures blur backgrounds pleasingly but narrow the zone. For groups in one row, f/2.8 or f/4 is usually enough; for several rows, f/5.6 to f/8 is safer, especially with longer lenses.
The hyperfocal and depth-of-field formulas are:
where \( f \) is the focal length, \( N \) the f-number, \( c \) the circle of confusion (about 0.03 mm on full frame) and \( s \) the focus distance.
Worked problem
Depth of field for a three-row group
A 70 mm lens at f/2.8 on full frame is focused at 6 m on the middle row of a three-row group. The rows are 0.5 m apart, so the front row is at 5.5 m and the back row at 6.5 m. Are all rows sharp? What happens at f/5.6?
Show solution
- Hyperfocal at f/2.8: \( H = 70^2 / (2.8 \times 0.03) + 70 ≈ 58{,}400 \) mm, or 58.4 m.
- Near limit: \( 58.4 \times 6 / (58.4 + 6) ≈ 5.44 \) m.
- Far limit: \( 58.4 \times 6 / (58.4 - 6) ≈ 6.69 \) m.
- Rows at 5.5, 6.0 and 6.5 m all fall within 5.44 to 6.69 m, but the front row is close to the limit.
- At f/5.6, \( H ≈ 29.2 \) m: near ≈ 4.98 m, far ≈ 7.55 m, giving a comfortable margin.
Answer: All rows are just within the zone at f/2.8, but small focus errors or people leaning forward could push someone out of it. Stopping down to f/5.6 doubles the margin while still softening the background at this distance. Many photographers use f/4 to f/5.6 for small multi-row groups and f/8 for large ones.
Shutter speed matters too: groups contain people who move, and a large group takes time to settle. Use at least 1/200 s for groups outdoors and keep ISO high enough to allow it.
Light for portraits and groups
Outdoors, the most reliable light for groups is open shade: the even light under a tree canopy, on the shaded side of a building, or on an overcast day, which avoids squinting and harsh shadows. Make sure the shade covers everyone equally; dappled light through leaves creates bright patches on faces. Backlighting, with the sun behind the subjects, produces a glowing rim and soft faces, but needs fill from a reflector or flash and careful exposure for skin. Direct midday sun is hardest; if unavoidable, turn people so the sun is behind them and add fill flash.
Golden-hour light, near sunset, is warm and flattering for couple portraits, which is why lesson 3 schedules short sessions then. Indoors, large windows provide beautiful directional light; place subjects facing or angled towards the window. In dark venues, use bounced or off-camera flash, as in lesson 7.
Worked problem
Fill flash for a backlit couple
A couple stands with the sun behind them. The background meters at f/8, 1/250 s, ISO 100, but their shaded faces meter two stops darker. The photographer wants faces one stop darker than the background highlights, for a natural look. How much flash is needed, in stops relative to the ambient exposure for faces?
Show solution
- Faces at ambient are 2 stops below the background exposure.
- Target is 1 stop below the background, so faces need 1 stop more light.
- Adding flash equal to the existing light on faces doubles it: that is +1 stop.
- So set the flash to provide about the same amount of light as the ambient on the faces, roughly flash exposure compensation near 0 in TTL fill mode, or a manual power that gives f/8 at that distance.
Answer: About one stop of fill, equal to the existing light on the faces. Check the result on the camera's histogram and adjust; many photographers prefer slightly less fill so the backlight still reads as natural.
Lenses for portraits and groups
Medium telephoto lenses, about 70 to 135 mm on full frame, flatter faces by avoiding the enlarged noses and receding ears that wide lenses produce up close, and they separate subjects from backgrounds. For groups, 35 to 70 mm is common, depending on space. Avoid placing people at the edges of a very wide lens, where stretching distortion makes them look wider; keep important people near the centre, or step back and use a longer focal length.
Children, elders and difficult situations
Children have short attention spans, so photograph groups with children early in the sequence, let parents help, and use play and silly prompts to get real smiles. Elders may need chairs, shade and more time; seat them first and do not keep them standing. Family tensions, such as divorced parents or estranged relatives, should be identified in the planning questionnaire and handled discreetly with separate groups and careful placement. If someone is missing or a family member refuses to be photographed with another, adjust calmly and move on.
Corporate portraits and award photos
At corporate events, posed images include headshots, speakers with hosts, award winners with presenters and sponsors, and team photos. Clients often need consistency, such as the same background and framing for every award winner, and fast delivery for social media. Set up a fixed position with consistent light, ask the organizer for a list of names and order, and use a helper to line people up. For awards on stage, agree on where presenters will pause for the handshake and look at the camera.
Working quickly when time runs short
On many wedding days, portrait time shrinks because the ceremony started late or the receiving line ran long. When that happens, prioritize: complete the family formals that matter most to the couple, photograph the wedding party in one or two strong arrangements rather than many variations, and spend the remaining minutes on a few couple portraits in the best available light. Tell the couple calmly what you are doing, and suggest a short session later, during golden hour or between dinner courses, to make up the time. Clients remember a photographer who stayed relaxed under pressure.
Posing guests with disabilities and diverse needs
Every group includes people with different needs. Ask rather than assume: someone with a mobility aid may prefer to stand with support, sit or stay in their wheelchair, and a guest with a hearing impairment may need you to face them and use gestures. Arrange groups so that everyone appears as an equal part of the family rather than at the edge. Plan accessible routes to portrait locations when scouting, and allow extra time for people who move slowly. These small acts of care show in the photographs and in the reviews that follow.
Checking groups before you move on
Before releasing a group, zoom in on the camera's screen to check that every face is sharp and every eye is open, or use the camera's face-detection review if it has one. It takes ten seconds and prevents the most common group-photo regret: a key relative blinking in the only frame.
Common mistakes
MistakeTelling people to "smile" and waiting.
InsteadUse prompts and interaction that create real expressions.
MistakeShooting a three-row group at f/1.8.
InsteadFocus on the middle row and use an aperture whose depth of field covers all rows.
MistakePlacing a group in dappled sunlight.
InsteadUse even open shade or add fill to control harsh light.
MistakePutting the most important people at the edges of a wide lens.
InsteadKeep key people near the centre or use a longer lens from farther back.
MistakeKeeping elders standing while groups are rearranged.
InsteadSeat them, photograph their groups early and release them.
Summary and key terms
- Posed images are often the most printed and valued, and must be made quickly and kindly.
- Direct with confidence, demonstration and prompts that create real expressions.
- Angle bodies, give hands something to do and prioritize connection for couples.
- Organize groups by list, height and relationship, building groups by adding or removing a few people.
- Use depth-of-field formulas to keep every row sharp, usually f/4 to f/8 for multi-row groups.
- Prefer open shade, backlight with fill or window light, and flash in dark venues.
- Plan for children, elders, family tensions and the consistency corporate clients need.
Practice problems
Work each problem on paper first, then reveal the answer to check.
Give an example of a prompt that creates a real smile.
Show answer
"Tell each other one thing you loved about today."
Where should the couple stand in a family group?
Show answer
At the centre, with closest family beside them.
Hyperfocal distance for 50 mm at f/4 with c = 0.03 mm?
Show answer
2,500/0.12 + 50 ≈ 20,880 mm, about 20.9 m.
Where should you focus on a three-row group?
Show answer
On the middle row, or about one third into the group.
Why avoid dappled light?
Show answer
It creates bright patches on faces.
What focal lengths flatter faces in portraits?
Show answer
About 70 to 135 mm on full frame.
How do you show faces in a very large group?
Show answer
Shoot from a high viewpoint with a wide lens.
Why photograph children's groups early?
Show answer
Children have short attention spans.
Faces in shade are 2 stops below the background; you want 1 stop below. How much fill?
Show answer
About one stop, equal to the ambient light on the faces.
What do corporate award photos often need?
Show answer
Consistent background, framing and light, and fast delivery.
Lesson quiz · 5 questions
Score 60% or more to complete this lesson.
Create a free account to save your progress, take quizzes and earn a certificate.