
PHOT-201 · Lesson 10 of 12 · 27 min
Raw files, image processing and computational photography
Between the sensor and the finished photograph lies a chain of processing that can be done in the camera, producing a JPEG or HEIF file, or later on a computer from a raw file. Understanding what this processing does, what raw files contain, how file formats and colour spaces differ, and how computational photography combines many frames into one image helps photographers choose settings, protect image quality and judge when a camera's processing is helping or hurting. This lesson covers the in-camera processing pipeline, raw files and their formats, bit depth and compression, JPEG and HEIF, colour spaces, and the computational techniques that power smartphones and increasingly dedicated cameras. PHOT-202 covers raw processing and retouching in practice.
The processing pipeline
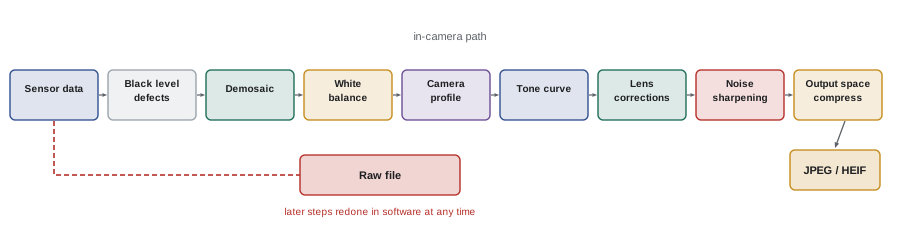
Whether done in the camera or in software, turning sensor data into a viewable image involves similar steps:
- Black level subtraction and correction of defective pixels.
- Demosaicing to estimate full colour at every pixel (Lesson 4).
- White balance, scaling the colour channels so that neutral objects appear neutral.
- Colour transformation from the camera's colour response into a standard colour space, using a profile.
- Tone mapping, applying a curve that brightens shadows and compresses highlights so that the image looks natural on a display, and adding contrast according to the chosen style.
- Lens corrections for distortion, vignetting and chromatic aberration.
- Noise reduction and sharpening.
- Conversion to the output colour space and bit depth, and compression.
In the camera, these steps happen in milliseconds according to the picture style and settings, and the result is fixed in a JPEG or HEIF file. In raw processing software, each step can be adjusted and redone at any time.
Raw files
A raw file stores the sensor data with minimal processing, together with metadata describing the camera, lens, settings and a JPEG preview. Raw files keep the full bit depth of the sensor, typically 12 or 14 bits per photosite, and leave decisions such as white balance, tone, colour and sharpening to be made later. The benefits are greater latitude to recover highlights and shadows, the ability to change white balance without loss, better results from improved software in future, and avoidance of the camera's compression artefacts. The costs are larger files, the need to process every image, and dependence on software that supports the camera's format.
Each manufacturer has its own raw format, such as CR3 for Canon, NEF for Nikon, ARW for Sony, RAF for Fujifilm and ORF or ORI for OM System. Adobe's Digital Negative (DNG) format, introduced in 2004, is an openly documented raw format that some cameras record natively and to which other raw files can be converted, often used for long-term archiving because it does not depend on a single manufacturer's software support.
Bit depth and compression in raw files
Bit depth determines how many levels each photosite value can take: 12 bits give 4,096 levels and 14 bits 16,384. The extra levels mainly benefit images with deep shadows that will be brightened strongly; for many images the difference is invisible, because sensor noise exceeds the step size. Some cameras offer 16-bit modes in medium format or multi-shot modes. Raw files may be uncompressed, losslessly compressed (smaller files with no loss), or lossy compressed, which discards some information in a way designed to be invisible except in extreme edits. Some cameras also offer smaller raw files at reduced resolution. Lossless compression is usually the best default when the camera offers it.
JPEG and HEIF
JPEG, standardized in 1992, remains the universal format for sharing photographs. It stores 8 bits per channel (256 levels), uses chroma subsampling and lossy compression based on the discrete cosine transform, and supports quality settings that trade file size against artefacts such as blockiness and halos. Editing JPEGs heavily, especially lifting shadows or changing white balance significantly, can produce banding and artefacts, because much information has already been discarded. HEIF (High Efficiency Image File Format), using HEVC compression, stores 10 bits per channel at roughly half the file size of an equivalent JPEG and supports high dynamic range display. It is the default on many smartphones and is offered by several cameras, though support in older software and websites is less universal.
| Format | Bit depth | Compression | Typical use |
|---|---|---|---|
| Raw (manufacturer or DNG) | 12–14 bits (16 in some) | None, lossless or lossy | Maximum quality and editing latitude |
| TIFF | 8 or 16 bits per channel | None or lossless | Edited masters, printing, archiving |
| JPEG | 8 bits per channel | Lossy | Sharing, web, fast delivery |
| HEIF | 10 bits per channel | Lossy (HEVC) | Efficient storage, HDR display |
| PNG | 8 or 16 bits per channel | Lossless | Graphics, screenshots |
Colour spaces
A colour space defines the range of colours (gamut) and how they are encoded. sRGB, defined in 1996, matches typical displays and is the standard for the web and most consumer printing services. Adobe RGB (1998) has a wider gamut, particularly in cyans and greens, useful for high-quality printing. Display P3, used by many modern phones, tablets and monitors, has a wider gamut than sRGB, especially in reds and greens. ProPhoto RGB is very large, used as a working space in editing to avoid clipping colours during processing. The in-camera colour space setting affects only JPEG and HEIF files; raw files are converted to a colour space during processing. Images for the web should be exported in sRGB, or with an embedded profile for wider-gamut displays, so that colours appear as intended; PHOT-301 covers colour management in depth.
Worked problem
Choosing settings for a commercial shoot
A photographer delivers same-day web images to a client during a product shoot, and later delivers high-quality prints. What capture and processing settings make sense?
Show solution
- Capture raw plus JPEG, with the JPEG in sRGB at high quality for immediate delivery.
- Use a neutral picture style so that the preview and histogram reflect the raw data more closely.
- Process the raw files later in a wide working space such as ProPhoto RGB, at 16 bits.
- Export print files as 16-bit TIFF in Adobe RGB or the printer's profile, and web files as 8-bit JPEG in sRGB.
Answer: Raw plus sRGB JPEG at capture; process raw in a wide space; export to Adobe RGB or printer profiles for print and sRGB for the web.
Computational photography
Computational photography uses algorithms to combine information from multiple frames, multiple cameras or other sensors into images that a single exposure could not produce. Smartphones pioneered the field to overcome their tiny sensors and lenses:
- Multi-frame noise reduction and HDR: the phone continuously captures frames, some underexposed to protect highlights, then aligns and merges many of them, collecting far more total light than one frame and extending dynamic range. Night modes extend this to seconds of capture with handheld alignment.
- Super-resolution: natural hand movement shifts the image slightly between frames, so merging them recovers more detail than one frame, similar to pixel shift.
- Depth estimation and synthetic bokeh: dual pixels, multiple cameras or machine learning estimate the depth of each part of the scene, allowing the background to be blurred artificially in portrait modes.
- Semantic processing: machine-learning models recognize skies, faces, skin, hair and foliage and process each differently, for example brightening faces and enhancing skies.
- Zoom fusion: combining images from cameras with different focal lengths.
Dedicated cameras increasingly adopt similar techniques, such as handheld high-resolution modes, in-camera focus stacking, live ND and subject recognition. Computational photography can produce impressive images in difficult conditions, but it can also produce artefacts, an overprocessed look, or details that were never in the scene. It raises questions for documentary and journalistic photography about where processing ends and fabrication begins (PHOT-320), and content provenance standards (Lesson 11) aim to record how images were made.
What happens when you change white balance in raw processing
White balance in a raw file is not baked into the data; it is stored as metadata suggesting multipliers for the red and blue channels relative to green. Changing white balance during raw processing simply applies different multipliers before the colour transformation, so there is no loss of quality whether the change is small or large. In a JPEG, white balance has already been applied, the colour has been transformed and the values compressed to 8 bits, so a large correction stretches some channels and compresses others, producing banding, noise in the stretched channel and colour shifts in the highlights. This is one of the clearest practical advantages of raw capture for mixed lighting such as tungsten interiors with window light, or for stage and event lighting that changes constantly.
Camera profiles and colour rendering
Raw processing software uses a camera profile to convert the camera's colour response into a standard colour space. Different profiles give different renderings from the same raw data: the software maker's default profiles aim for neutral or pleasing results, while manufacturer-matching profiles imitate the camera's own picture styles, such as standard, portrait, landscape or film simulations. Photographers seeking accurate colour for product or art reproduction create custom profiles by photographing a colour target, such as a ColorChecker chart, under the shooting light, and using software to build a profile that makes the chart's patches match their known values. This custom profiling, combined with a calibrated monitor and printer profiles covered in PHOT-301, forms the basis of an accurate colour workflow.
Worked problem
File sizes for a day of shooting
A wedding photographer shoots 3,000 frames with a 45-megapixel camera, recording 14-bit lossless compressed raw files of about 50 MB each plus large fine JPEGs of about 15 MB. How much storage is needed for the day, including one backup copy?
Show solution
- Raw: 3,000 × 50 MB = 150,000 MB ≈ 150 GB.
- JPEG: 3,000 × 15 MB = 45,000 MB ≈ 45 GB.
- Total per copy: about 195 GB.
- With one backup copy: about 390 GB, and a third copy off site for safety brings it to about 585 GB.
Answer: About 195 GB per copy, roughly 390 GB with a backup and about 585 GB following the 3-2-1 approach.
Metadata: EXIF, IPTC and XMP
Every image file carries metadata describing it. EXIF (Exchangeable Image File Format) metadata, recorded by the camera, includes the date and time, camera and lens model, exposure settings, focal length, serial numbers and, if enabled, GPS location. IPTC metadata, a standard developed by the International Press Telecommunications Council, holds information added by the photographer or agency, such as captions, keywords, creator, copyright notice, contact details and usage rights, and is essential for news and stock photography. XMP (Extensible Metadata Platform), introduced by Adobe, provides a flexible framework that can store IPTC fields and processing instructions; raw processors often save edits in XMP sidecar files beside the raw file, so the original data remains untouched. Photographers should add copyright and contact metadata automatically in the camera or during import, and consider removing location data from images shared publicly to protect privacy, particularly for photographs of homes or people.
Non-destructive editing
Raw processing is non-destructive: the original raw file is never changed, and the software stores a list of instructions describing the adjustments. Each time the image is displayed or exported, the software applies the instructions to the raw data. This allows any adjustment to be changed or removed later, multiple versions to be created from one file without duplicating data, and edits to benefit from improved processing algorithms. Catalogue-based programs store instructions in a database, while others use sidecar files; both require careful backup of the catalogue or sidecars as well as the raw files. Exported JPEG or TIFF files are new files that contain the result of the processing at that moment.
The evolving role of the camera processor
Camera processors have become powerful computers, with dedicated circuits for demosaicing, noise reduction, video encoding and, increasingly, machine-learning tasks such as subject recognition. This processing power is what allows modern cameras to track subjects, record high-resolution video and produce high-quality JPEGs with lens corrections and noise reduction in real time. Some manufacturers now offer in-camera AI processing for noise reduction, upscaling and subject-aware adjustments, and cloud-based workflows send images from the camera to online services for processing and delivery. For professionals, the decision between in-camera processing and raw processing depends on deadlines, quality requirements and the time available for editing.
Common mistakes
MistakeShooting only JPEG for important work.
InsteadShoot raw, or raw plus JPEG, when quality and latitude matter.
MistakeHeavily editing 8-bit JPEGs.
InsteadEdit raw or 16-bit files to avoid banding.
MistakePosting Adobe RGB images to the web without profiles.
InsteadExport in sRGB for the web.
MistakeAssuming the camera colour space affects raw files.
InsteadIt applies only to JPEG and HEIF.
MistakeTreating computational images as straightforward records.
InsteadUnderstand and disclose processing where it matters.
Summary and key terms
- Processing includes demosaicing, white balance, colour, tone, corrections, noise reduction and compression.
- Raw files keep sensor data and full bit depth for later processing.
- DNG is an open raw format used for archiving.
- JPEG is 8-bit lossy; HEIF is 10-bit and more efficient.
- sRGB suits the web; Adobe RGB and Display P3 offer wider gamuts.
- Computational photography merges frames for noise, dynamic range, detail and depth effects.
- Computational processing raises questions of authenticity.
- Raw file
- File storing minimally processed sensor data.
- DNG
- Adobe's open raw format.
- Bit depth
- Number of levels per value.
- Lossless compression
- Compression without information loss.
- JPEG
- 8-bit lossy image format.
- HEIF
- 10-bit efficient image format using HEVC.
- Colour space
- Defined gamut and encoding of colours.
- sRGB
- Standard colour space for displays and the web.
- Tone mapping
- Mapping scene tones to display tones.
- Computational photography
- Algorithmic combination of frames and data.
Practice problems
Work each problem on paper first, then reveal the answer to check.
List four processing pipeline steps.
Show answer
Demosaic, white balance, colour profile, tone curve, corrections, noise reduction, sharpening.
Name two benefits of raw files.
Show answer
Latitude, lossless white balance changes, better future software.
Why is DNG used for archiving?
Show answer
It is openly documented and not tied to one manufacturer.
Levels in 12-bit data?
Show answer
4,096.
Best default raw compression?
Show answer
Lossless.
Bit depth of JPEG?
Show answer
8 bits per channel.
Advantage of HEIF?
Show answer
10-bit at about half the size of JPEG.
Which colour space suits the web?
Show answer
sRGB.
How do phones reduce noise?
Show answer
By aligning and merging many frames.
How is synthetic bokeh made?
Show answer
By estimating depth and blurring the background.
Lesson quiz · 5 questions
Score 60% or more to complete this lesson.
Create a free account to save your progress, take quizzes and earn a certificate.