
ELV-120 · Lesson 6 of 12 · 18 min
Rail bracket layout and anchorage
Rail brackets hold the rails to the building. Every force the rails take, from the steady push of a car loaded off centre to the sudden grip of the safeties stopping a falling car, passes through the brackets and their fastenings into the hoistway walls or steel. A rail is only as good as the brackets that hold it, and a bracket is only as good as its anchors. At Quayside, the bracket stage took more crew-hours than any other part of the rail work, because each bracket has to be fastened in exactly the right place, to the right bearing point, with the right anchors, and adjusted so that the rail it carries will land on the plumb line.
This lesson covers the types of brackets, how their spacing is set and laid out, the ways of fastening them to concrete and steel, drilling and anchoring safely, the seismic requirements that apply in the Pacific Northwest, and how an anchor's load is checked against its capacity.
Types of brackets
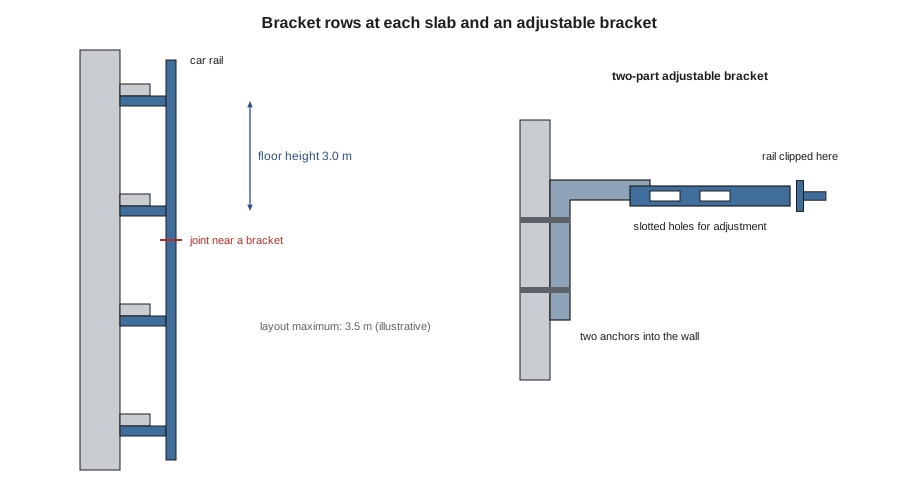
Brackets come in a few basic forms, and the layout's details sheet shows which one goes where. The simplest is a fixed wall bracket: a steel angle or bent plate fastened to the hoistway wall with the rail clipped to its outer face. More common on new work is the adjustable bracket, made of two parts that overlap and bolt together through slotted holes. One part is fastened to the wall; the other carries the rail. The slots let the crew move the rail toward or away from the wall, and side to side, to bring it onto the plumb line, and once the rail is aligned, the overlap is locked with bolts tightened to torque or, where the drawing calls for it, by welding.
- Car rail brackets. One bracket per car rail at each bracket row, fastened to the side wall or to a separator beam.
- Counterweight brackets. Where the counterweight runs along a wall, a single bracket can carry both counterweight rails; where it runs between cars, the rails are carried on a beam spanning the hoistway.
- Separator beam brackets. In a multi-car hoistway, steel beams span between the front and rear walls at each bracket row, and the rails of adjacent cars are fastened to opposite sides of the same beam, centred between the two cars' plumb lines with packing plates.
- Pit and overhead brackets. Special brackets at the bottom and top of each rail run, including the rail base plates on the pit floor and the top bracket below the overhead.
Bracket spacing
The layout sets the maximum vertical distance between bracket rows, and that maximum comes from the rail size and the loads, as Lesson 5 explained. The actual spacing is then set by where the building offers bearing points. In a concrete tower with uniform floors like Quayside, the brackets go at each floor slab, where the walls are thickest and the inserts were cast in, and the spacing is the floor height. Where a floor is taller than the maximum spacing, such as a lobby or a mechanical floor, intermediate brackets go between the slabs, often on steel added for the purpose. In the pit, a bracket row sits partway up the pit wall, and at the top, a row is set in the overhead so that the top length of rail is held.
Two more rules come from the joints. Every rail length must be held by at least one bracket, even a short length cut to fit at the top. And joints are placed near, but not at, a bracket, so that the fishplate does not clash with the bracket and so that the joint is supported. The joint positions on the layout are worked out with these rules, and the crew checks them as the rails go up, because a cut length at the bottom moves every joint above it.
# Bracket rows for Quayside car 2 over the full height (heights above the pit floor, m)
pit, travel, overhead, top_gap = 2.4, 87.0, 4.6, 0.15
max_spacing = 3.5                    # from the layout for these rails (illustrative)
rows = [1.2]                        # bracket row partway up the pit wall
rows += [pit + travel * k / 29 for k in range(30)]    # one row at each of the 30 floor slabs
rows += [pit + travel + 3.0]       # one row in the overhead
extra = 0
fixed = [rows[0]]
for r in rows[1:]:                     # add intermediate rows where a gap is too large
    while r - fixed[-1] > max_spacing:
        fixed.append(fixed[-1] + max_spacing); extra += 1
    fixed.append(r)
gaps = [b - a for a, b in zip(fixed, fixed[1:])]
print(f"bracket rows: {len(fixed)} (including {extra} intermediate)")
print(f"largest gap between rows: {max(gaps):.2f} m (limit {max_spacing})")
print(f"rail above the top row: {pit + travel + overhead - top_gap - fixed[-1]:.2f} m")
car, cwt = 2 * len(fixed), len(fixed)  # two car rail brackets, one counterweight bracket per row
print(f"brackets: {car} car rail, {cwt} counterweight; anchors: {2 * car + 4 * cwt}")bracket rows: 32 (including 0 intermediate) largest gap between rows: 3.00 m (limit 3.5) rail above the top row: 1.45 m brackets: 64 car rail, 32 counterweight; anchors: 256
The calculation gives 32 rows over the full height, none intermediate, with the largest gap equal to the floor height and well within the limit. It also shows how much rail stands above the top bracket, which must be short enough that the top length is properly held. The bracket and anchor totals go on the material order, and the anchor count is a reminder of the scale of the drilling: more than 250 holes for one car.
Fastening to concrete
Most brackets at Quayside are fastened to concrete, and there are three ways to do it. The best is a cast-in insert: a steel channel or plate embedded in the wall when it is poured, at the position the layout gives. A channel insert takes T-head bolts that can slide along it, which allows some adjustment if the insert is a little out of place, and one long insert at each bracket location, rather than two short ones, lets both sides of the bracket fasten to it. Embedded plates are steel plates with studs cast into the wall, to which brackets are welded. Both need the general contractor to place them accurately before the pour, which is why the inserts were on Lena's turnover list.
Where there is no insert, or it is out of position, brackets are fastened with post-installed anchors drilled into the hardened concrete. The common types are mechanical expansion anchors, such as wedge and sleeve anchors, which grip by expanding against the sides of the hole when tightened; undercut anchors, which lock into a cone-shaped cut at the bottom of the hole; and adhesive anchors, threaded rods bonded into the hole with an epoxy or similar adhesive. Each type has its own installation instructions, and each is only as strong as its installation: the right drill bit, the hole depth, the hole cleaned of dust, the edge distance and spacing from other anchors, and the torque or cure time.
| Method | How it holds | Points to watch |
|---|---|---|
| Cast-in channel insert | Embedded channel with T-head bolts | Position set at the pour; bolt type and torque from the details |
| Embedded plate | Plate with studs cast in; bracket welded on | Qualified welder; check plate position before the pour |
| Expansion anchor | Expands against the hole when torqued | Hole size, depth and cleaning; edge distance; torque |
| Undercut anchor | Locks into an undercut at the base of the hole | Special drill or tool; set indicator |
| Adhesive anchor | Rod bonded into the hole | Hole cleaning, cure time and temperature; no load until cured |
Post-installed anchors in an elevator hoistway are used only in sound poured concrete, at the size, type and embedment the engineer specified, and only by workers trained in that anchor. They are not used in concrete block, brick or cracked concrete unless the engineer has designed for it; block walls usually get through-bolts with plates on the far side, or steel framing. A bracket fastening in a wood-framed building is always detailed on the elevator drawings, because ordinary wood screws and lag bolts cannot be relied on for safety loads.
Fastening to steel
Brackets on separator beams and on structural steel are bolted through drilled holes or welded. Bolted connections need holes drilled to size; burning holes with a torch is avoided, because it leaves rough, oversized holes, can weaken the steel around them, and may need the engineer's approval. Welds are made only by welders qualified for the process and position under the welding standard the job specifies, which in Canada is usually CSA W47.1 for the company and CSA W59 for the welds, and in the United States is AWS D1.1. Welding in a hoistway is hot work, with a fire watch, a fire extinguisher at hand, protection for the lines and anything combustible, and screens for anyone nearby.
Seismic requirements
Vancouver and Seattle are both in high seismic regions, and the code has a separate set of requirements for elevators in buildings where earthquakes are expected. They affect the guiding system directly. Rail brackets and their fastenings must resist the seismic forces the code specifies, which often means closer bracket spacing or heavier rails than a non-seismic job would use. Counterweight rails get particular attention, because a counterweight that leaves its rails in an earthquake can strike the car; the counterweight frame is fitted with retainer plates or guards that keep it on the rails. These requirements are designed into the layout, and the mechanic's part is to install every bracket, clip, retainer and tie the layout calls for, exactly as detailed.
Drilling safely
Drilling hundreds of anchor holes in a concrete hoistway brings three hazards: dust, noise and hidden obstructions. Concrete dust contains crystalline silica, which causes lung disease when breathed over time.
WorkSafeBC requires an exposure control plan for silica, and the controls at Quayside are a rotary hammer with an integrated dust extraction shroud connected to a vacuum with a HEPA filter, respirators where the risk assessment calls for them, and no dry sweeping of the dust.
Noise from a rotary hammer in a concrete hoistway was measured at 103 dBA during the ELV-110 survey, so hearing protection is worn by everyone on the platform. Hidden obstructions are the third hazard. A drill that strikes reinforcing steel stops cutting and can kick. The crew does not cut through rebar to place an anchor without the engineer's approval; the hole is moved within the bracket's adjustment and the abandoned hole is filled as specified. Walls and slabs with post-tensioned cables or embedded conduit are scanned before drilling, because cutting a tensioned cable can release enough energy to kill.
Checking an anchor's load
The reactions table on the layout gives the forces at each bracket, and the details sheet gives the anchors chosen to carry them. A mechanic can check the arithmetic in a simple case: how the force is shared between the anchors, and how the share compares with the capacity the anchor manufacturer and engineer allow for that concrete and installation. The check below uses illustrative values for a two-anchor car rail bracket, with a simple linear combination of tension and shear. Real anchor design uses the method in the concrete design standard, done by the engineer. The point of the exercise is to see what happens when one anchor is missing or poorly set.
# Two-anchor bracket: share of the load and a simple tension-shear check (illustrative values)
F_out, F_side = 3.2, 2.4        # kN: force pulling the bracket off the wall, force along the wall
T_allow, V_allow = 4.0, 5.0      # kN: allowed tension and shear per anchor
for anchors in (2, 1):             # as designed, and with one anchor missing or not holding
    T, V = F_out / anchors, F_side / anchors
    ratio = T / T_allow + V / V_allow
    print(f"{anchors} anchor(s): tension {T:.1f} kN, shear {V:.1f} kN each, "
f"combined ratio {ratio:.2f} -> {'ok' if ratio <= 1.0 else 'OVERLOADED'}")2 anchor(s): tension 1.6 kN, shear 1.2 kN each, combined ratio 0.64 -> ok 1 anchor(s): tension 3.2 kN, shear 2.4 kN each, combined ratio 1.28 -> OVERLOADED
As designed, each anchor works at about two-thirds of its allowance. With one anchor missing, the remaining one is overloaded. This is why every anchor on the details sheet goes in, why a hole that is drilled too shallow or too large is not used, and why anchors are torqued and recorded. At Quayside, Ray has Tamsin torque each expansion anchor with a calibrated torque wrench and mark it with paint once done, and a sample of anchors on each car is proof-tested with a hydraulic tension tester as the specification requires.
Common mistakes
MistakeMoving a bracket to miss an insert that is out of place, without telling anyone.
InsteadReport it; the engineer decides whether to use a post-installed anchor or another fix.
MistakeBlowing the dust out of an anchor hole by mouth.
InsteadClean the hole with a brush and the vacuum as the anchor instructions say.
MistakeCutting through rebar to place an anchor.
InsteadMove the hole within the bracket's adjustment; cut rebar only with the engineer's approval.
MistakeLeaving out one anchor because the hole hit steel.
InsteadEvery anchor on the details carries load; drill a new hole or get a design change.
MistakeBurning holes in a separator beam.
InsteadDrill them to size; burned holes are rough and oversized and may need approval.
Summary and key terms
- Brackets carry every rail force into the building; anchors carry every bracket force.
- Adjustable two-part brackets with slotted holes let the rail be brought onto the plumb line.
- The layout sets the maximum bracket spacing; every rail length needs at least one bracket.
- Cast-in inserts are preferred; post-installed anchors need the right type, hole, cleaning and torque.
- Seismic requirements add bracket strength and counterweight retainers in Vancouver and Seattle.
- Silica dust, noise and hidden rebar or cables are controlled before and during drilling.
- Rail bracket
- A steel support that fastens a rail to the building.
- Bracket row
- The set of brackets at one level of the hoistway.
- Channel insert
- A steel channel cast into concrete that takes sliding T-head bolts.
- Expansion anchor
- A post-installed anchor that grips by expanding in its hole.
- Adhesive anchor
- A threaded rod bonded into a drilled hole.
- Separator beam
- A beam spanning a multi-car hoistway that carries the rails of adjacent cars.
Practice problems
Work each problem on paper first, then reveal the answer to check.
Why must every rail length be held by at least one bracket?
Show answer
An unsupported length could move or fall; each length must be fastened.
What are the four parts of a correct post-installed anchor installation?
Show answer
Correct bit and depth, a cleaned hole, edge distance and spacing, and the specified torque or cure.
A bracket sees 4.0 kN off the wall on two anchors. What is each anchor's tension?
Show answer
2.0 kN.
What must be done before drilling a slab that may contain post-tensioned cables?
Show answer
Scan it to locate the cables and avoid them.
Lesson quiz · 5 questions
Score 60% or more to complete this lesson.
Create a free account to save your progress, take quizzes and earn a certificate.