
ELV-120 · Lesson 4 of 12 · 18 min
Plumbing the hoistway
Plumbing the hoistway means setting the vertical reference lines from which every bracket, rail and entrance is installed. Each line hangs, or shines, from the top of the hoistway to the pit in an exact position taken from the layout drawing, and for the rest of the rail work the crew measures from the lines rather than from the building. The lines represent where the elevator will be. Once they are set, the hoistway can be crooked around them and the elevator will still run straight. Ray calls plumbing the most important day of the job, because a mistake in the lines is built into every bracket that follows.
This lesson covers the purpose of the lines, templates, wire and laser methods, how the line positions are chosen to fit the real hoistway, how to keep the lines accurate and protected, and the safety of the work. It follows directly from the survey in Lesson 3, which tells the crew how much room the hoistway actually has.
What the lines represent
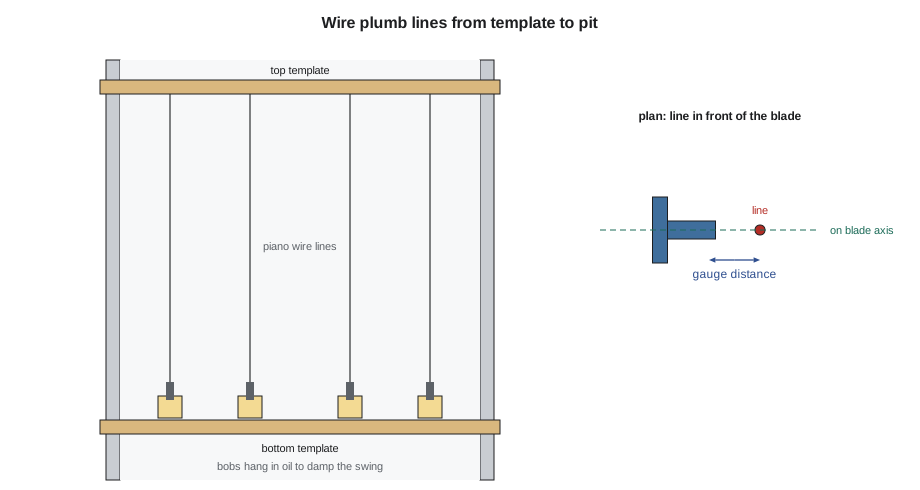
Each plumb line stands for a feature on the plan view. The most common arrangement uses one line for each rail, set a small, fixed distance in front of the rail blade face and centred on the blade, so that the blade can be checked against the line with a gauge at every bracket. Two more lines are often hung near the front of the hoistway for the entrances, set on the line of the hoistway sills or a fixed distance behind it. With four rail lines and two entrance lines, every important feature of the elevator has a reference running the full height of the hoistway.
At Quayside, the four cars share one hoistway, so the lines for all four cars are set together from one set of templates. That keeps the four entrances in a straight line along the lobby walls, keeps the separator beams in the right place between the cars, and makes sure that rails set by two different crews end up where the drawing puts them relative to each other. The first car's lines are set from the front wall line and the car centre line; the others are set from the first car by the dimensions on the plan.
Templates
A template is a frame fixed across the hoistway at a known height, with the line positions marked and notched on it. There are always at least two: one at the top, from which the lines hang, and one at the bottom, usually in the pit or at the lowest landing, which fixes the lower ends. Templates are traditionally built from straight, clear lumber, such as 25 by 150 mm (1 by 6 in) or 50 by 150 mm (2 by 6 in) boards, braced so they cannot rack, and fastened to the hoistway walls or to steel at the top. Some manufacturers supply steel templates or adjustable plumbing frames for their units.
The top template is set first. Its front edge is set parallel to the front wall line, and the rail and entrance line positions are marked on it from the layout using a steel tape and a square, checking every mark against two different dimensions. A small notch and a cinch nail at each mark hold the wire so that it can slide vertically but not move sideways. The bottom template is then set below, and the lines are brought to it and fixed once they hang plumb. Brackets are installed before the templates come out, but the templates are removed before the rails go in, so the crew records the line positions on the brackets or on the walls before taking them down.
Wire lines
The traditional plumb line is steel piano wire, chosen because it is strong, thin and stretches little. A plumb bob, heavy enough to pull the wire straight, hangs at the bottom, and the bob hangs in a bucket of oil or water to damp its swing. The bob does not touch the bottom of the bucket. Once the wire has settled, its position at the bottom template is marked, the wire is fixed there, and the bob may be left hanging below as a tensioner.
A long wire takes a long time to settle, and it is easy to disturb. The swing of a hanging wire is like a pendulum, and the longer the pendulum, the slower it swings. In a tall hoistway, a wire can take a quarter of a minute or more to complete a single back-and-forth swing, and air moving up the hoistway, which is strong in a tall building on a cold day, keeps it moving. The calculation below shows the period of a free-hanging wire for some Quayside lengths.
# Period of a free-hanging plumb line (simple pendulum), for a feel for the swing
import math
g = 9.81                                   # metres per second squared
for floors in (5, 10, 22, 30):
    length = floors * 3.0                # wire length, m
    period = 2 * math.pi * math.sqrt(length / g)
print(f"{floors:2d} floors ({length:5.0f} m): one full swing takes {period:4.1f} s")5 floors ( 15 m): one full swing takes 7.8 s 10 floors ( 30 m): one full swing takes 11.0 s 22 floors ( 66 m): one full swing takes 16.3 s 30 floors ( 90 m): one full swing takes 19.0 s
A wire hanging the 22 floors that were poured at Quayside takes about 16 seconds to swing back and forth once. Nobody can read a position off a line like that by eye; the damping bucket, closed barricades to cut the draught, and patience are what make wire plumbing work. Ray waits for the wire to sit still in the bucket for a full minute before marking the bottom template, and he checks it again the next morning.
Laser lines
On tall hoistways, many crews use a laser plumb instead of, or alongside, wire. A laser plumb unit sits on a fixed base at the bottom or top of the hoistway and projects a vertical beam, which is caught on a target at each bracket row. The beam does not swing in a draught, does not snag on the platform, and can be removed and reset to the same mark. Its accuracy depends on the instrument and its set-up: a laser that is not level on its base, or that has been knocked, throws a beam that is plumb in the wrong place, so it is checked against its own reversal or against a wire before use. Dust and heat shimmer in the hoistway can make the spot hard to read at long range, and many crews reset the laser partway up a tall building, transferring the line at an intermediate template.
| Wire | Laser | |
|---|---|---|
| Cost and set-up | Low cost; slow to settle in a tall hoistway | Higher cost; quick to set and reset |
| Effect of air movement | Swings; needs damping and closed openings | Not affected by draught; may shimmer in heat or dust |
| Risk of disturbance | Easily snagged by the platform or material | Beam can be blocked but not bent; base can be knocked |
| Check of accuracy | Plumb by gravity if hanging free | Must be checked by reversal or against a wire |
| Eye hazard | None | Class 2 or 3R beam; keep below eye level and warn others |
Choosing where the lines go
The layout gives the positions of the lines relative to each other. The plumbing decision is where to put the whole set in the hoistway as built. If the hoistway were perfect, the lines would go exactly where the drawing shows, measured from the front wall and the side walls. A real hoistway leans, bellies and twists, so the crew places the set of lines to get the best clearances over the full height, while keeping the front of the set parallel to the front wall line so the entrances line up. The survey readings from Lesson 3 are the input.
Across the hoistway, the question is how far to shift the car centre line from the drawing position, if at all, so that the bracket clearance on the tightest side is as large as possible. The code below takes the smallest clearance between each side wall and its bracket position over the full height, from the car 2 survey after the general contractor ground back the patch at floor 18, and finds the shift that balances them, limited by the shift the layout allows.
# Where to set the car 2 line set across the hoistway (mm)
# Smallest gap over the full height between each wall and its bracket position,
# if the lines were set exactly where the layout puts them:
min_gap_left = 8          # tightest at floor 14, where the left wall leans in
min_gap_right = 30         # tightest at the pit
max_shift = 15             # largest shift of the car centre line the layout allows
needed = 15                # smallest bracket clearance the crew wants on each side

shift = (min_gap_right - min_gap_left) / 2    # positive = move the lines to the right
shift = max(-max_shift, min(max_shift, shift))
left, right = min_gap_left + shift, min_gap_right - shift
print(f"shift the line set {abs(shift):.0f} mm to the {'right' if shift > 0 else 'left'}")
print(f"smallest clearance: left {left:.0f} mm, right {right:.0f} mm")
print("enough room on both sides" if min(left, right) >= needed else "not enough room: report it")shift the line set 11 mm to the right smallest clearance: left 19 mm, right 19 mm enough room on both sides
Shifting the whole set 11 mm (7/16 in) to the right gives about 19 mm (3/4 in) on each side at the tightest points, enough for the brackets and their adjustment. The shift is recorded on the top template and on the as-built record, and the same shift is applied to the entrance lines so that the car stays centred on the openings. Front to back, the same kind of decision is made, but with less freedom, because the entrance lines must stay on the sill line at every floor.
Keeping the lines right
Lines that were right on Monday can be wrong on Wednesday. A line can be snagged by the work platform, bumped by a bracket being lifted, bent by a careless hand, or pulled off its notch. The crew protects the lines and checks them. At the start of every shift on the rail work, Tamsin measures the distance between the lines at the top template, at the bottom template and at the floor where the crew is working, and compares them with the template marks. Any difference means a line has moved, and work stops until it is found and reset.
- Keep the lines clear. Nothing may touch a line anywhere along its length. A line that touches a bracket, a pipe or the platform is not plumb below that point.
- Mark and protect. Lines are flagged at each landing so other trades see them, and the platform is fitted with guides or cut-outs that keep it clear of the lines as it moves.
- Check before setting. Every bracket is set from a line that has just been checked, never from a reading taken the day before.
- Record before removing. Before templates and lines come down, the line positions are transferred to each bracket so that the rails can be set without them.
Safety while plumbing
Plumbing is done at the top of an open hoistway and in its pit, often before any other permanent work is in, so it combines the worst of both. The top template is built and fixed from the work platform or from a landing with both workers tied off. The plumb bobs are lowered on their wires, never dropped, and nobody is in the pit or the lower hoistway while a line or bob is going down. The bottom template and buckets are set once everyone above is off the work, and the crew working in the pit is in radio contact with anyone at the top. Oil in the buckets is kept in closed containers between uses and cleaned up if spilled, because oil on a pit floor is a slip and fire hazard.
At Quayside, the plumbing of each hoistway is a separate task on the job hazard analysis, reviewed with Lena, and it is covered by the written fall protection plan required under WorkSafeBC's Part 11 for this work. The access log shows who is in the hoistway and at which end.
Common mistakes
MistakeReading a wire before it has stopped swinging.
InsteadDamp the bob in oil, close openings to cut the draught, and wait until the wire is still for a full minute.
MistakeSetting brackets from lines checked the day before.
InsteadCheck the line spacing at the top, bottom and working floor at the start of every shift.
MistakeLetting a line touch a bracket or pipe.
InsteadA touching line is not plumb below the contact; clear it and recheck.
MistakeTrusting a laser that has not been checked.
InsteadCheck it by reversal or against a wire at set-up and after any knock.
MistakeShifting the rail lines without shifting the entrance lines.
InsteadMove the whole set together so the car stays centred on the openings.
Summary and key terms
- Plumb lines represent the rails and entrances and are the reference for all rail work.
- Templates at the top and bottom hold the lines; at least two are needed.
- Wire lines are damped in oil and take a long time to settle in a tall hoistway.
- Laser lines do not swing but must be checked for accuracy and used with eye protection rules.
- The line set is placed to balance clearances at the tightest points, within the layout's allowed shift.
- Lines are checked at the start of every shift and protected from contact.
- Plumb line
- A vertical reference line, wire or laser, set from the layout for the full height of the hoistway.
- Template
- A frame across the hoistway that holds the plumb lines in their marked positions.
- Plumb bob
- A weight that pulls a wire line vertical.
- Damping bucket
- A container of oil or water in which the plumb bob hangs to stop it swinging.
- Laser plumb
- An instrument that projects a vertical beam as a reference line.
- Line set
- All the plumb lines for a car or group, placed together.
Practice problems
Work each problem on paper first, then reveal the answer to check.
Why are templates removed before the rails go in, and what must be done first?
Show answer
The rails occupy the space; line positions are first transferred to the brackets.
A wire touches a pipe at floor 12. What is wrong with readings below floor 12?
Show answer
The wire is deflected by the pipe and is not plumb below it.
The left minimum gap is 10 mm and the right is 26 mm. What shift balances them?
Show answer
8 mm to the right, giving 18 mm each side.
What is checked at the start of every shift on rail work?
Show answer
The spacing between the lines at the top, the bottom and the working floor, against the template marks.
Lesson quiz · 5 questions
Score 60% or more to complete this lesson.
Create a free account to save your progress, take quizzes and earn a certificate.