
ELV-120 · Lesson 1 of 12 · 19 min
Installation sequence and the mechanic's role
Tamsin Iwasaki spent her first months at Northcrest Elevator learning how to stay alive in a hoistway. ELV-120 is where that knowledge goes to work. This course follows the Quayside Tower installation from the day the general contractor hands over the first hoistways to the day car 2 has its rails set, plumbed, aligned and checked, with its buffers, pit equipment, counterweight frame and machine in place. The work is heavy, precise and done at height, and nearly everything that happens later in the life of the elevator depends on it. A rail set 2 mm (1/16 in) out of line gives a rough ride for thirty years. A bracket anchored badly can let a rail move when the safeties set. A pit poured too shallow can hold up a whole job.
This first lesson sets out the order of the work, who does what, and the paperwork and permits that frame it. The later lessons take each stage in turn: reading the layout drawings (Lesson 2), surveying the hoistway (Lesson 3), plumbing it (Lesson 4), the rails themselves (Lesson 5), brackets and anchors (Lesson 6), setting and aligning the rails (Lesson 7), buffers and pit equipment (Lesson 8), the counterweight frame and the first parts of the car (Lesson 9), the machine-room-less machine space (Lesson 10), and the temporary construction elevator (Lesson 11). Lesson 12 brings it together in a checklist for car 2.
What the elevator contractor installs, and what it does not
An elevator installation is a contract inside a larger building contract. The general contractor builds the hoistway: the concrete or block walls, the pit slab, the openings at each landing, the overhead slab, and any steel the layout calls for. It also provides things the elevator contractor needs but does not install: bracket bearing points such as embedded plates or cast-in inserts, a hoist beam or lifting point at the top of the hoistway, temporary power and light, pit drainage, barricades at the open landings, and a dry, clean hoistway. The elevator contractor supplies and installs everything that moves or guides: rails, brackets, buffers, the machine, the car, the counterweight, ropes, doors and entrances, wiring, the controller, and the fixtures.
The line between the two is drawn on the elevator layout drawings and in the specification, and a mechanic needs to know where it falls. If the inserts for the rail brackets are in the wrong place, that is the general contractor's work to correct, or the engineer's to approve an alternative. If a bracket is bolted to the wrong insert, that is Northcrest's mistake. Lena Ostrander, the field superintendent, keeps a list at Quayside of every item the general contractor owes before each stage can start, and she will not let a crew start a stage until the items are in place, because a crew working around missing work wastes days and takes risks.
| Usually by the general contractor | Usually by the elevator contractor |
|---|---|
| Hoistway walls, pit slab and overhead slab | Guide rails, brackets and fastenings |
| Bracket bearing points, inserts or embedded plates | Buffers, buffer supports and pit equipment |
| Hoist beam or lifting point at the top of the hoistway | Machine, machine supports and controller |
| Temporary power, light and barricades | Car, counterweight, ropes and governor |
| Pit drainage, ladder recess and waterproofing | Entrances, doors, wiring and fixtures |
| Fire-rated walls and sealing of penetrations | Testing, adjusting and acceptance |
The installation sequence
Every manufacturer and every contractor has its own installation manual, but the order of work on a traction elevator is broadly the same. The sequence is set by two rules. The first is that the guiding system is the reference for everything else: the car, counterweight, doors and machine are all located from the rails, so the rails have to be right before anything is hung from them. The second is safety: the hoistway is most dangerous when it is open, full of other trades and without a working car, so the sequence tries to get the car running, under control, as early as possible.
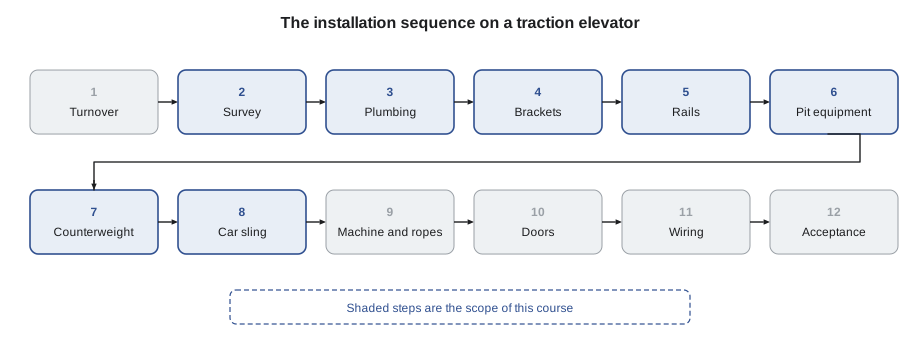
- Hoistway turnover and survey. The general contractor hands over a hoistway, and the crew checks it against the layout: dimensions, plumb, pit depth, overhead, openings and bearing points.
- Plumbing. Plumb lines or laser lines are set from templates at the top and bottom, establishing the rail lines for the whole height.
- Brackets. Rail brackets are fastened at the spacing the layout requires, starting at the bottom.
- Rails. Car and counterweight rails are stacked from the pit up, joined with fishplates, clipped to the brackets, then aligned.
- Pit equipment. Buffers, buffer supports, the governor tension sheave and the pit stop switch are installed.
- Machine and counterweight. The machine is set, and the counterweight frame is assembled and partly filled.
- Car. The car sling and platform are built on the lowest landing or in the pit.
- Ropes, safeties and doors. These later stages belong to other courses: ropes and machines in ELV-230, doors and safeties in ELV-320.
- Wiring, adjusting, testing and acceptance. The unit is wired, adjusted, tested and inspected before it carries the public.
On a high-rise such as Quayside Tower, the sequence is complicated by the building still going up. Hoistways were poured to the 22nd floor when Tamsin started, and the top eight floors were still being formed. Northcrest cannot set rails to the top of a hoistway that does not exist yet, so the crew works up the building in stages, and the service car is installed early so that it can serve as a construction elevator for the trades (Lesson 11).
Permits before the first bracket
Installing an elevating device in British Columbia needs an installation permit from Technical Safety BC, applied for by a licensed elevating devices contractor, before work on site begins. The application includes the layout drawings and design information the regulation requires. The work is done by certified mechanics and by Mechanics-in-Training working under them, and the finished unit cannot carry anyone until it has passed an acceptance inspection and been given an operating permit. The code in force is CSA B44 as adopted by the Elevating Devices Safety Regulation, and WorkSafeBC's Occupational Health and Safety Regulation governs the safety of the crew while they do the work.
The permit is not just paperwork. It fixes the code edition the unit is designed and inspected to, and it is the inspector's record that the unit exists. Any change to the design during the job, such as a different rail size or a moved bracket line, may need to be submitted before it is built. Ray Abernethy's rule is that the layout drawing on site must always be the approved one, with revisions marked, and that nobody works from an old print.
The mechanic, the apprentice and the crew
An installation crew at Northcrest is usually a mechanic and an apprentice, sometimes two mechanics and two apprentices on a large job. The mechanic is responsible for the work and for the apprentice: what is installed, how it is done, and whether it is safe. The apprentice learns by doing the work under direct supervision, and in the first year never works alone in a hoistway, a pit or on a work platform. At Quayside, Tamsin's crew is Ray and Tamsin for the rail work on cars 1 and 2, with a second crew led by another mechanic on cars 3 and 4.
The mechanic's role on an installation goes beyond turning wrenches. A good installer reads the drawings and spots problems before they are built, plans each day's lifts and moves, keeps the job's records, coordinates with the general contractor's superintendent through Lena, and keeps the hoistway safe for the crew and for others. The apprentice's role is to learn all of that, starting with the tasks that build the foundation: handling and staging material, setting plumb lines with the mechanic, drilling and setting anchors, holding the other end of the tape, and keeping the job log.
| Role | Responsible for |
|---|---|
| Field superintendent (Lena) | Schedule, coordination with the general contractor, access logs, barricade checks, job records |
| Mechanic in charge (Ray) | Quality and safety of the crew's work, daily plan, layout decisions, supervising the apprentice |
| Apprentice (Tamsin) | Assigned tasks under supervision, material handling, measurements, the crew's daily log |
| General contractor | Hoistway construction, bearing points, hoist beam, temporary services, site rules |
| Inspector | Acceptance inspection and approval of the finished unit |
Safety on the installation
Installation work brings together the hoistway hazards from ELV-110 in their most severe form. The hoistway is open at many landings, there is no car to stand on, and the crew works from a temporary work platform hung from the top. Heavy rails and brackets are lifted overhead. Concrete dust, drilling noise and welding fumes fill a confined vertical space. Other trades want to work in or near the hoistway. Three branch rules carry through every lesson in this course.
- Tie off at every height. Every worker on a platform or at an open landing is connected to an independent lifeline or anchor before stepping onto the platform or opening a barricade.
- No work below other work. Nobody works in the pit or lower hoistway while anything is being done above in the same hoistway, unless there is overhead protection rated for the work.
- Plan every lift. Rails, brackets and machines are lifted with a plan, with the load path and the exclusion zone below agreed before the lift. The rigging itself is the subject of ELV-130.
WorkSafeBC requires fall protection where a worker could fall 3 m or more, or less where the fall could cause serious injury, and a written fall protection plan for work above the heights set in Part 11. Every hoistway at Quayside is covered by a written plan.
Overhead protection is the second line. Once a crew is working in a hoistway, a protective deck or the work platform itself sits above the crew, and nothing is stored or worked on above it. When two crews must work in the same hoistway at different heights, which happens in a common four-car hoistway like the one at Quayside, Lena separates them with a rated protective deck and records it on the access log.
Planning the work in crew-hours
Installation is estimated and tracked in crew-hours: the hours a crew of one mechanic and one apprentice needs for each task. The estimate turns into a schedule when it is divided by the hours the crew can actually work in a day, after access, weather, crane time and other trades take their share. Ray keeps a simple table of the rail-stage tasks for each car and compares it to the actual hours each week. The table below is the Quayside estimate for one car, up to the 22nd floor that is poured.
# Crew-hours for the rail stage of one Quayside car (one mechanic + one apprentice)
tasks = [                      # (task, crew-hours)
    ("hoistway survey and as-built check", 12),
    ("templates and plumb lines", 10),
    ("rail brackets, 23 bracket rows", 64),
    ("rail stacking and fishplates", 48),
    ("rail alignment and final check", 40),
    ("pit equipment and buffers", 16),
]
hours_per_day = 7.0            # productive hours after access and coordination
total = sum(h for _, h in tasks)
for name, h in tasks:
    print(f"{name:38s} {h:4d} h")
print(f"{'total':38s} {total:4d} h")
print(f"working days at {hours_per_day} h per day: {total / hours_per_day:.1f}")
print(f"weeks at 5 days: {total / hours_per_day / 5:.1f}")hoistway survey and as-built check 12 h templates and plumb lines 10 h rail brackets, 23 bracket rows 64 h rail stacking and fishplates 48 h rail alignment and final check 40 h pit equipment and buffers 16 h total 190 h working days at 7.0 h per day: 27.1 weeks at 5 days: 5.4
The output gives about 27 working days for one car, a little over five weeks. With two crews on four cars, the rail stage for the poured floors takes about eleven weeks, and the schedule has to allow for each crew to come back once the top floors are poured. The real value of the table is the weekly comparison: when bracket installation is running at 90 crew-hours instead of 64, Ray and Lena look for the cause, which at Quayside turned out to be inserts cast out of position on four floors.
Records and the daily log
An installation produces records that matter for decades. The as-built survey shows what the hoistway really is. The plumb line offsets show where the rail lines were set. The bracket and anchor records show what was installed and how it was torqued or tested. The rail alignment readings show that the rails were within tolerance when the job was done. When a ride complaint comes in ten years later, or a building settles, these records are the starting point. Tamsin keeps the crew's daily log: date, crew, hoistway, floors worked, work done, readings taken, problems found, and who was told. Ray signs it at the end of each day.
Common mistakes
MistakeStarting a stage before the general contractor's work is complete.
InsteadCheck the turnover list with the superintendent first; working around missing work wastes time and creates risk.
MistakeWorking from an old layout print.
InsteadUse only the current approved drawing, with revisions marked, and destroy superseded prints.
MistakeTreating the permit as the office's problem.
InsteadThe permit fixes the code edition and the approved design; changes on site may need approval before they are built.
MistakeLeaving the apprentice to finish a task alone while the mechanic goes for material.
InsteadFirst-year apprentices are never alone in a hoistway or on a platform; the task stops until the mechanic is back.
MistakeEstimating the job without allowing for access and coordination.
InsteadPlan on productive hours per day, not clock hours, and track actual against estimate every week.
Summary and key terms
- The general contractor builds the hoistway and bearing points; the elevator contractor installs everything that moves or guides.
- The rails are the reference for the whole elevator, so the guiding system is installed and checked first.
- Technical Safety BC issues the installation permit and does the acceptance inspection; WorkSafeBC governs crew safety.
- The mechanic is responsible for the work and the apprentice; first-year apprentices never work alone in a hoistway.
- Tie off at every height, never work below other work, and plan every lift.
- Crew-hours turn tasks into a schedule, and weekly comparison finds problems early.
- Layout drawing
- The manufacturer's or contractor's drawing that fixes the position of every part of the elevator in the hoistway.
- Turnover
- The point at which the general contractor hands a hoistway to the elevator contractor.
- Bearing point
- A place in the building structure where a bracket or support is fastened, such as an embedded plate or insert.
- Installation permit
- The authority's permission to install a specific unit to an approved design.
- Crew-hour
- One hour of work by a standard crew of one mechanic and one apprentice.
- Overhead protection
- A deck or barrier above workers that stops falling objects from reaching them.
Practice problems
Work each problem on paper first, then reveal the answer to check.
Name four items the general contractor usually provides that the elevator crew depends on.
Show answer
Any four of: hoistway walls and pit, bracket bearing points or inserts, a hoist beam, temporary power and light, barricades, pit drainage.
Why are the rails installed before the car?
Show answer
The rails are the reference from which the car, counterweight, doors and machine are located.
A task is estimated at 84 crew-hours and the crew works 7 productive hours a day. How many working days?
Show answer
12 days.
What must be in place before a crew works in the pit while another crew works higher in the same hoistway?
Show answer
Rated overhead protection between them, recorded on the access log, or the work does not happen.
Lesson quiz · 5 questions
Score 60% or more to complete this lesson.
Create a free account to save your progress, take quizzes and earn a certificate.